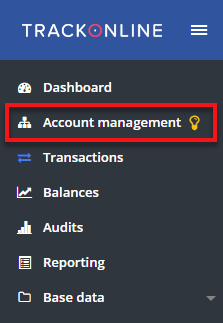
Account management
Account management is a feature in TrackOnline in wich you can manage accounts. You can find account management on the left side of your screen.
If you open account management you will find information about the in-/outbox where you receive reports and emails from other TrackOnline users. Also here you find everything about rentalcontracts and about sharing data.
Data sharing
In TrackOnline, it is possible to share transactions and documents with your network. If you are doing business with other companies, you can invite them to also use TrackOnline and directly share transactions and documents between your administrations.
You can add all your connections and view them in one clear overview, to know which of your counterparts have a TrackOnline administration as well and are sending/receiving data within your administration.
You have the opportunity to share data with your connections. This ensures that everyone is up to date about the latest changes and are looking at the same information. To share data with your network, you can send invites to existing locations and carriers. Locations/carriers that you select will receive transactions, added documents and more that you create in your administration.
If your company creates transactions you’ll be able to invite the FROM location, TO location, Carrier and Contractor to also view the same transaction information in their own environment. The functionality of sharing data with your connections, is called TrackOnline CONNECT.
TrackOnline CONNECT
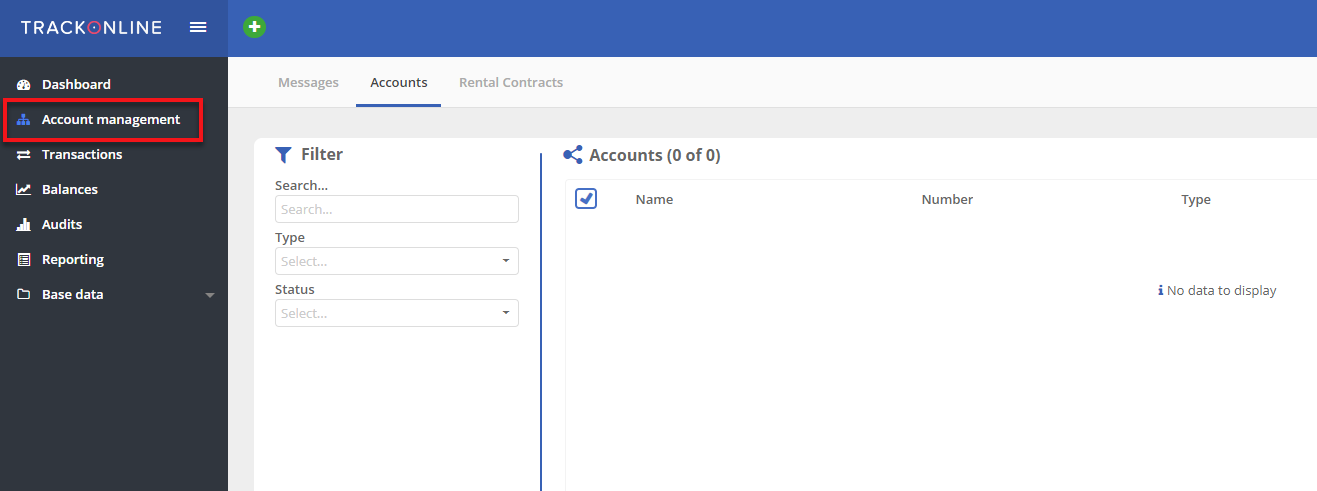
If you would like to connect with your costumers, go to the account overview as shown below. This overview is still empty because we have not added any accounts yet. In the next paragraph we explain how to create a new account.
Empty account overview
Create new account
To create a new account, click on the  button in the right upper corner of your screen. A window is shown similar to the image below.
New account detail window
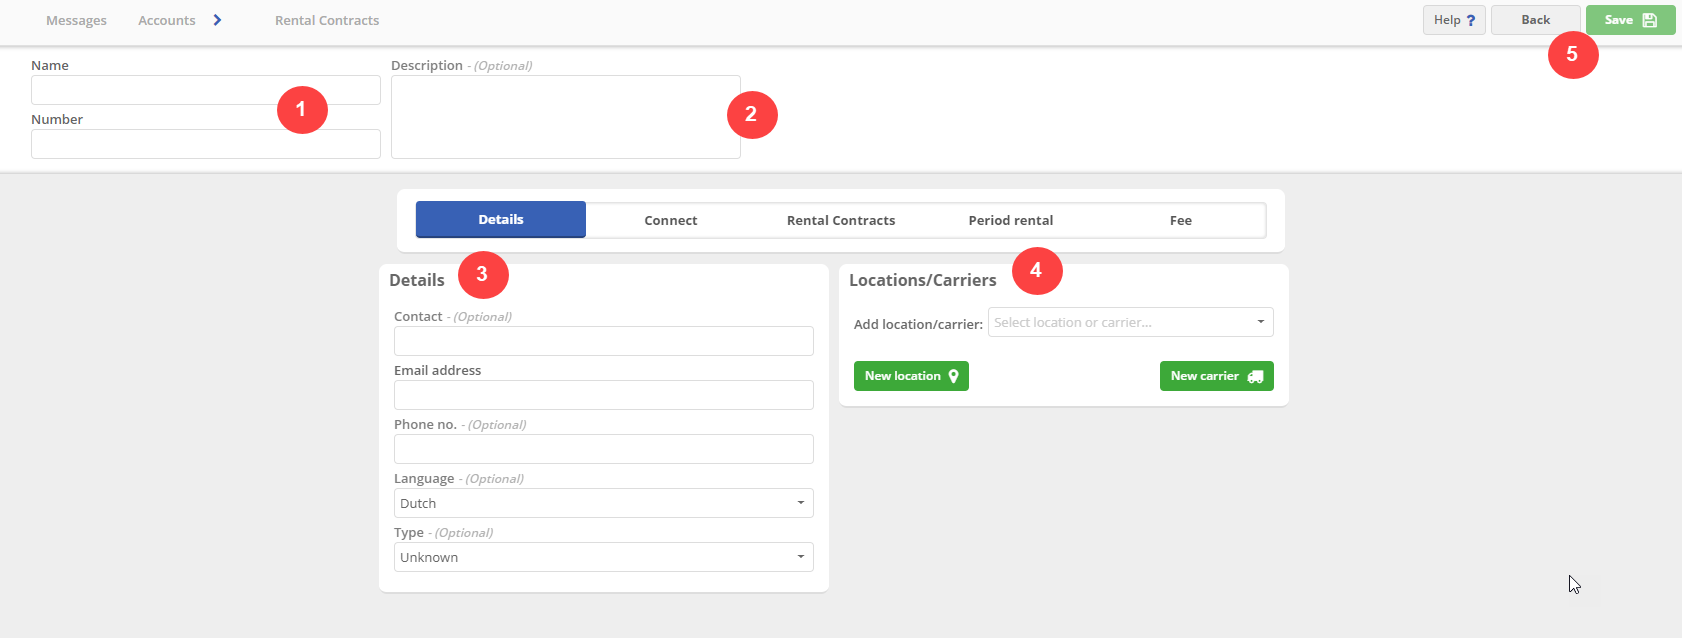
1. Name/Number (required): Here you can give a name and number to the new account. For example, you can fill in a name that indicate the customer that you are making a connection with.
2. Description: Here you can give an extra description about the account. This is optional.
3. Details: Here you can fill in the detail information about the customer:
- Contact: This is the contact of your account who’s responsible for the returnable items.
- Email address (required): This is the administration email address of the contact that you would like to share data with.
- Phone no.: This is the phone number of the contact that you would like to share data with.
- Language: Here you can choose the language in which you are communicating with the contact that you would like to share data with. If you are connecting to a new administration, this is the language in which the invitation mail is written.
Note:
If you select a language other than Dutch or English, the email that your customer is receiving is automatically converted to English.
Other languages will be available in the future.
- Type: Here you can register the type of customer that would like to share data with.
4. Locations/Carriers: Here you can select one or more locations and/or carriers. Only the data of these locations/carriers will be shared when you are connected to another administration. If you can not find the location or carrier in the list, you can add a new location/carrier to your administration by clicking on the  or
or  button.
5. Back/Save: If you have filled in all the required fields, the  button gets enabled. Press this button.
Note:
It is not possible to share data if you have not saved the detail information yet!
If you have changed your mind and you don't want to create a new account, you can click on the  button. This brings you back to the account overview.
In the image below an example of a complete form is shown. In this example we would like to share data with 'customer A' who is registered as 'Loc 1' in our administration. The contact person of this location is 'Simon Support'.
Complete account form
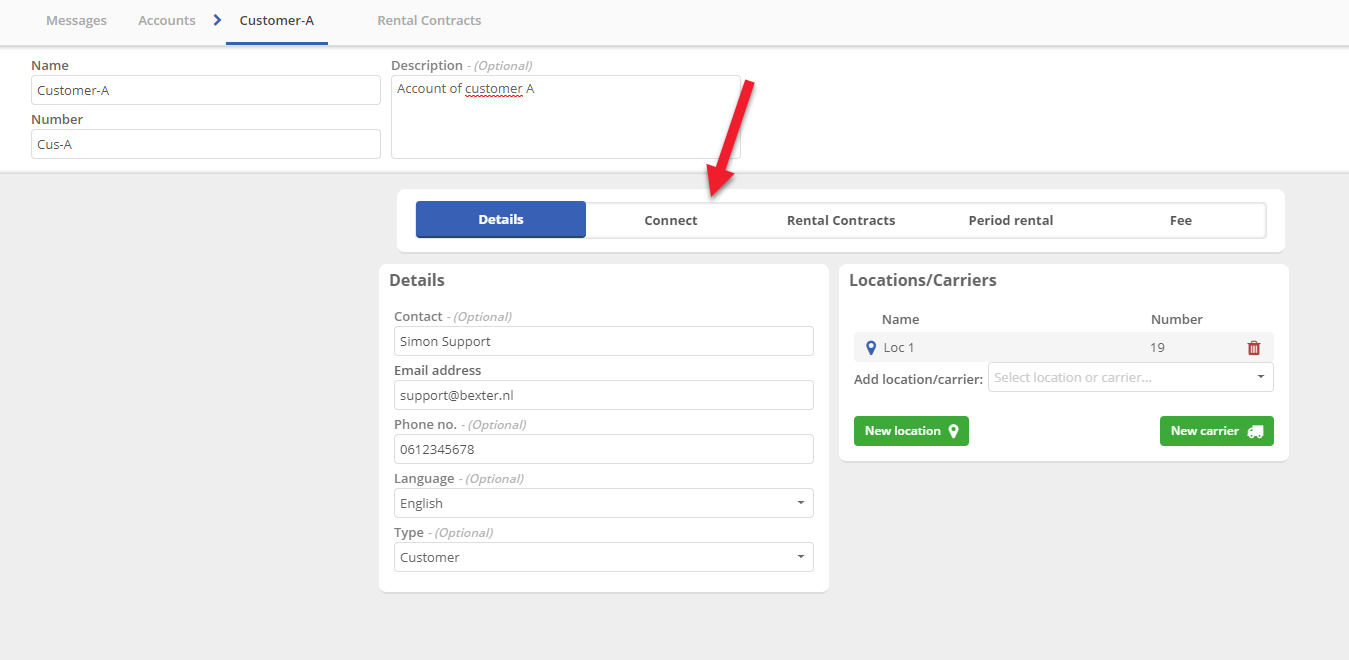
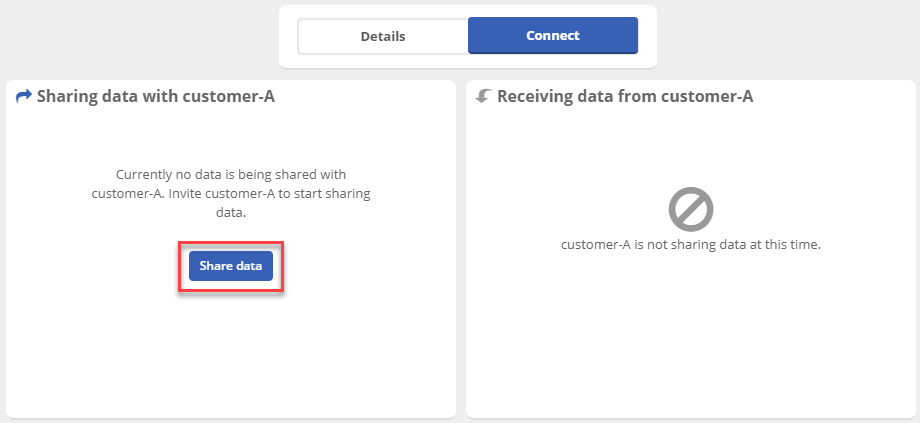
Now you are ready to actually connect with another administration. Therefor, click on Connect, shown with the red arrow in the image above. You will see a window similar to the image below.
CONNECT window
Click on  . You get the options to
 Invite with TrackOnline Number or Invite with email address, see the image below. For more information you can click on  in the upper right corner of the pop-up window.
CONNECT invite options

In the next paragraphs we explain how to invite an existing administration and/or a new administration.
1. Add account from suggestions
Sometimes, you will see a light bulb icon next to the Account management item in the left menu, as shown in the picture below.
This means that TrackOnline has identified locations you work a lot with and suggests you to add them to your accounts. When you navigate to the account overview, a popup will show you the suggested locations. For each of them, you can choose to ignore or to create a account with the location.
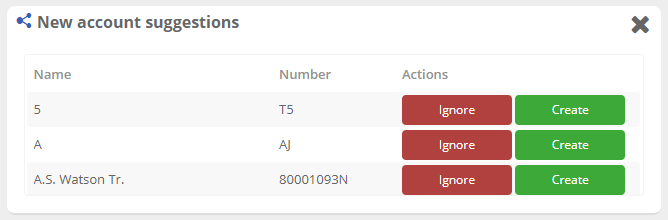
When you click on the Create button, the account is directly added to the overview as status inactive. You can then activate the connection to share data with it by following the step 2 or step 3 below.
2. Invite with TrackOnline Number
If you would like to invite an existing TrackOnline administration, you need the TrackOnline number of this administration.
Note:
You can find the TrackOnline Number in the Administration Settings.
Click HERE for more information.
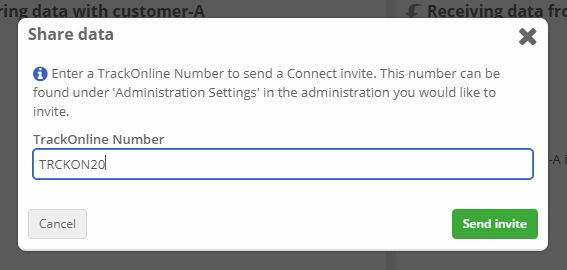
To invite an existing administration, click on  as shown in the image 'CONNECT invite options'. You see a window where you can fill in the TrackOnline Number, see the image below. In this example the TrackOnline Number of the administration that we are inviting is 'TRCKON20'.
Enter TrackOnline Number
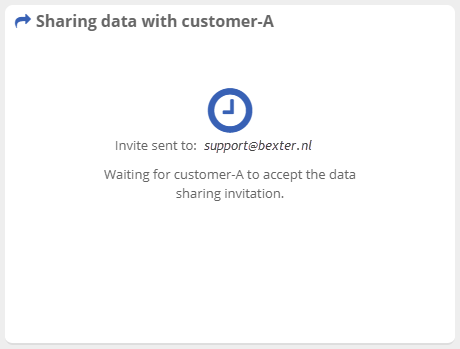
Then click on the  button. A message is shown similar to the image below.
Invite sent message

Now you see a window as shown in the image below.
Waiting for approval
Also in the account overview you see that the connect status is 'Pending'.
Connect status Pending

Customer-A now has received an email, but also sees the invite in TrackOnline itself. This message looks like the image below.
Pending Invites
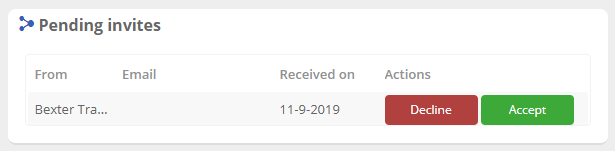
Customer-A has the option to 'Decline' or 'Accept' the invitation. If customer-A clicks on accept, the status in your own overview changes from Pending to Active. See the image below.
Connect status Active

Now data is shared one way. So for example, if we make a new transaction with 'from' location Loc 1, Customer-A sees this transaction as read-only in his/her transaction overview. However if Customer-A creates a transaction, this is NOT yet visible for you.
Note:
- Transactions with the status 'New' will not be shared.
- You can ONLY share transactions if the items in a transaction have a valid GS1-code. More information about GS1-codes can be found HERE or go to the GS1-website and download the list of codes.
If you can not find the right GS1-code for your item, please contact us. Mail to info@bexter.nl or call +31 15 750 10 50
In the right upper corner of a transaction detail window you can see if a transaction is shared or not. This is indicated with a arrow. The arrow can have four different colours. If the arrow is grey, it means the transaction is not shared. If the arrow is red, it means that the transaction can not be shared (for example when an item in the transaction does not have a valid GS1-number). If the arrow is blue, it means that the transaction will be shared when saved. If the arrow is green, it means that the transaction is actually shared. See also the table below.
Shared indication
| Indication | Explanation |
|---|---|
 | Transaction is not shared |
 | Transaction CAN NOT be shared |
 | Transaction will be shared |
 | Transaction is shared |
Now it is also possible to use the chat functionality. For instance when you have a question about a transaction, you can quick send a message to your contact. You can open the chat-window by clicking on  in the right upper corner of the transaction detail window. More information about the chat can be found HERE.
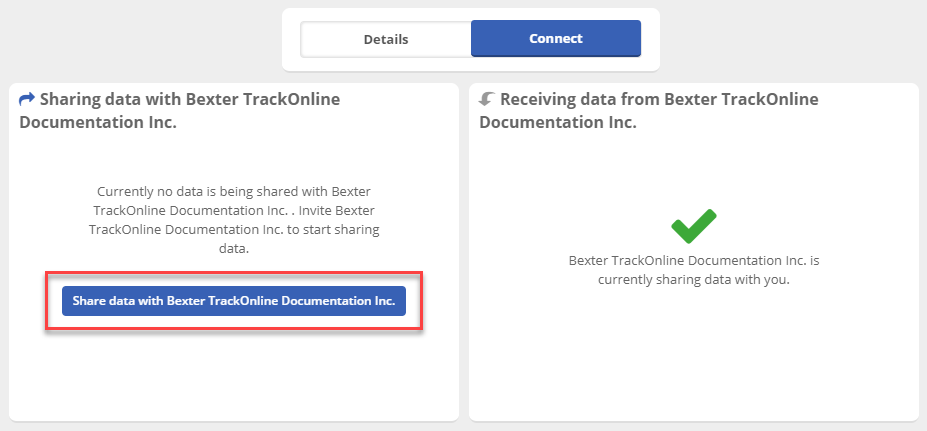
If customer-A also wants to share data with you, customer-A can simply click on the 'Share data with ...' button in the 'Connect' pannel of the account detail window. In the image below an example is shown how this could look like. With the red frame, the button is indicated.
Share data two ways
Now you get an invite that can be declined or accepted. If you accept the invite, data is shared both ways. In the account overview this looks like the image below.
Connection status overview

Also in the details of the connect pannel you see that data is shared both ways and which locations are involved. See the image below.
Connection details

In this window you can also choose if you only want to share 'Processed' transactions or not. Therefor you can click on the switch, shown with the red frame in the image above.
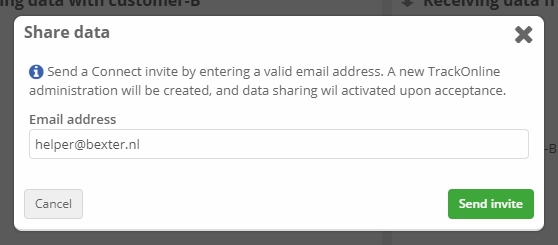
3. Invite with email address
To invite an customer to share data with, but this customer does not has a TrackOnline administration, you can click on  as shown in the image 'CONNECT invite options'. You see a window where you can fill in the email address, see the image below.
Enter email address
Then click on the button. A message is shown similar to the image below.
Invite sent message
For this example we have invited 'Customer-B'. Before we can share data with Customer-B, we have to wait until customer-B accepts the invite. Therefor Customer-B has to create a new TrackOnline administration. This type of administration is called: TrackOnline CONNECT. At the TrackOnline CONNECT website you can find more information about the content of this package or read more about 'CONNECT' itself.
Rental module
Now that all the details have been entered, you can proceed with the configuration of the rental module. Within the rental module, rental calculations are made and rental report are generated for each customer, for specific items. You can then download this report and email it to your relationships.
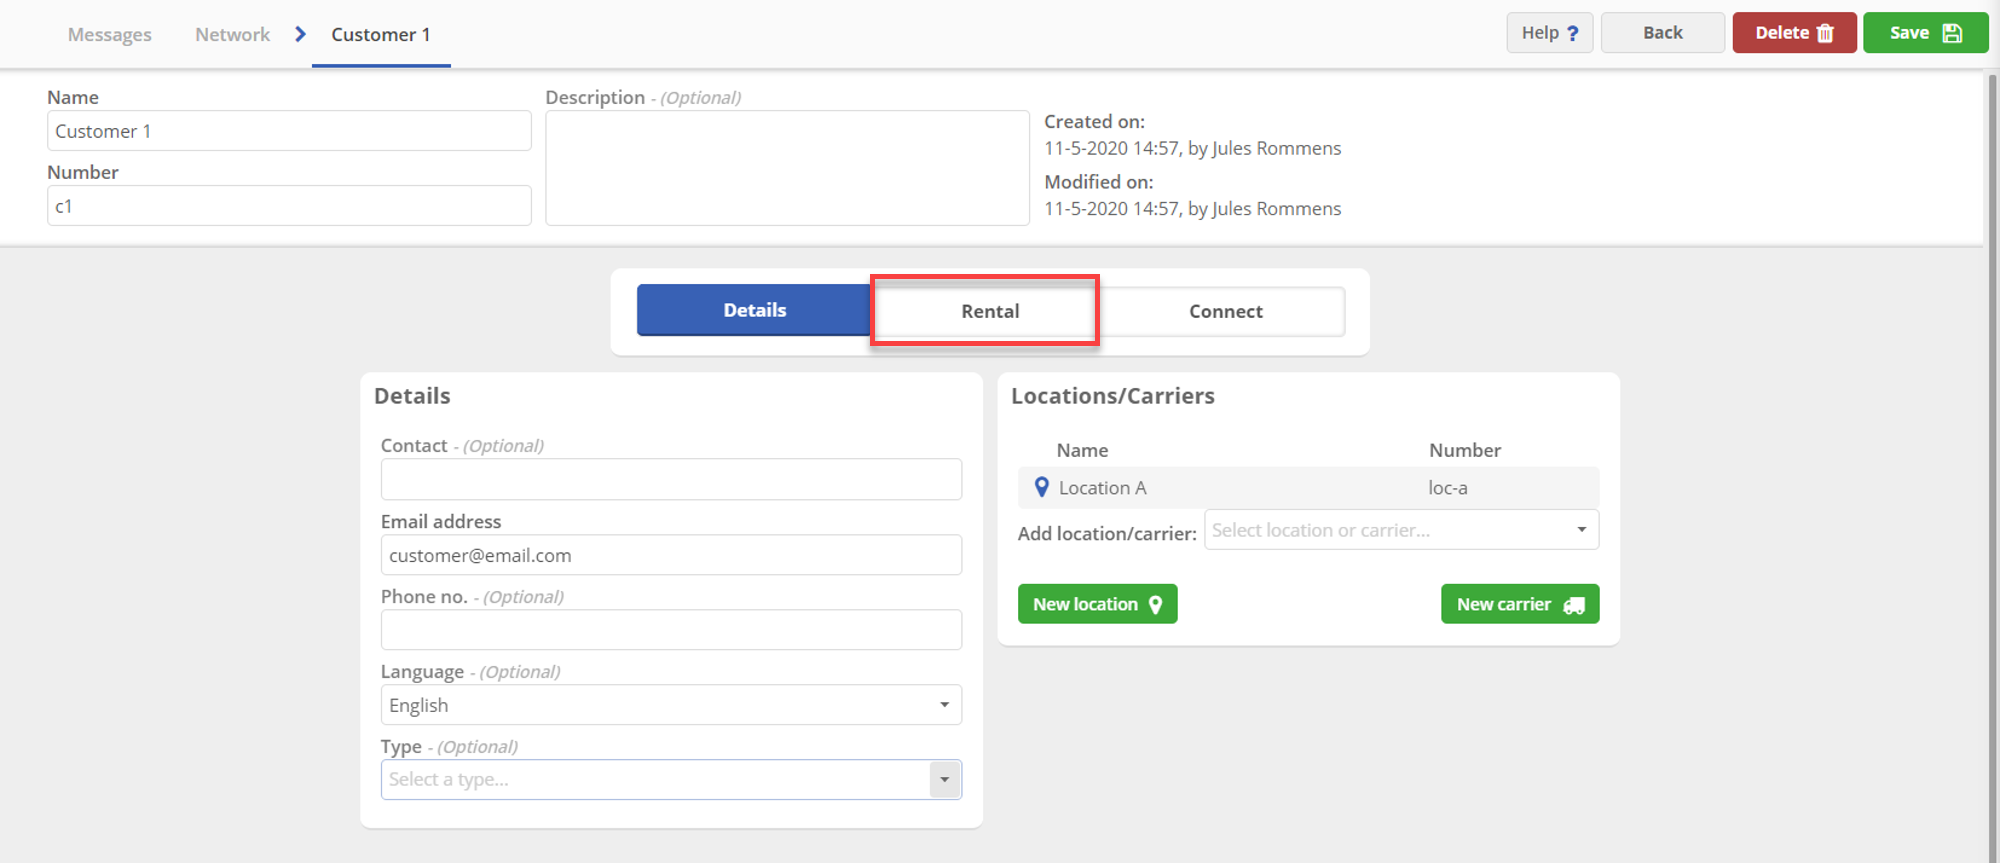
To configure the rental module, click on the Rental tab, shown in the red frame of the image below.
Rental tab
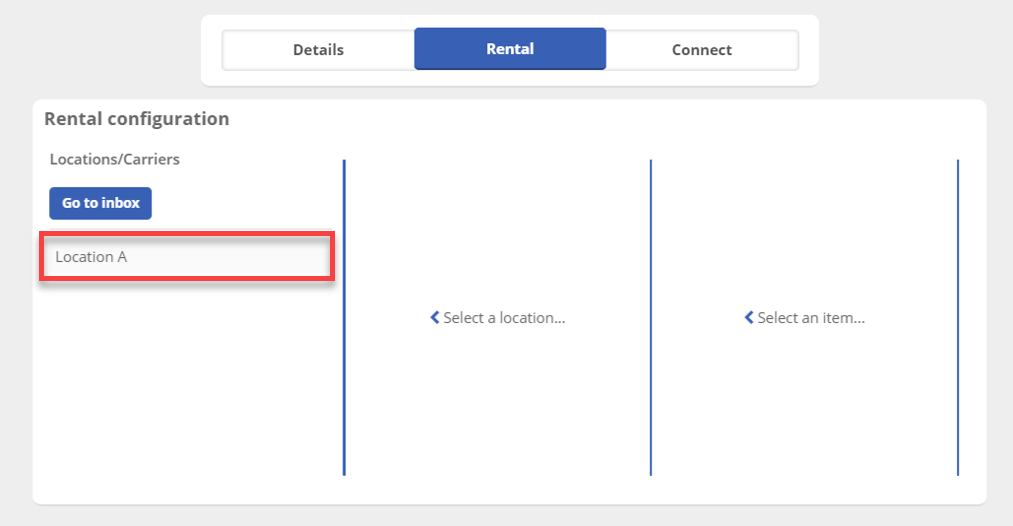
You are now in the rental configuration, click on the created location / carrier to start filtering for the rental calculation.
Rental module overview
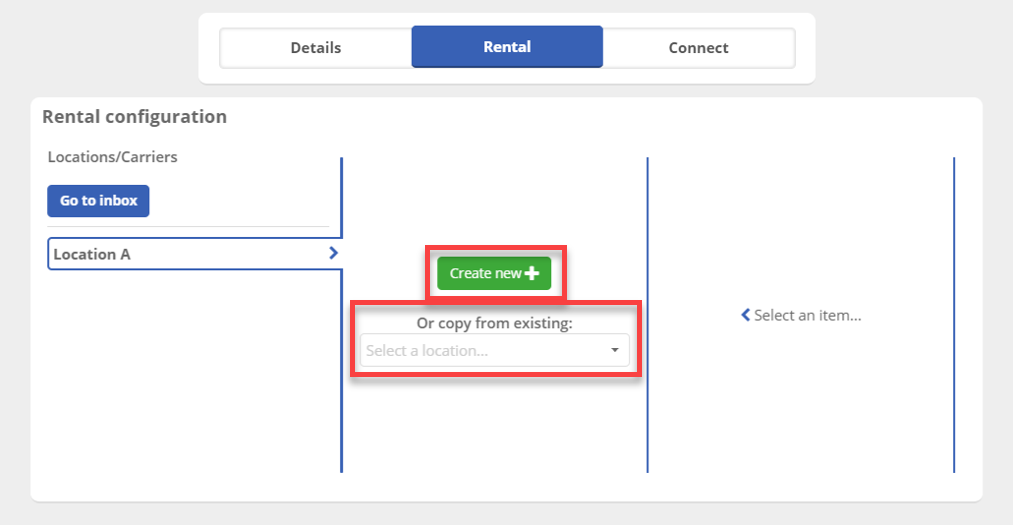
You now get two options: add a new configuration or copy an existing configuration (see the image below). In this case, no configuration has been created yet, so you cannot select an existing configuration.
Start configuration of the rental module
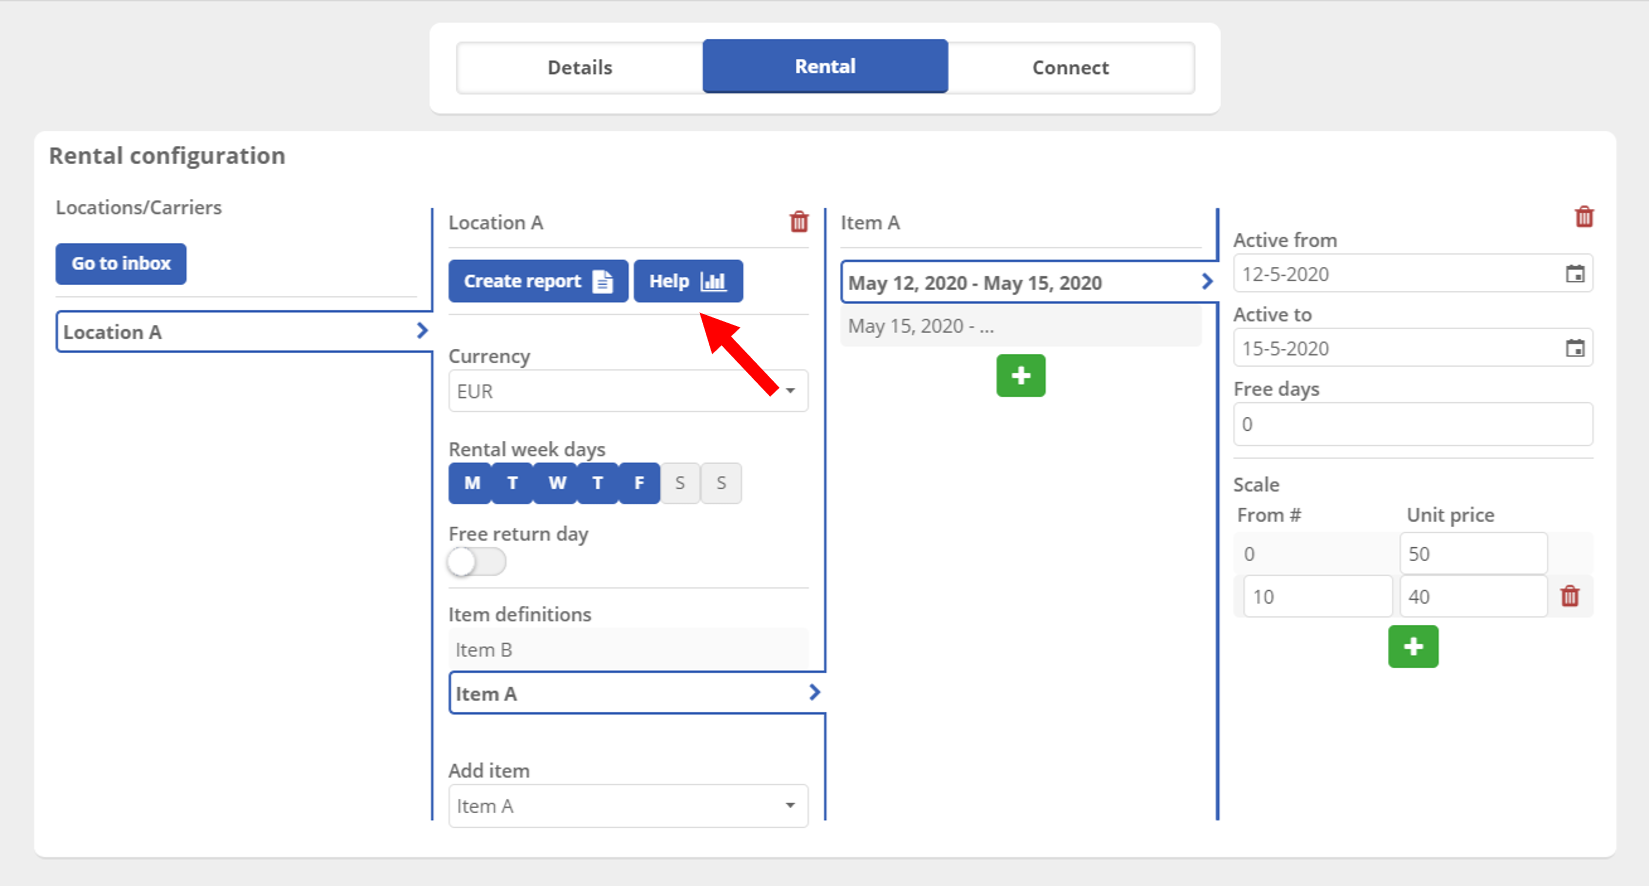
Click on Add. The extended rental configuration screen will appear. Choose the desired currency, rental days per week, whether the delivery day is free and for which items you want to perform the rental calculation. The settings are explained further below the image.
Rental module configuration
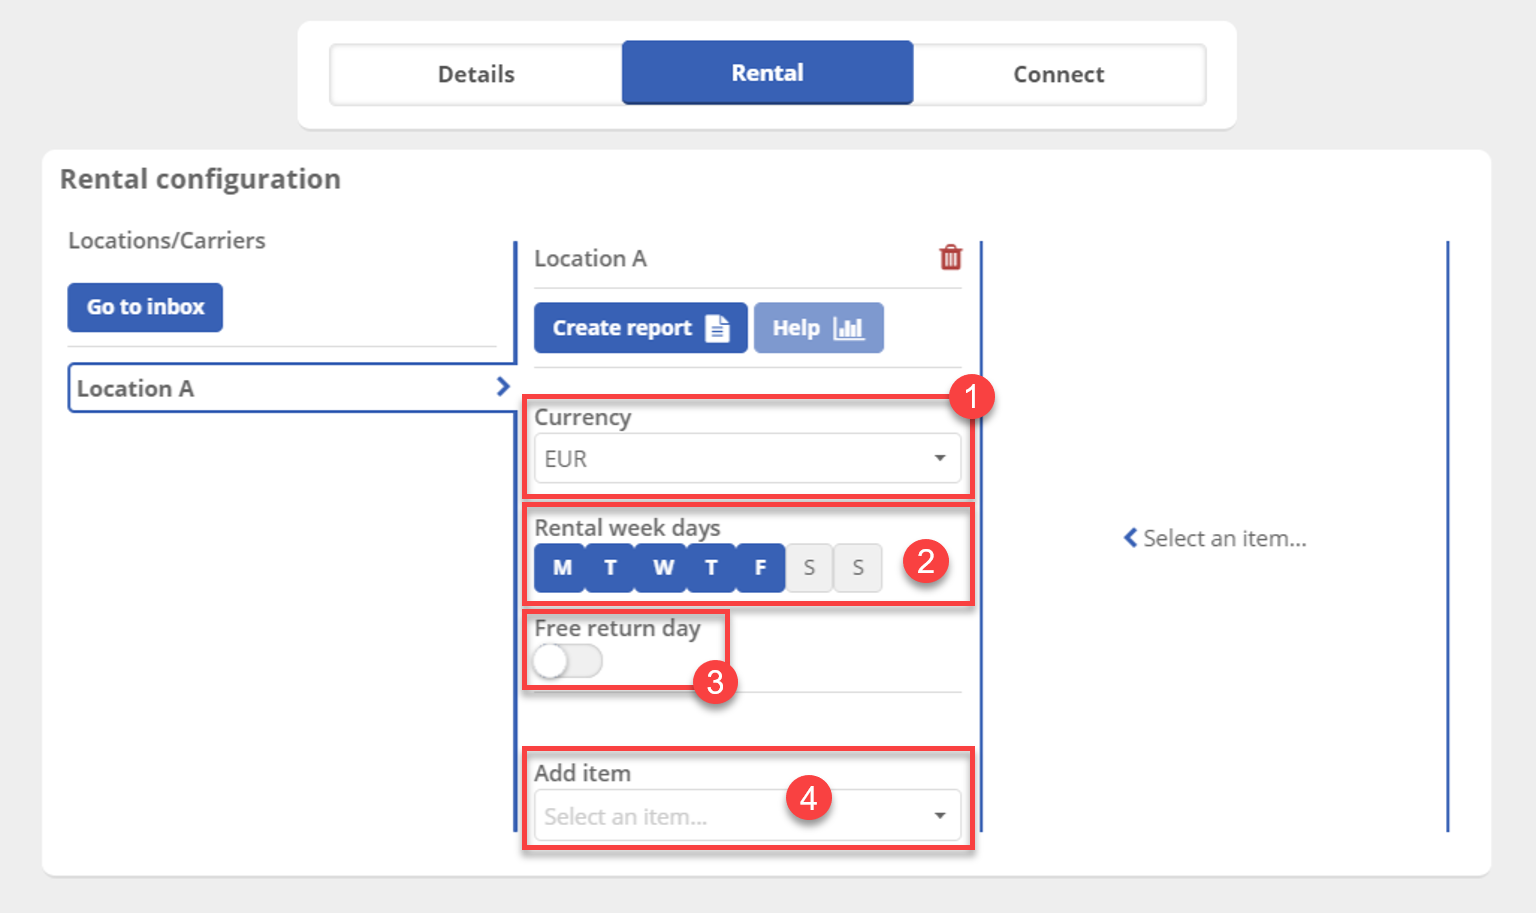
Each number in the image above indicates a different functionality. All functionalities are explained below:
- Currency: Here you can select the desired currency for the report.
- Rental days: Here you can select the number of days per week over which the rent is calculated.
- Delivery day: By selecting this button you can say whether the delivery day is free or not.
- Add items: Here it is possible to select the relevant items on which the rent is calculated. It is possible to add multiple items. Now you can select the duration of a rental period per item. If a different rental price is applied for an item in a certain period, you can click on the green +. Then enter the
Active fromdate andActive todate so that different rental prices are calculated for these periods.
Rental module period configuration
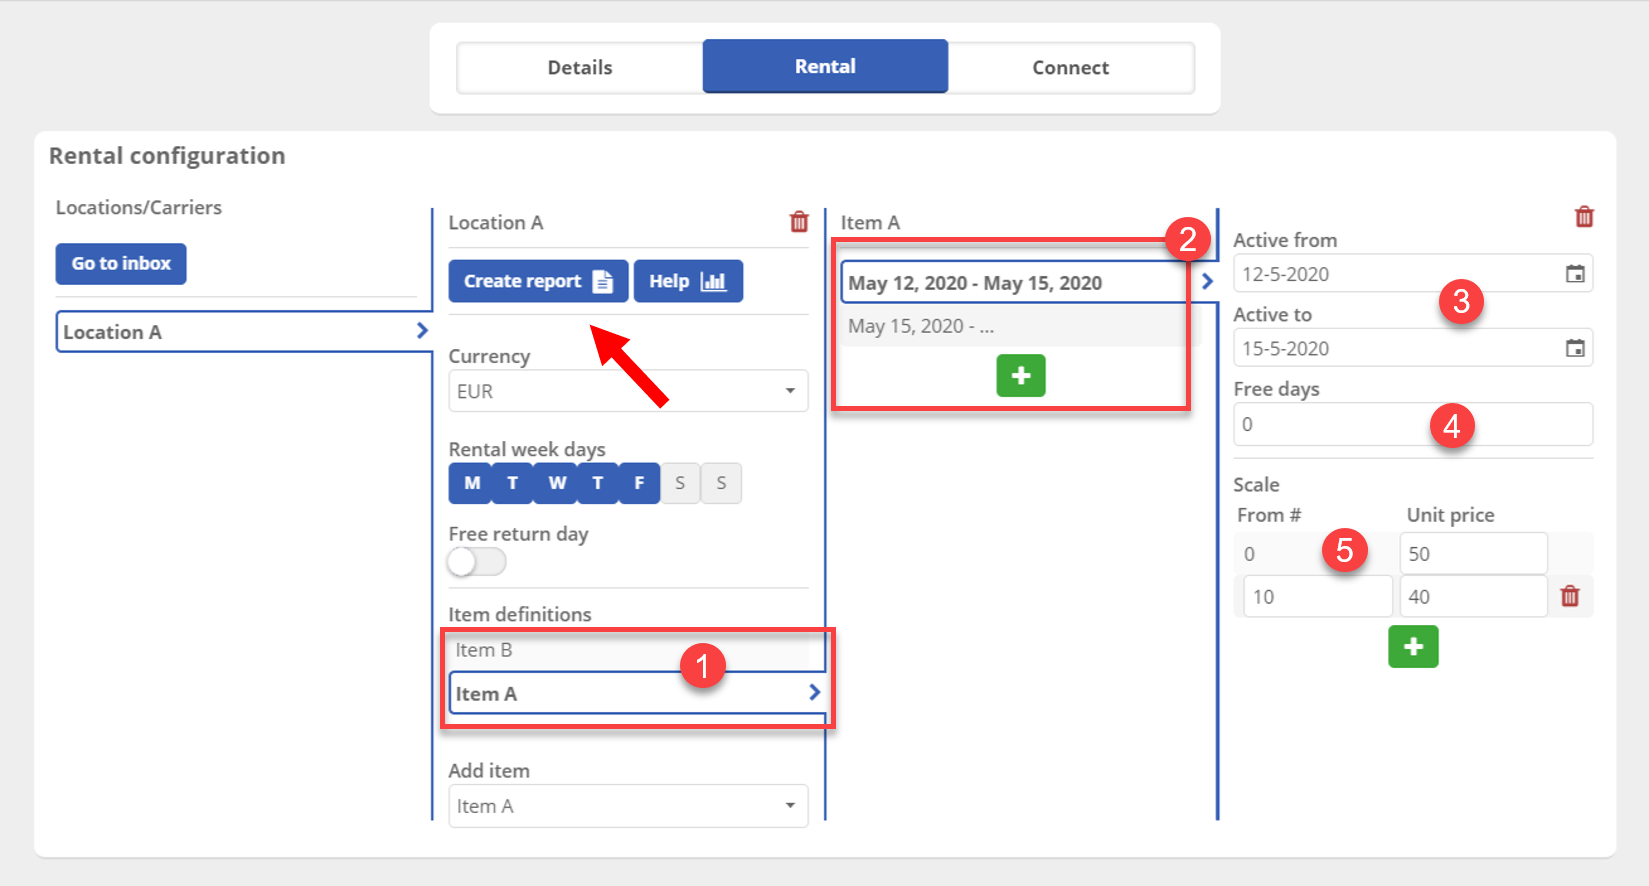
Each number in the picture indicates a different functionality. All functionalities are explained below:
- Selecting items: Here you can select the item for which you want to set the rental period. It is possible to add multiple items. For this you have to set the rental period separately.
- Duration: Here you can see the duration of a rental period. This is automatically filled in by the period you set at point 3. If a different rental price is applied for an item in a certain period, it is possible to add an extra period. You do this by clicking on the green +.
- Period: Here you select the
Active fromdate and theActive untildate for which you want the rental configuration to run. You can set this for each period created at point 2. - Days off: Here it is possible to set the number of days off during the selected period.
- Rent graduated scale and unit price: Enter the graduated scale of the relevant item here, along with the unit price per graduated scale. By clicking on the green + it is possible to add an additional graduated scale and unit price. In this example, the price is 50 euros each, but for a number of 10 or more, the price becomes 40 euros. It is also possible to use a fixed price per item. Then enter the unit price only once. When all details have been entered, click on save first. It is then possible to generate a report. Click on
Create report, indicated with the red arrow in the image above.
You will now see a screen with the following options.
Rental module report settings
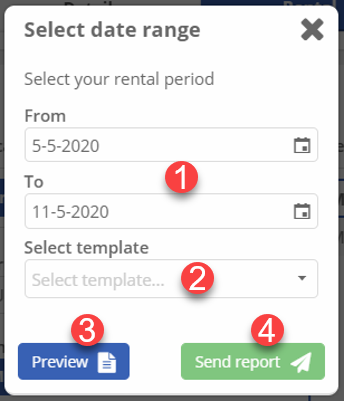
Each number in the picture indicates a different functionality. All functionalities are explained below:
- From / To: Here you select the rental period. This is the period over which the rent must be calculated and will be shown in the report.
- Select template: Select here the template with which the email (in which the report is attached) will be sent. If you have not yet created a template or would like more information, click HERE .
- Preview: Allows you to preview the report for review, making sure you send the correct report to the customer.
- Send report: If the template is selected and you are satisfied with the settings, click
send report.
Pay attention!
Reports can only be sent to customers with whom you have an active CONNECT connection. How you can actually share data is explained in the previous section Create a new connection.
The image below shows an example of a rental report.
Rental module report example
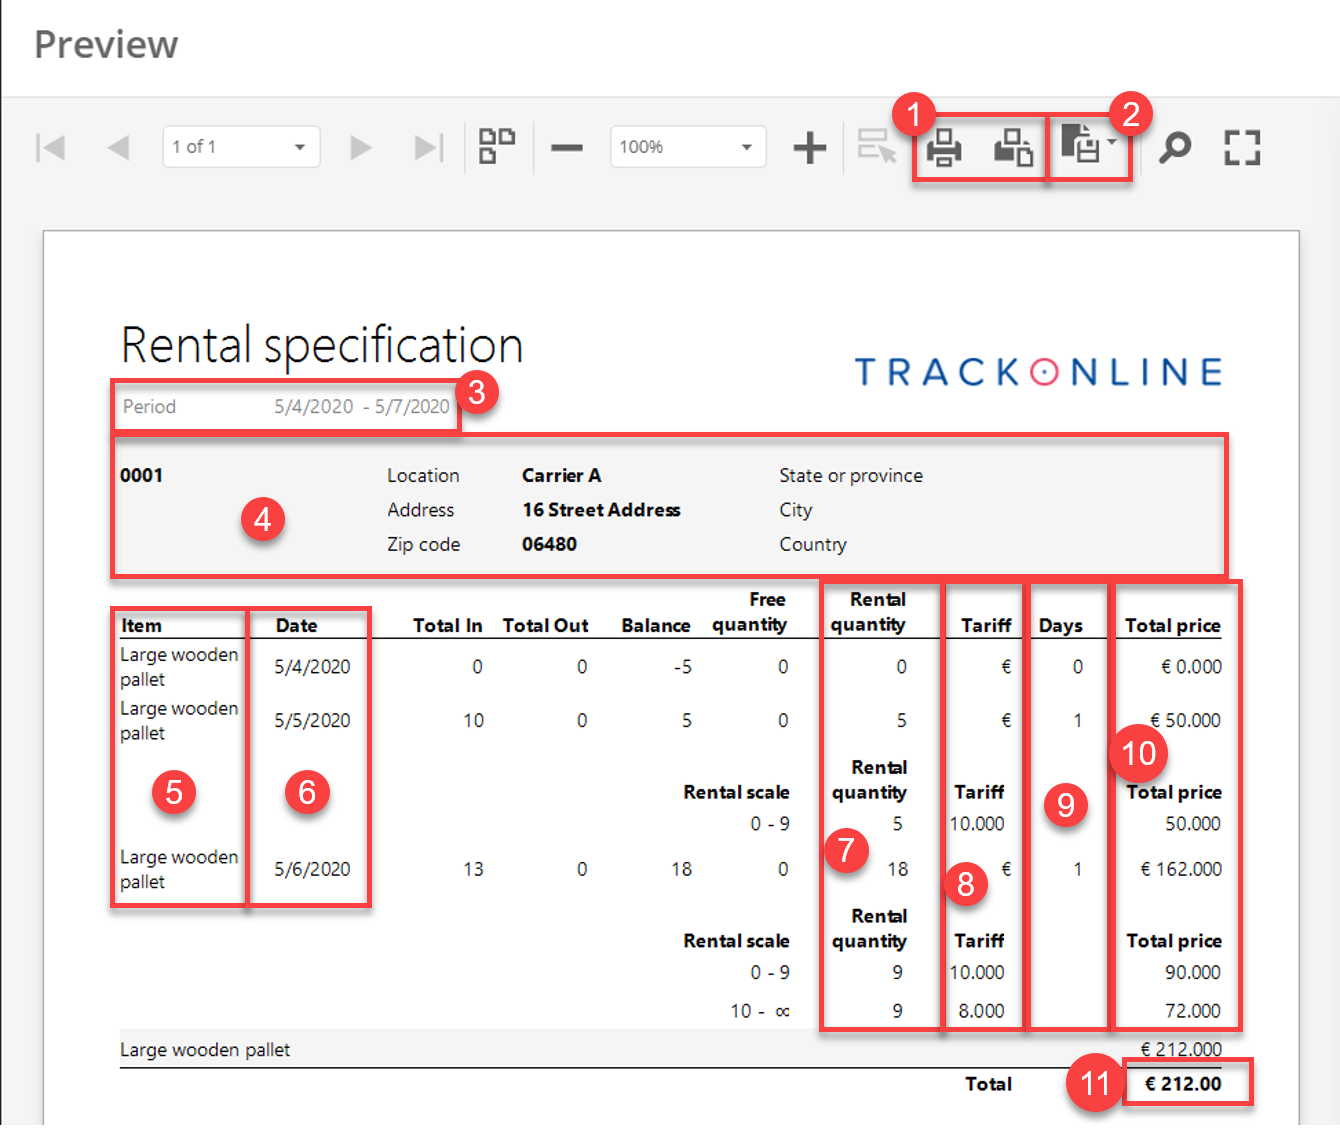
Each number in the picture indicates a different functionality. All functionalities are explained below:
- Printing: Here you can print the rental report.
- Export report to: Here it is possible to export the report to the following file types: PDF, XLS, XLSX, RTF, DOCX, MHT, HTML, Text, CSV and image.
- Period: Here you see the period over which the rent is calculated.
- Company information: Here you will find the company information.
- Item: Displays all items.
- Date: The date on which the balance was adjusted is stated here.
- Rental number: The rental numbers are displayed here. These are added cumulatively per line.
- Rate: The rental price per item is shown here.
- Days: This shows the number of days on balance over which the rental price per item is calculated.
- Total price: Displays the total rental price of the balance depending on the number of items, rate and days.
- Total: Displays the total amount of the rented items.
Rental help
The rental module also gives you the possibility to preview the rental balance according to your rental settings. To open the preview, click on Help as shown above. You will see the following window.
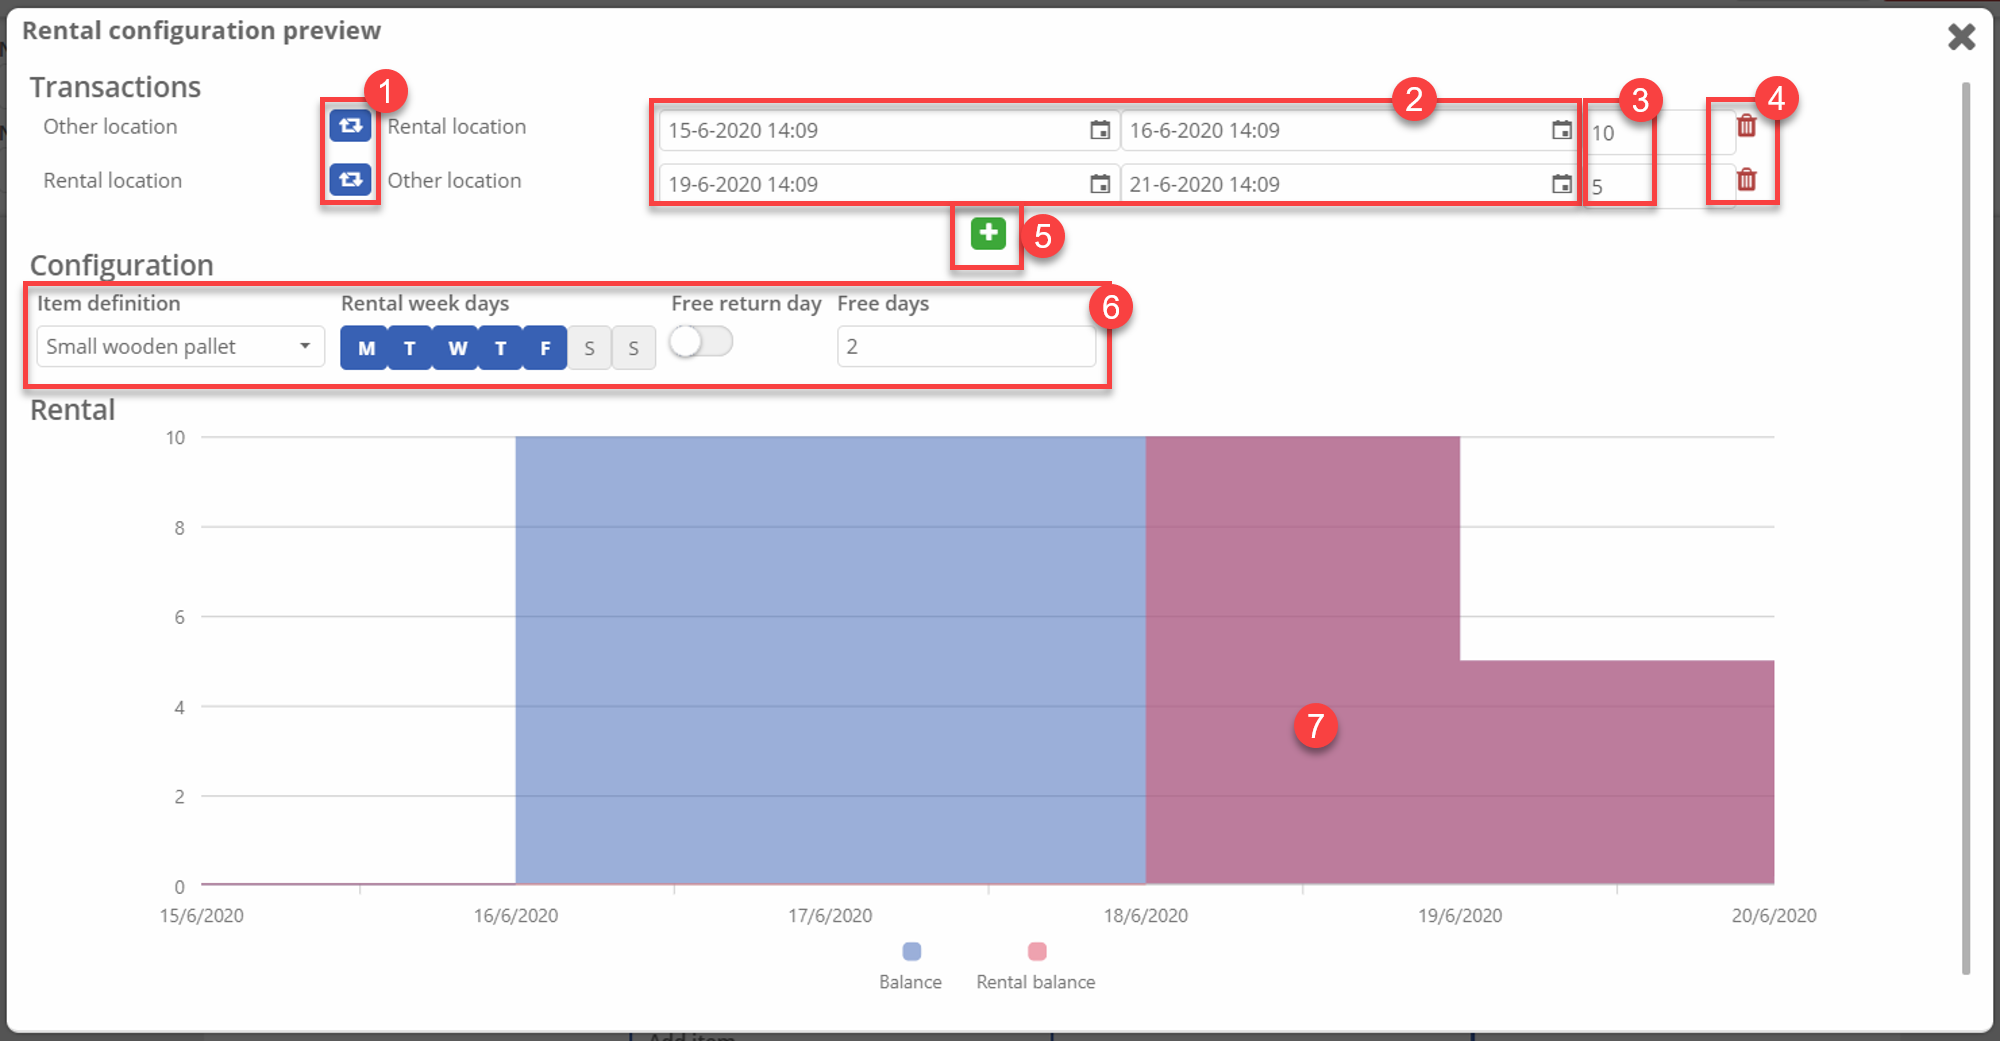
- Here you can reverse the from and to locations, either from the other location to the rental location or from the rental location to the other location.
- For each line, you can choose the period with a start and an end date.
- Here you can adjust the number of items.
- Here you can delete a line by clicking on the button.
- This button allows you to create a new line like the ones above.
- Here is the rental configuration. You can choose the item you want to preview the balance of, the days for which the rent is applied, if the return day is free or part of the rent and how many free days are offered at the beginning.
- This is finally the result of your configuration. In blue, you can see the actual balance for the item definition. In red, you can see the item balance of the actual rent including the parameters. As blue and red parts can overlap, you can have a clearer view by hovering both parts with your mouse.
Delete connection
If you no longer want to share data with one of your connections, you have the option to delete a connection. Therefor go to the connection overview and click on the connection that you would like to delete. In the upper right corner of the screen, you find the  button. When you click on this button you see a pop-up window as shown in the image below.
Delete network connection

Click the  button to actually delete the connection. The following message is shown:
Delete network connection message
Now in the connection overview of the other party, the Connect status and the Incoming data status are both changed and set to inactive. See the image below.
Inactive data sharing
