Transactions
Create a new transaction and take a look at the overview
A transaction can be made by multiple ways. There are two options, which will be explained in several steps.
Create transaction
Step 1
• Option 1: Press on the green 'Quick create' button on the top left corner of the screen, as shown in the image below.
Quick create button

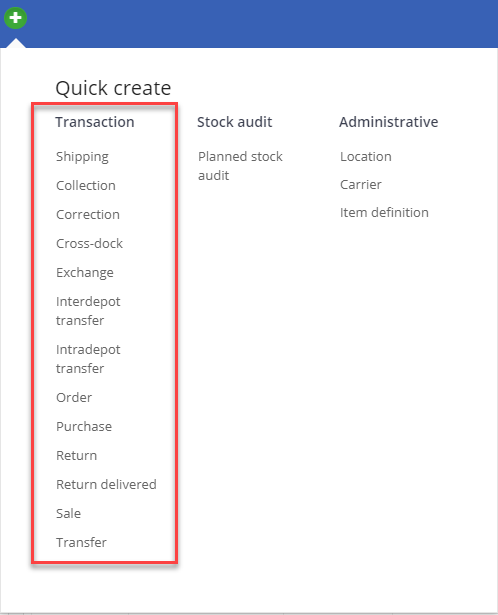
When you click this button, a menu is shown, see the image below. In this menu you will see a couple of options under the topic 'Transaction'. These are different transaction types. If you click on one of the transaction types, you will open a transaction screen. For an explanation about the different transaction types, click HERE.
Quick create menu
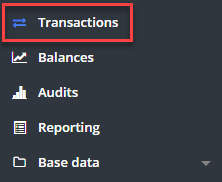
• Option 2: Select 'Transactions' in the left menu as shown in the image below.
Transactions menu
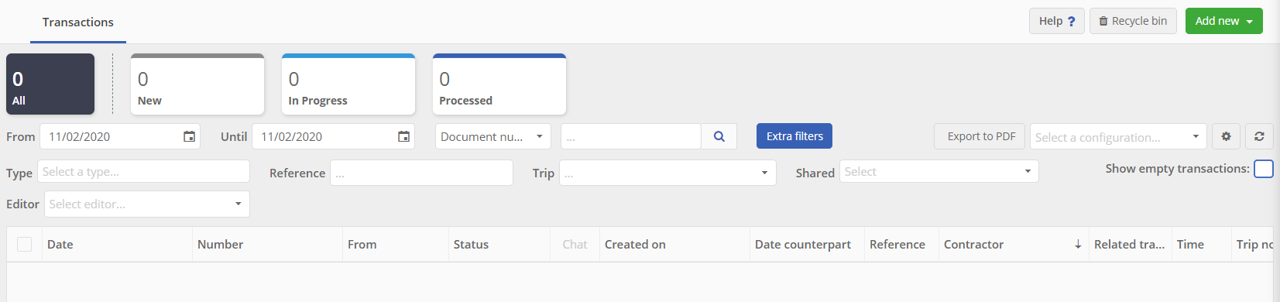
If you click on 'Transactions', you will see an overview of all the transactions you have made in your TrackOnline so far. In case you have not done any before, this overview screen will be empty. See the image 'Empty transaction overview' below.
Empty transaction overview
To create a new transaction, click on the  button.
Step 2
In order to make a transaction you can either pick option 1 or 2, as described in step 1 of this chapter. For this description we use option 2 for creating a transaction.
Click on 'Transactions' in the screen on the top left corner, as shown earlier in the image 'Transactions menu'. When you have clicked on 'Transactions', you will see the transaction overview (the overview will be explained later in Transaction overview). Click on to choose your transaction type, see the image below.
Add new menu

In this case we choose 'Collection' as transaction type. You will see the following window:
Transaction screen - Collection
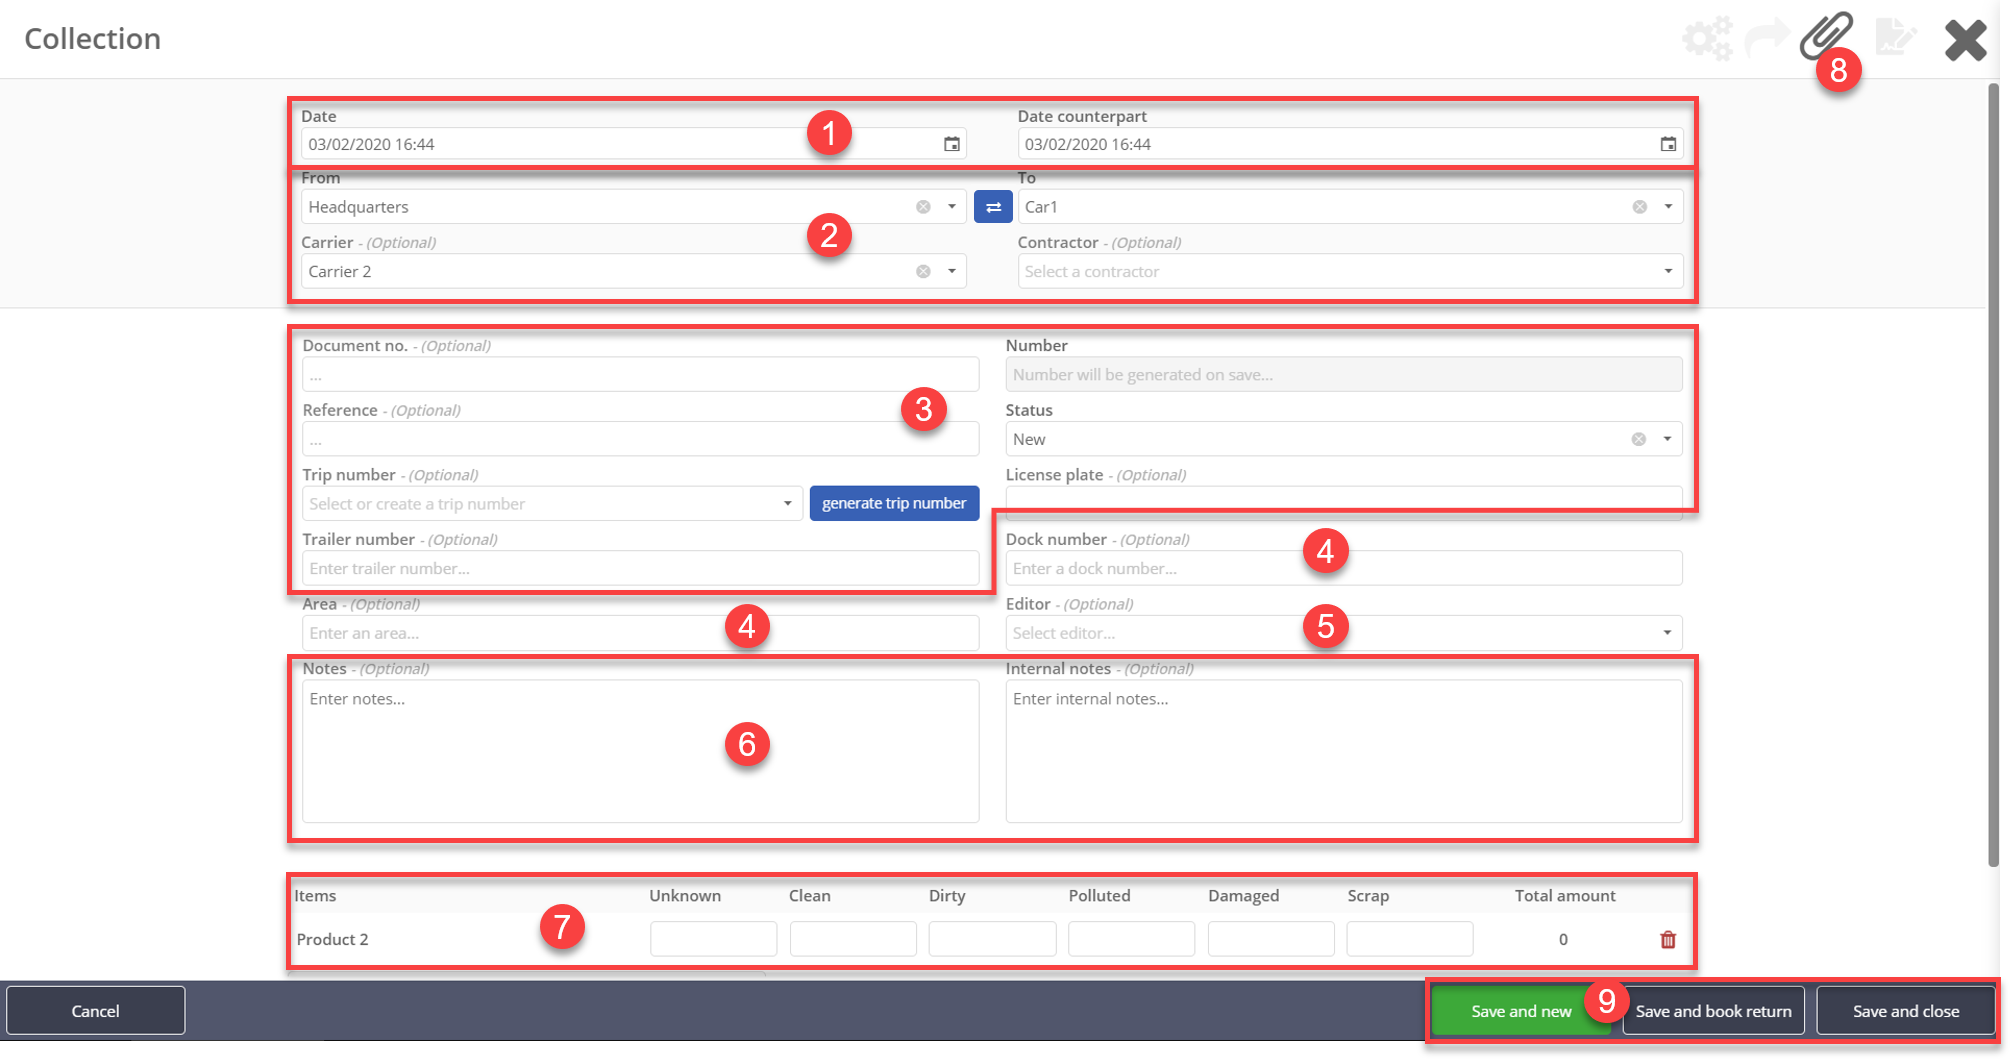
The different numbers, will be explained below.
- Here you can fill in the begin and end date and time.
- Here you can fill in all locations concerning the transaction. Both the locations and the carriers originate from 'Base data' (see Base data - Locations and Base data - Carriers). You can quickly invert from and to locations by clicking on the invert button in the middle.
- These fields are mostly intended for the carrier. If you have already filled in information such as the licence plate in the past, it will be suggested. If you type a licence plate, you need to hit enter to validate it before going to the next field. The status is automatically set to New when creating a transaction, unless you change it. You can either generate automatically a new trip number, pick one from the list or fill in a new one.
Note:
If you choose the status 'Processed', the transaction is final and CAN NOT be changed anymore.
AreaandDockare information for the truck driver.- Here you can pick an editor (formerly 'driver') for the transaction, for example the driver delivering the items.
- Notes are indications or remarks you can leave. Notes will be visible to anyone whereas internal notes will only be visible by people from your organisation. You can enable warnings for internal notes, more information HERE.
- Here you can fill in what items are part of the transaction. If you enabled item condition in the administration settings, you are able to fill in products for different conditions like above, more information about item condition HERE. You can send as many items as you want in one transaction, as long as the items are registered in TrackOnline.
- Here you can attach a file to the transaction, this can be a packing note for example, or a CMR.
- The
save and newbutton on the right let you save the ongoing transaction and start a new one immediately.Save and book returnsaves the transaction and automatically opens a new screen with a return type transaction and from/to inverted.Save and closesaves the transaction and sends you back to the transactions overview.
In the image below, an example of a filled-in transaction window is shown.
Example transaction
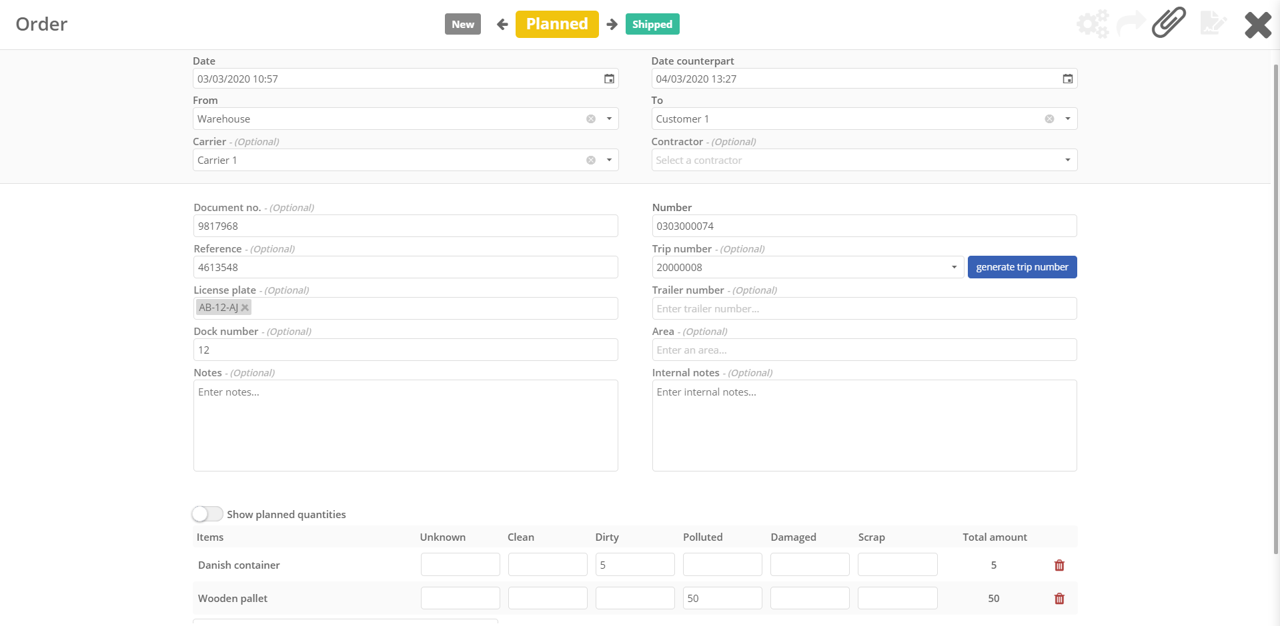
There is a transaction composed of 5 dirty Danish Containers and 50 polluted Wooden Pallets shipped from 'Warehouse' to 'Customer 1' with 'Carrier 1'. The transaction is planned on 03-03-2020 and will arrive on 04-03-2020.
The transaction has the status Planned and it can be changed into New or Shipped. This can be configured in the transaction types configuration.
If you have already created a transaction before, a prefilled transaction detail screen is shown when you want to create a new transaction. The information that is already filled-in is the last information that you used before for this specific transaction type. The information filled in are the last used 'from' and 'to' location, the last used carrier and the last used items.
Anomaly detection PROPRO+Enterprise
TrackOnline now has anomaly detection! Based on previous transactions, TrackOnline can display a warning when saving a transaction if the quantities deviates from usual quantities, as shown below. This prevents entering incorrect data.
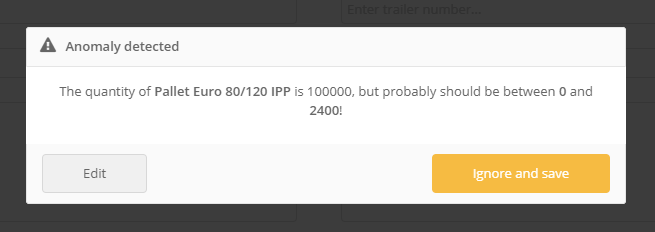
ℹ️ Want to know more about anomaly detection? Click HERE.
Shortcuts
If you would like to go quick and easy through the transaction detail steps, you can use different shortcuts. In the table below you see the key combinations that apply to the transaction detail screen.
| Shortcut | Function |
|---|---|
 | Open help menu |
 | Close help menu/transaction window |
 | Save and close transaction |
 | Save and new transaction |
 | Save and book a return transaction |
 | Jump to 'Select an item...' |
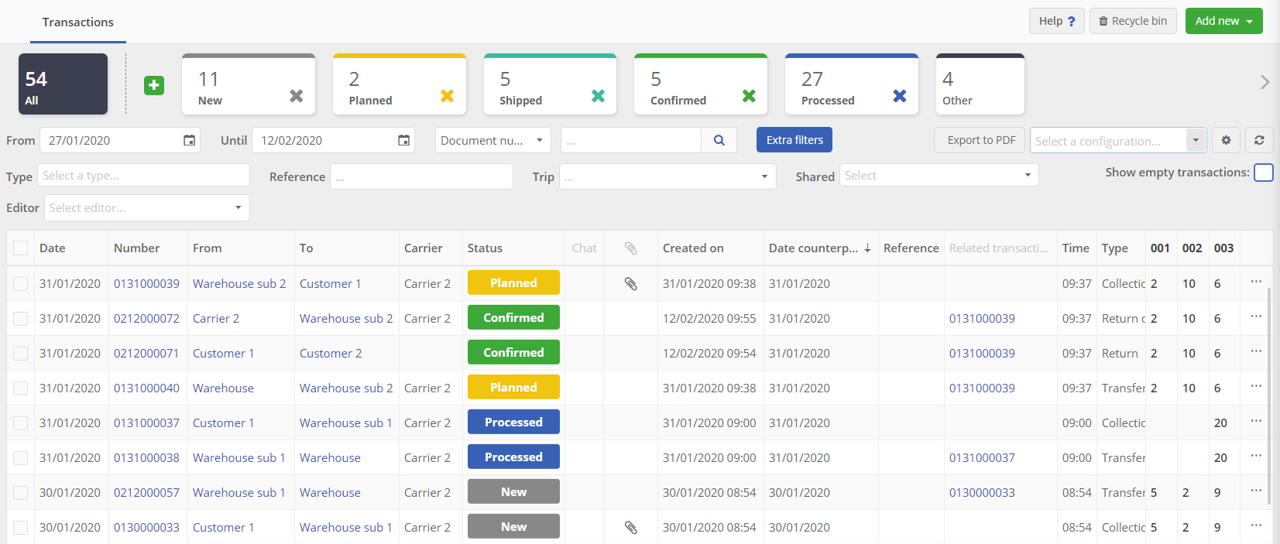
Transaction overview
The transaction overview shows you an overview of all the transactions in your administration. An example of an overview is shown in the image below, 'Transaction overview'.
Transaction overview
When you are in the overview you can use different shortcut keys. For instance, to quick create a new transaction with the last selected transaction type. In the table below you see the key combinations that apply to the transaction overview screen. To open the shortcut key help-menu, click on '?' (on your keyboard).
| Shortcut | Function |
|---|---|
| Open help menu |
| Close help menu |
 | Create new transaction with last selected type |
The possibilities of transaction overview screen, will each be explained below.
How to change a transaction status?
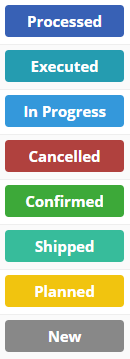
Let's start with the status of a transaction. The status of a transaction is shown in de column 'Status', see the image below. The color of the status shows if the status is categorized as New, Planned, Shipped, Confirmed, Cancelled, In Progress, Executed or Processed.
Transaction status column
The total number transactions and per category are displayed on top of the overview, as shown in the image below.
Transaction status amount
The amount of all transactions and per category are shown on the top of the overview, as shown in the image below. You can choose which tiles you want to see, click on the X on a tile to remove it or on the  button to add one.

If you want to change the status of a transaction, there are two options. First you can double click on a transaction, or click on the document number to open the transaction screen. Here you can change the status. Click on 'Save and close' and the change will be visible in the transaction overview.
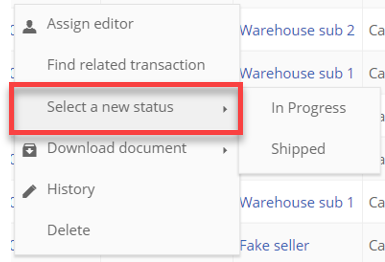
A faster way to change the status is by clicking on a transaction with the right mouse button and click on 'Select a new status'. The different transaction types are shown, see the image below.
Transaction status - Fast change
If you click on one of them, the status will change and it will be visible in the overview. If the change was successful the following message will appear in the screen:
Transaction status - Message change

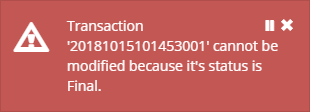
If a status change failed, a message will appear as shown below. For instance, when you want to change the status 'Processed' to a new status. The status 'Processed' is final and CAN NOT be changed.
Transaction status - Message change failed
Changing a status is also possible for multiple transactions. Therefor, select multiple transactions by clicking the checkboxes in front of each transaction, see the image below. Here two transactions are selected.
Transaction status - Multiple selected

Then if you click on the selected transactions with the right mouse button, click on 'Select a new status' and choose one of the transaction types, the status of both transactions will be changed in the newly chosen status. In this case we choose the new status 'Confirmed'. See the images below.
Multiple status change
This is only possible is all the selected transaction have the same status.
Transaction status - Multiple changed

Transaction status - Multiple changed new

Transfer auto update
If you change the status of a transaction, related transaction of type 'Transfer' will also be updated to this status.
From the details
Obviously, you can also change the transactions status while editing. This is what you see at the top of the screen.

The status in the middle is the current one. You can click on the left one or the right one to apply them. The statuses offered can be configured in the transactions configuration, learn more about it HERE. Once you have reached the Processed status, you will not be able to go back.
How to filter my transactions?
When you have made a lot of transactions in your administration, sometimes it can be useful to filter your transactions. The transaction overview offers you a couple of filter options, see the red frames in the image below.
Transaction: filter options

- Here you can view the number of transactions with each status, but you can also click on the tile to filter transactions by status. These tiles can be configured, more information HERE.
- Here you can filter the transactions by date range. Choose
Combinedbelow if you want the from / until dates filters to apply to both starting and counterpart dates,Dateto only apply them to the starting date andConterpart dateto only apply them to the counterpart date of transactions. - You can select in the list in which column you want to research what is typed in the input on the right.
Related transactionwill let you search within the transactions and related transaction number.Document numberwill let you search in the name of the documents attached to the transactions. - Here you can pick in the list by which item configuration you want to filter the transactions by.
Note
You can create item configurations in Configuration > Location profiles > Item configuration tabs. Learn more about item configurations by clicking HERE.
- Here you can pick in the list the transaction type you want to filter by.
- Here you can filter by transaction reference number.
- Here you can filter by trip number.
- Here you can choose to display just read-only transactions or to hide them.
- Here you can filter by editor person.
- Here you can check the box to show transactions which do not containing any item.
Furthermore, you can open an extra filters pane by clicking on the  button. You will see the following pane.
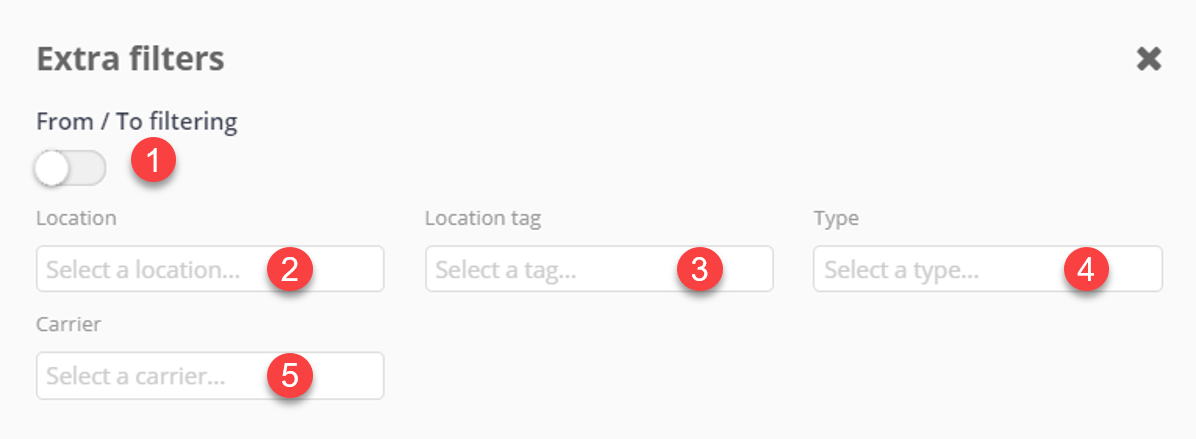
- This switch enables you to have separate from and to filters. More explanations about this below.
- Here you can select locations for the transactions to be related to. Once you have selected a location, you can still add other locations by clicking on the field. You can also delete locations from the selection by clicking on the their cross.
- Here you can select locations tags for the transactions to be related to. Once you have selected a tag, you can still add other tags by clicking on the field. You can also delete tags from the selection by clicking on the their cross.
- Here you can select the type of transaction you want to filter by.
- Here you can select locations carriers for the transactions to be related to. Once you have selected a carrier, you can still add other carriers by clicking on the field. You can also delete carriers from the selection by clicking on the their cross.
If you have clicked on From / To filtering switch, you should have doubled the first line of filters, as below. 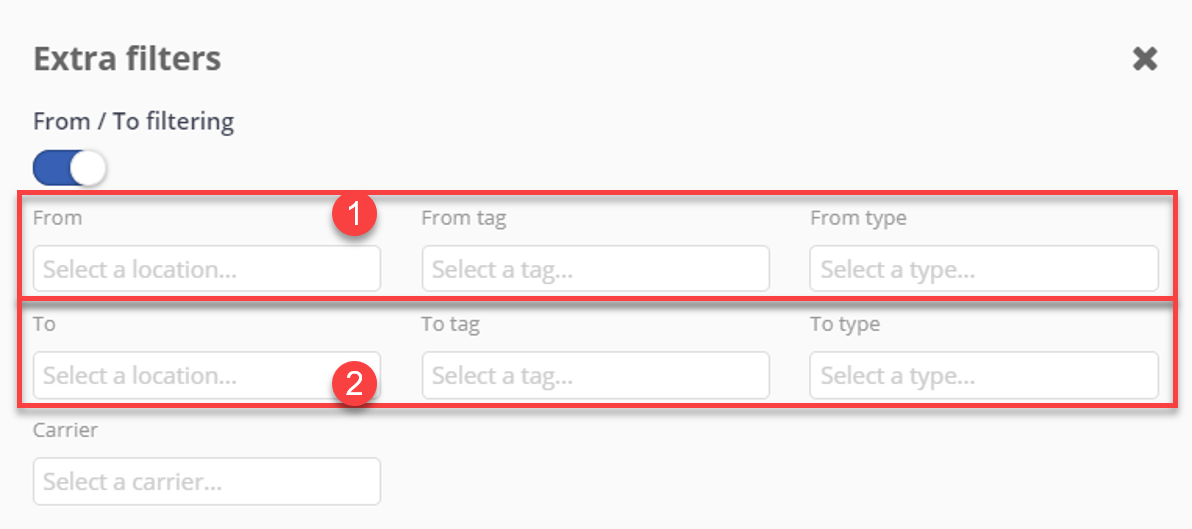
- These filters are the same than 2, 3 and 4 above, but they only relate to the departure location of the transactions.
- These filters are the same than 2, 3 and 4 above, but they only relate to the arrival location of the transactions.
Once you are done, just click on the top right cross to close the pane.
Besides the above-mentioned filter options, you can also click on a column name to sort the relevant column by ascending or descending order. For instance, if you click on the 'From' column name, the transactions will be sorted by alphabetical departure location.
How to arrange the columns in the transaction overview?
To create a structured overview, you can choose which columns and in which order the columns are shown on your screen.
Column Chooser
To choose which columns are visible in your overview, click on the gear wheel on the top right corner of your screen. See the image below.
Choose columns

When you have clicked on this button, the following window will appear.
Column Chooser
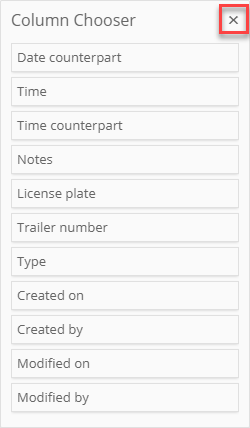
The window shows you different column subjects. You can drag one of these subjects to the transaction screen to add the column to the transaction overview. Also you can remove columns from your overview by simply dragging the column to the 'Column Chooser' window.
Note:
It is not possible to remove the item columns from your overview.
If you want to close the 'Column Chooser' window, click on the 'x' indicated in the image above with the red frame.
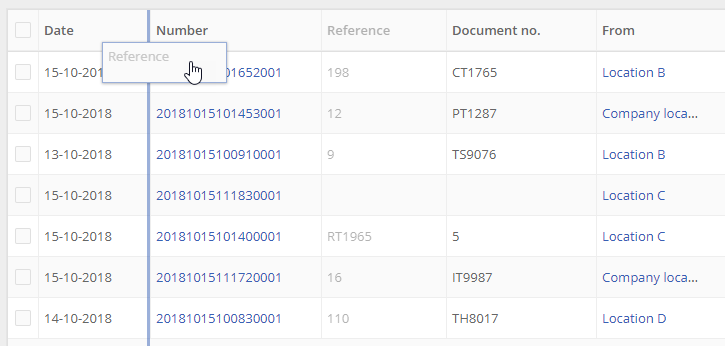
Sort columns
To order the columns, you can click on a column name and drag it to the position you like. This is shown in the image below. Here we drag the column 'Reference' to the second position, between the columns 'Date' and 'Number'.
Drag columns
Sort item columns
Changing the order of the item columns, works in a different way than explained above. The order of these columns is based on item configurations. If there is no item configuration selected as filter on the transaction overview, the default of the item column order is the order in which you created the items in your administration. See the image below.
Transaction overview without filter
If you have filtered the overview based on an item configuration, as shown in the image below, the item columns are in order as selected in this item configuration.
Transaction overview with item configuration filter
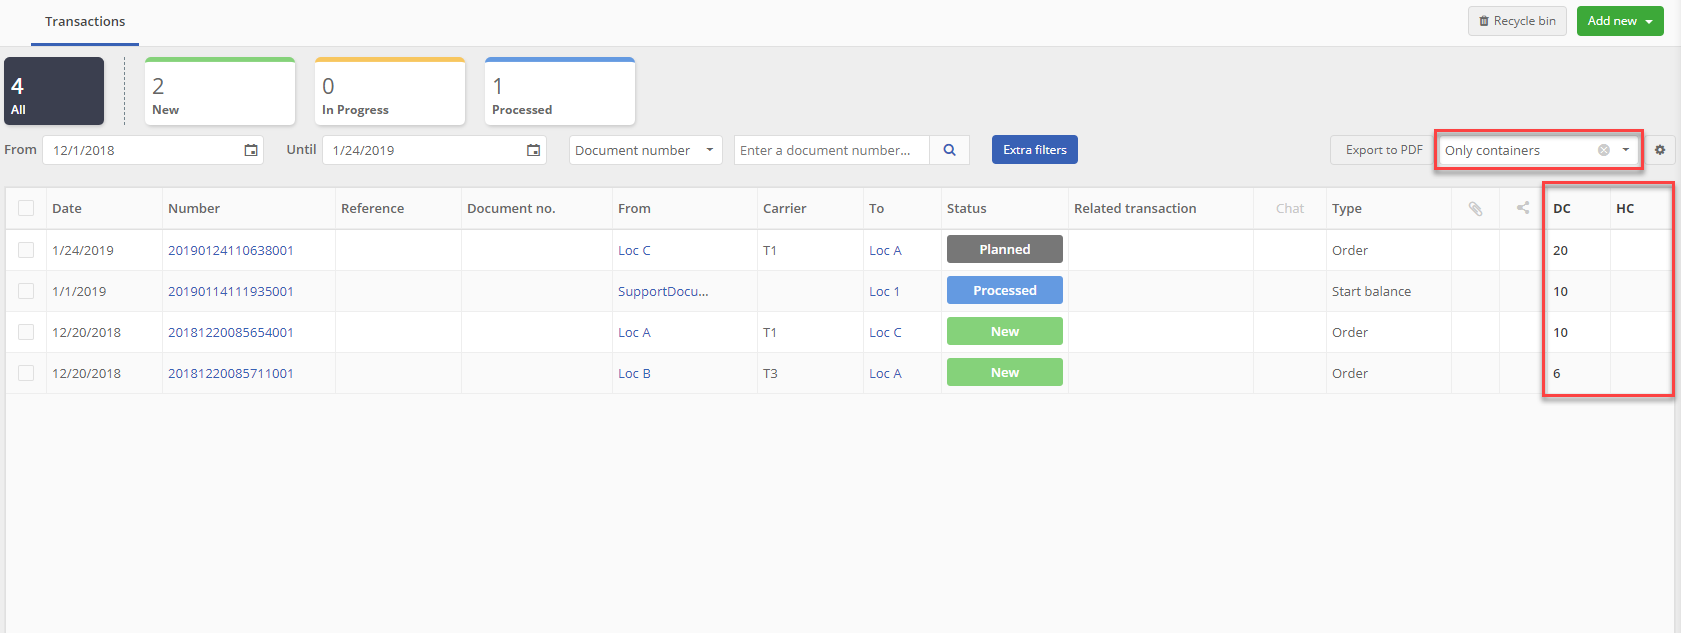
In this overview there is filtered on the item configuration 'Only containers'. Only the items in this configuration are shown. If we take a look at the item configuration, as shown in the image below, you see that the items are in the same order as shown in the overview.
Item configuration order
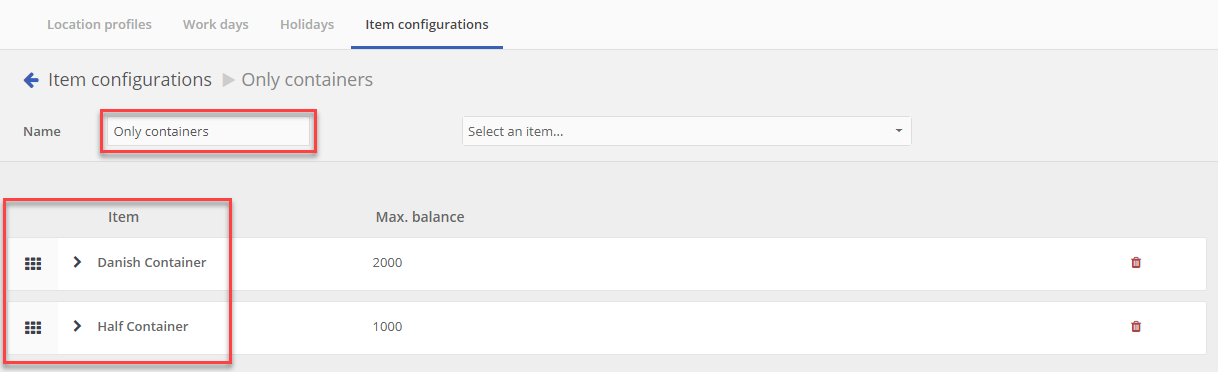
ℹ️ So if you would like to change the order, you have to change this in the item configuration. For more information about changing the item configuration, click HERE and take a look at the image 'Items in configuration' (option 5).
How to export transactions to PDF?
If you want to export all the transactions that are shown in your transaction overview to a PDF file, click on the  button, on the top right corner of the screen.
Note:
This export might take a minute, depending on the amount of transactions.
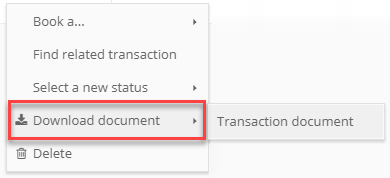
In order to export an individual transaction to PDF, click with your right mouse button on a transaction. You will see a menu as shown in the image below. Click on 'Download document' and then click on 'Transaction document'.
Export single transaction to PDF
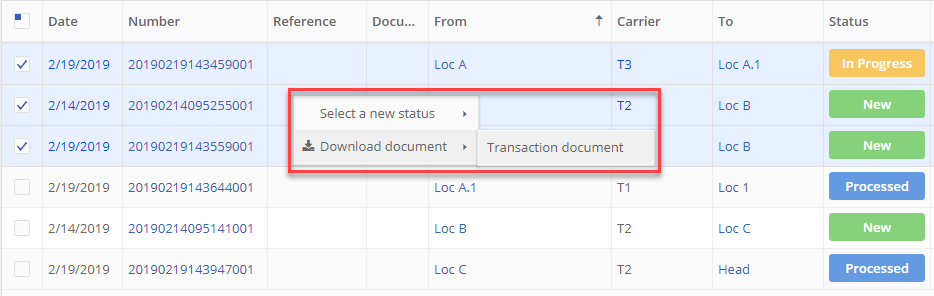
You can do the same if you would like to export a selection of transactions to a PDF file. Therefor select the transactions that you want to export and click with the right mouse button on one of the selected transactions. Click on the option 'download document' followed by 'Transaction document'. See the image below. The download will now start.
Export multiple transactions to PDF
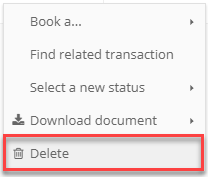
How to quick delete a transaction?
If you want to delete a transaction, click with the right mouse button on the transaction that you want to remove. This will show you a menu where you can click on 'Delete'. See the image.
Delete transaction
If you have clicked on 'Delete' you will see the following window:
Delete transaction message

Click on 'Yes' if you are sure you want to remove the transaction. If not, click on 'No'. You will return to the transaction overview.
Note:
If you delete a transaction, all related transactions will also be removed.
The deleted transaction is moved to the Recycle bin. You find the Recycle bin in the transaction overview, by clicking on the  button on the top right corner of the screen.
How to find related transactions?
If you would like to look for transactions that are related to a specific transaction, click with your right mouse button on the transaction where you want to find the related transactions to. You will see a menu as shown in the image below.
Find related transactions
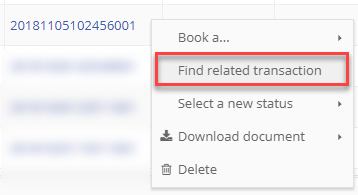
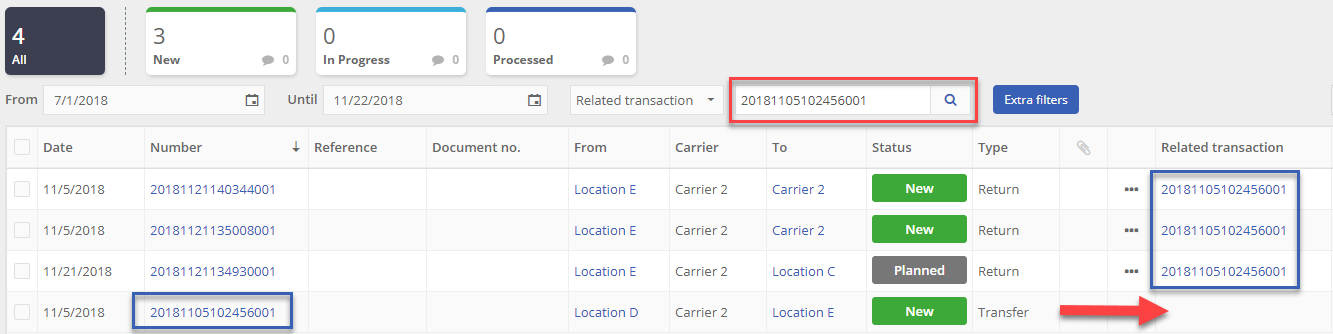
Click on 'Find related transaction'. You'll see a screen with the related transactions and the transaction to which they are related to, the 'main transaction'. You can distinguish the main transaction because it has no 'related transaction number'. See the red arrow in the image below. The image below shows an overview of the main transaction with transaction number '20181105102456001' and his related transactions. This number is also visible as filter, shown in the red frame.
Overview of related transactions
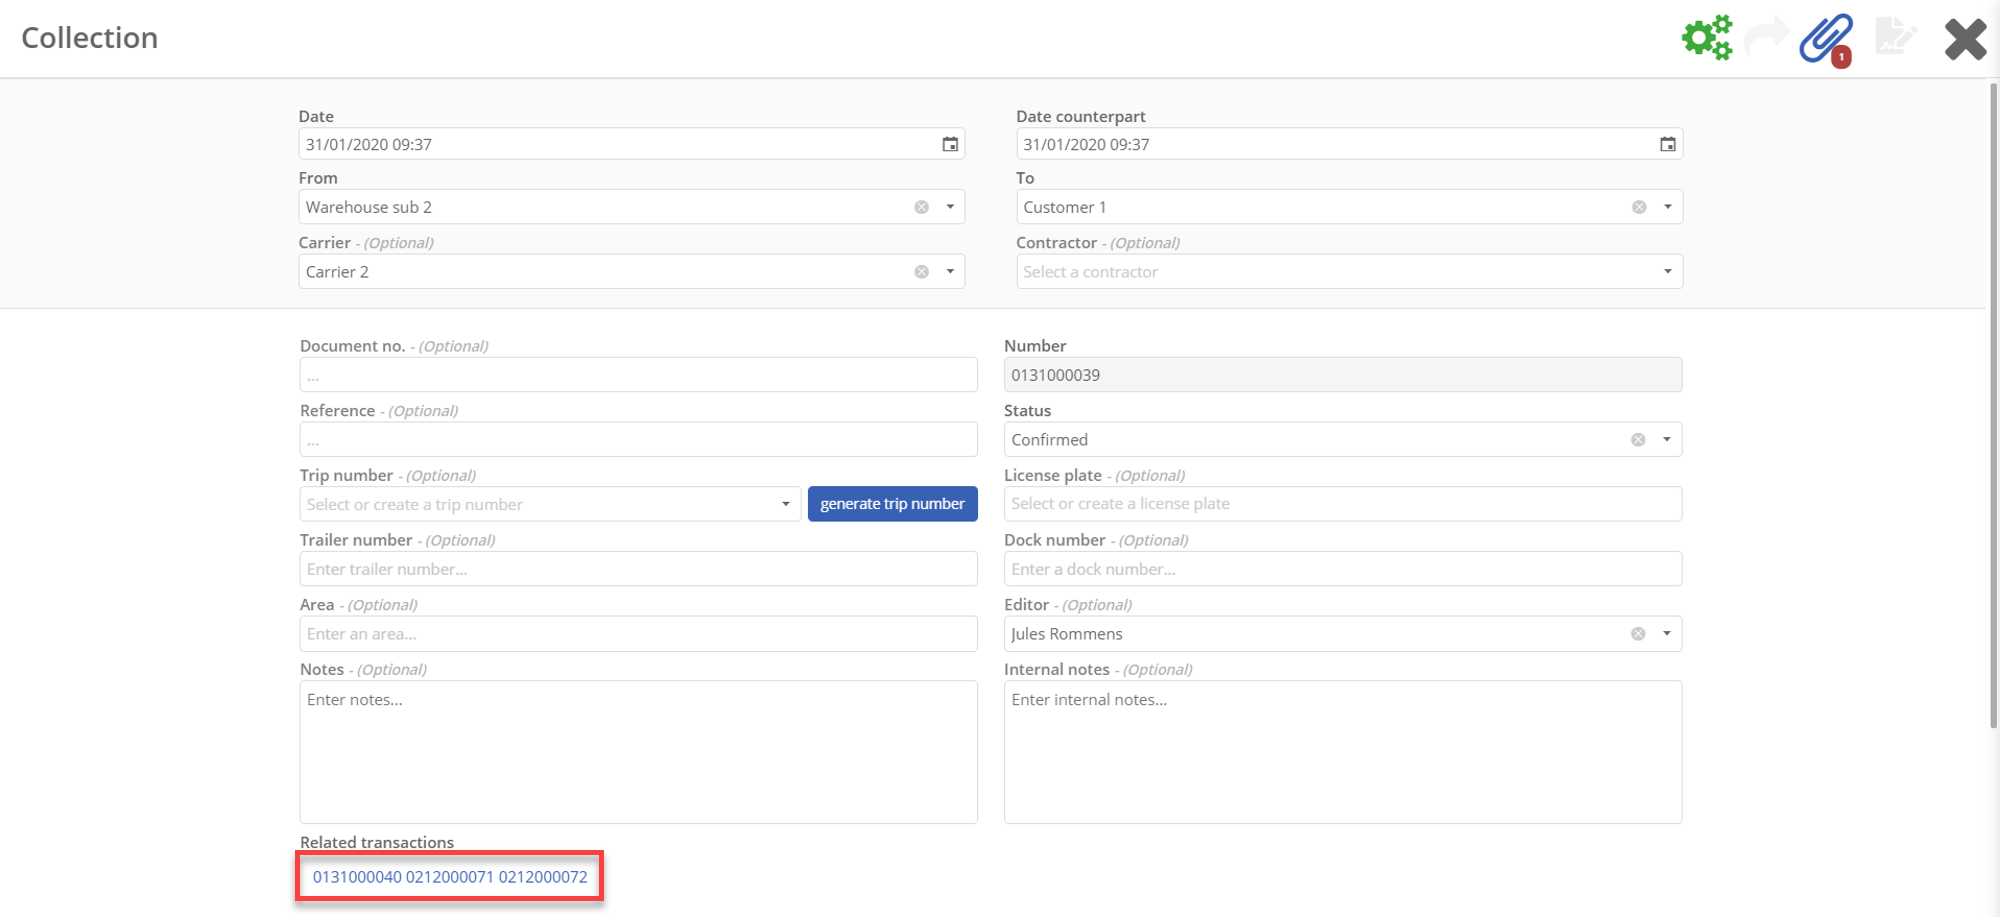
Another way to see which transactions are related, is by clicking on a transaction. You see a transactions screen as shown in the image below. The red frame shows the transaction number(s) of the related transaction(s).
Transaction window related numbers
How to quick book a ...?
If you quickly want to book a related transaction, you can click with the right mouse button on a transaction and select 'Book a...'. This shows you a couple of options as shown in the image below. Each of these options will be explained under the image.
Book a...
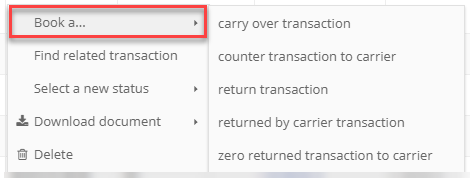
Note:
The 'Book a...' option is not visible for transactions of type 'Return'.
Book a carry over transaction
If you want to book a transaction from a 'To' location to a next location, you can click on 'carry over transaction'. For example, if you already have a transaction from location A to location B and you want to book a new transaction from location B to location C, you can use this option. A transaction screen will open in which the 'To' location is filled in as 'From' location. An example is shown in the images below.
Original transaction

Carry over transaction screen
Book a counter transaction to carrier
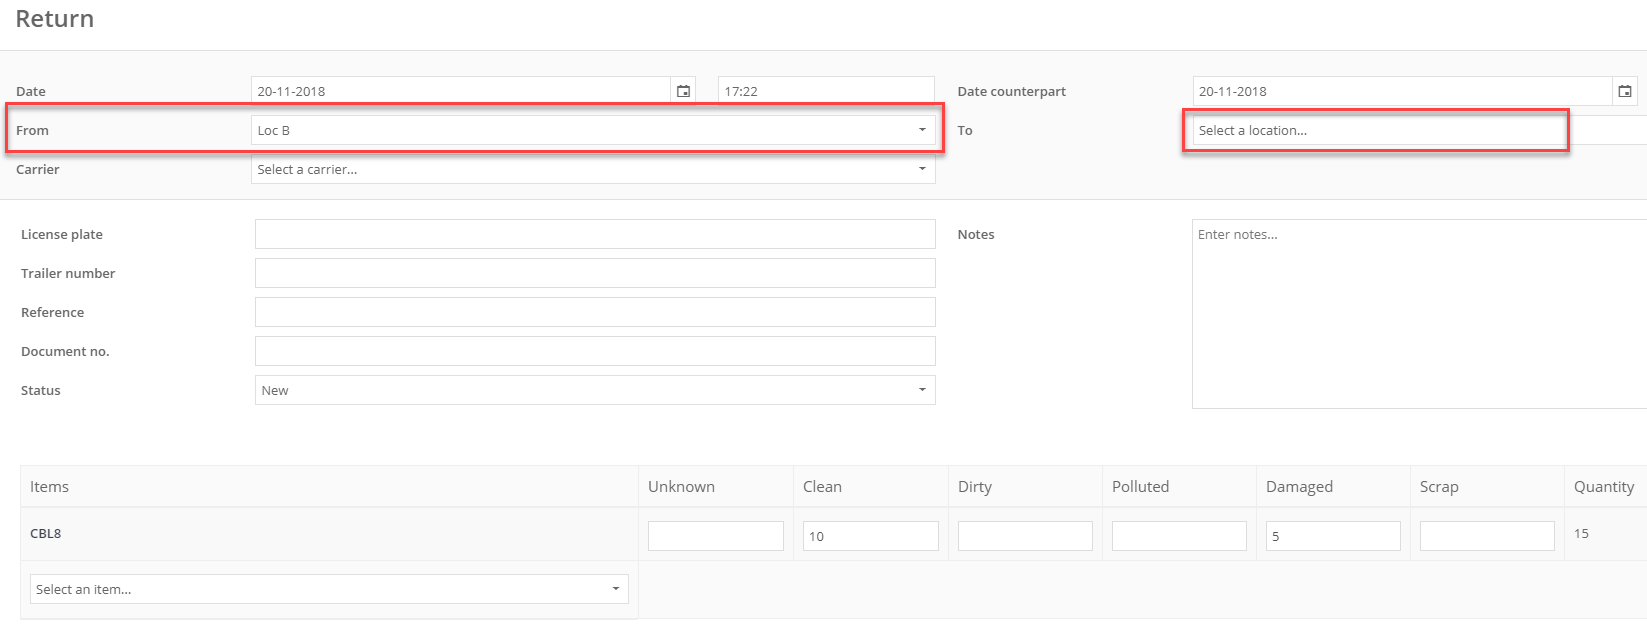
If you would like to make a counter transaction to a carrier, click on 'counter transaction to carrier'. You enter the transaction 'Return' screen. See an example in the image 'Transaction Return screen'.
Transaction Return screen
Automatically, the 'To' location of the original transaction, is now filled in as 'From' location. The same applies to the carrier. The carrier is automatically filled in as 'To' location. The reference number, document number and Status are the same as noted in the original transaction. If you click on the 'Save and close' button on the right bottom of the transaction screen, you will see the new return transaction in your overview. In the image below, an example of how it looks like in the overview is shown.
Overview - Return transaction to carrier

Note:
The action 'Book a counter transaction to carrier', is only possible if a carrier has been entered in the original transaction.
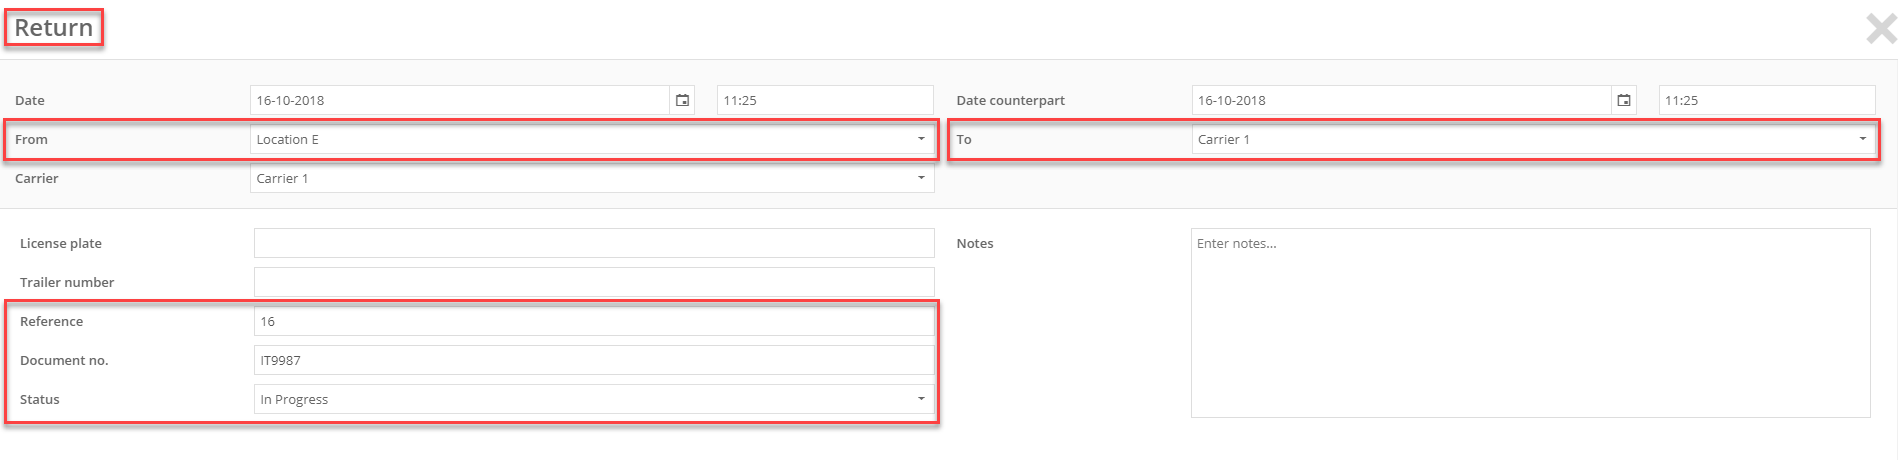
Book a return transaction
If you would like to book a return transaction, click on 'return transaction'. You'll enter the transaction Return window. This time the 'From' and 'To' locations are reversed in comparison with the original transaction. Also the status of the transaction is reset to 'New'. The reference number, document number and carrier (if present) are the same as the original transaction.
If you have filled in all the information, click on 'Save and close'. You will see the return transaction in your transaction overview. See the image below.
Overview - Return transaction

Book a returned by carrier transaction
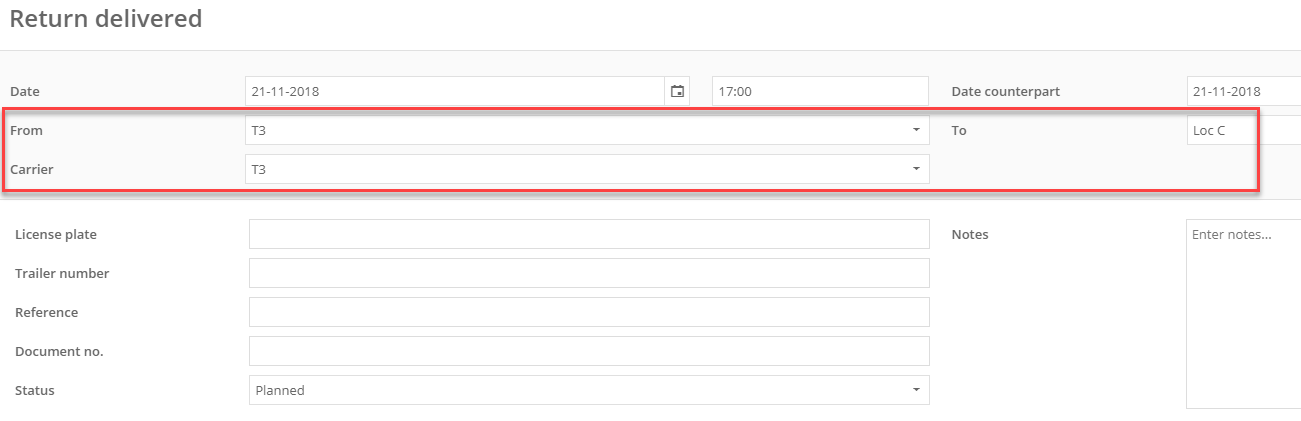
If you would like to book a transaction that is returned by the carrier, click on 'returned by carrier transaction'. You'll enter the transaction Return delivered window. For example, if the original transaction went from location C to location B, with carrier T3, then the return window will look like the image below. In this window, the From location is now T3 (the carrier) and the To location is now location C. The carrier is still the same.
Transaction returned by carrier screen
Note:
The action 'Book a returned by carrier transaction', is only possible if a carrier has been entered in the original transaction.
Book a zero returned transaction to carrier
If you want to book a transaction to the carrier with zero items, click on 'zero returned transaction to carrier'. For example, carrier T1 delivers items to location B, but takes none with him to his own location. Then you can create a zero returned transaction to carrier, in which a carrier does not take any items with him from location B after delivery. This example is shown in the images below.
Original transaction

If you have clicked on 'zero returned transaction to carrier' you will see a screen as shown below. Note that the location 'To' is now the location 'From' and the carrier is both the location 'To' as the carrier.
Transaction screen zero returned transaction to carrier

If you have filled in all the information, click on 'Save and close'. You will see the zero returned transaction in your transaction overview. See the image below.
Overview - Zero returned transaction to carrier

Note:
The action 'Book a zero returned transaction to carrier', is only possible if a carrier has been entered in the original transaction.
Book a correction transaction
If you want to correct an already processed transaction, click on 'correction transaction'. For example, you created a transaction with 6 containers but you notice that only 5 were sent. You can't edit the transaction anymore since it has been changed to Processed status. You can book a correction transaction in order to correct the mistake.
When you make a correction on a processed transaction, you can enter the correct numbers of what that transaction should have been. TrackOnline will automatically reverse the original transaction and enter the correct numbers.
As an example, we have an original Company-to-Customer Declare of 10 Euro Pallets. This should have been 8, but the Declare has already been processed. In TrackOnline you can right click on the processed transaction to book a correction and enter an 8. This will result in a correction of 10 and a new Declare of 8 Euro Pallets.
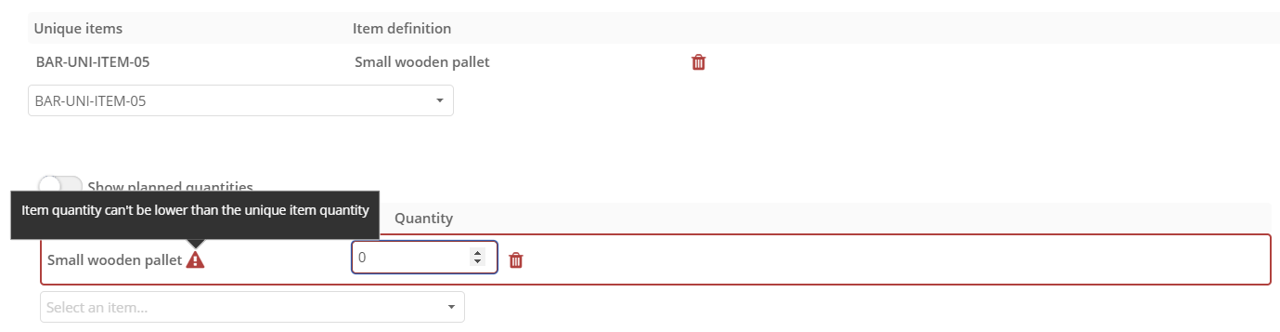
How to add unique items to a transaction?
You can add unique items in a transaction by picking them from the unique items list at the bottom of the transaction details screen.
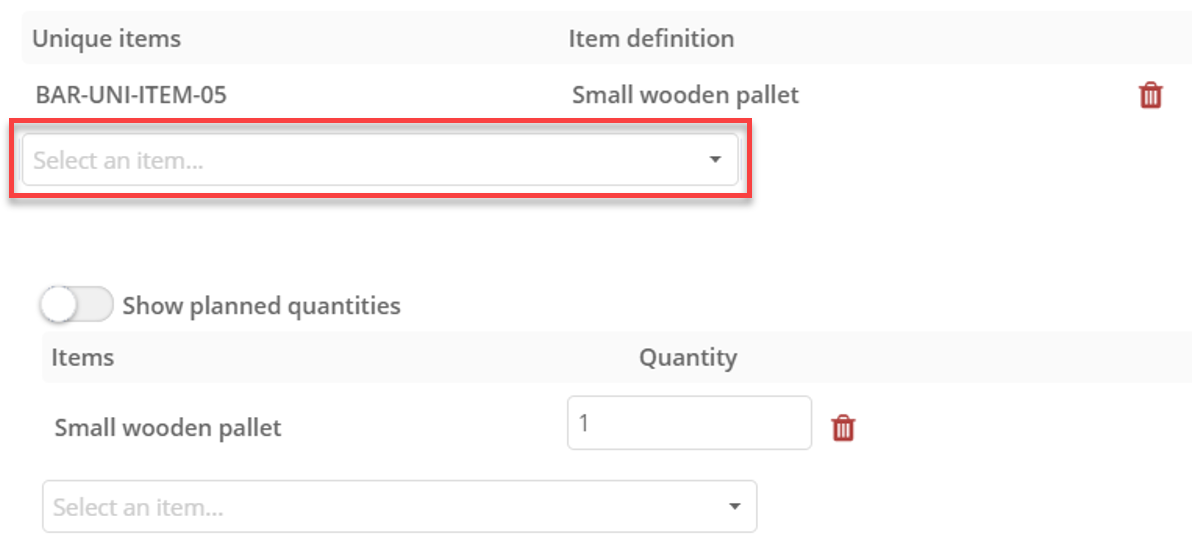
The number of unique items and total items for one item definition can differ, but he number of total items cannot be less that the number of unique items. In this case, the following error message will be shown.
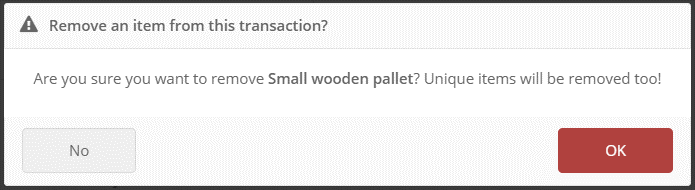
Removing an item definition will issue a warning message. If you remove the item definition, all unique items of this type will also be removed from the transaction.
Change transaction details
If you would like to make changes of an existing transaction, you can double click on the transaction in the transaction overview. Now the detail screen of a transaction will open. In the image below, an example is shown.
Example - Existing transaction details

In this example 6 'Danish Containers' and 50 'Wooden pallets' are transported from Customer 1 to Customer 2 with Carrier 1.
Now we just got a call that the amount of 6 Danish Containers is not right and it should have been 5. We change the amount in the transaction detail screen from 6 to 5 and we save and close the transaction. If we open the same transaction again, there is an option visible that shows us the 'planned quantities'. These are the quantities that were used as input the last time the transaction was modified. In the image below, the example as described above is shown.
Example - Show planned quantities

Split a transaction
It is possible to split a transaction in half by clicking on the split icon at the top of the transaction details screen.
![]()
However, this option is available under certain conditions. This may not be available if:
- The transaction is processed, declined or cancelled.
- The transaction is an exchange.
- The transaction is read-only.
- The transaction has a child or a related transaction.
- Item condition is enabled.
- The transaction is not saved yet.
- The transaction has unique items.
When you click on it, you get a new transaction details screen. The details are similar except for the items, as shown below.

You can enter as many items as yopu want between 0 and the amount of the original transaction indicated in parentheses. Once it's done, click on Save and quit to come back to the overview. You will see the exact same transaction with ".1" at the end of the number with the split icon and an updated item amount.

You can even split a splitted transaction if you want to, the process is the same as explained above.
Transaction fees
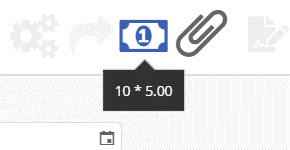
When viewing the details of a transaction, you can manually add fees applying to this transaction. Therefor, click on the bank note icon at the top.

If you have not entered fees yet, click on +. You will see the following window.
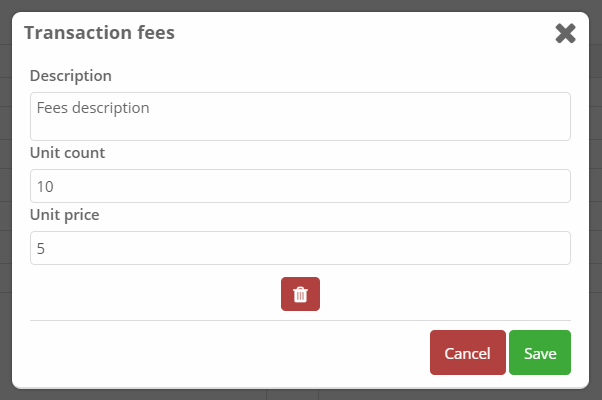
Here, you can enter a description for the fees, the unit count and the fees for each unit. Then, you can click on Save to save your modifications. Alternatively, you can click on Cancel or on the cross at the top to close the window without saving. You can also click on  to delete the fees.
When you are on the transaction details screen, you can quickly view the fees by hovering the icon with your mouse, as shown below.
Chat
The chat allows you to send a quick message to a connection within TrackOnline. Chats are specific to each transaction.
To open the chat, navigate to a transaction shared with a connection. To learn more about connections, click HERE. You can now open the chat by clicking the speech bubble on the top right corner. This will open a pane as below. 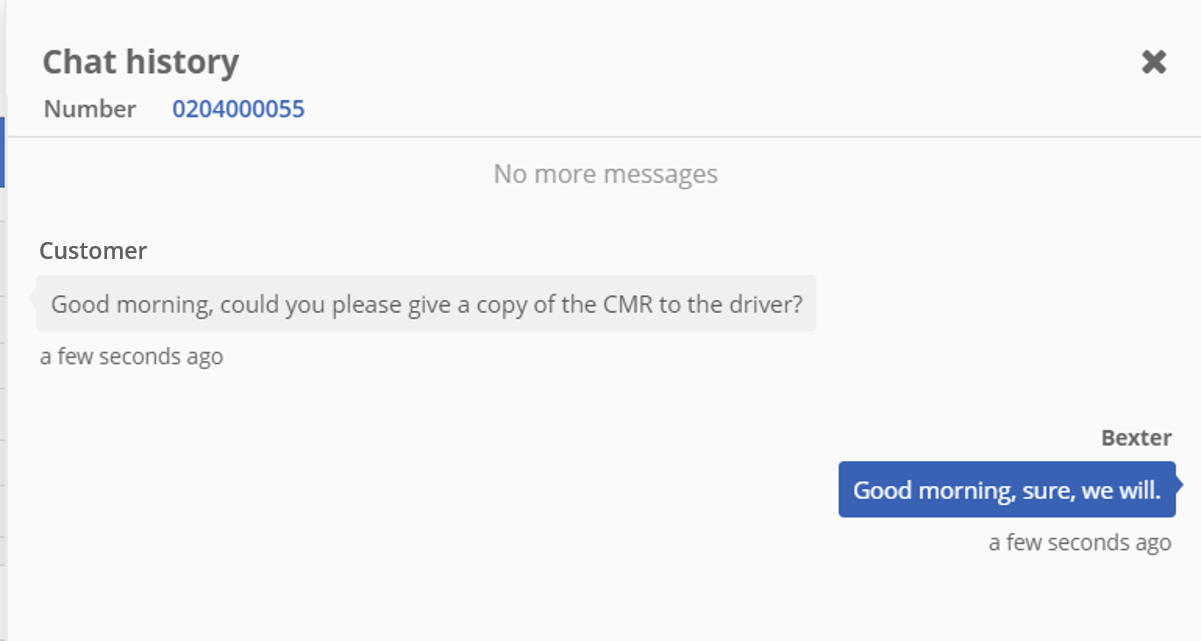 In this example, you can see that the customer asks for a copy of the CMR. You can answer by typing your message at the bottom and clicking on
 send or by hitting Enter key.
![]()
The chat is also available from the transaction overview, in the column chat. If you don't have this column, you can add it through the column chooser, more information HERE. When you have an unread message, the speech bubble turns blue. 
The chat notifications can be turned off under Profile / Notifications. More information HERE.
Transaction history
Users are able to make changes in the TrackOnline administration. For instance, the user can change item quantities or decides to change the status of a transaction. In order to always have insight in your administration, it can be useful to take a look at the transaction history.
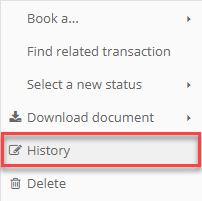
Therefor, go to the transaction overview and click with the right mouse button on the transaction that you would like to see the changes of. A menu is shown similar to the image below. Click on 'History', marked with the red frame. The window 'Transaction history' will open at the right side of your screen.
Menu - History
The transaction history window shows you the history of a specific transaction. It tells you when, by who and what is changed. In the image below an example is shown.
Transaction history window
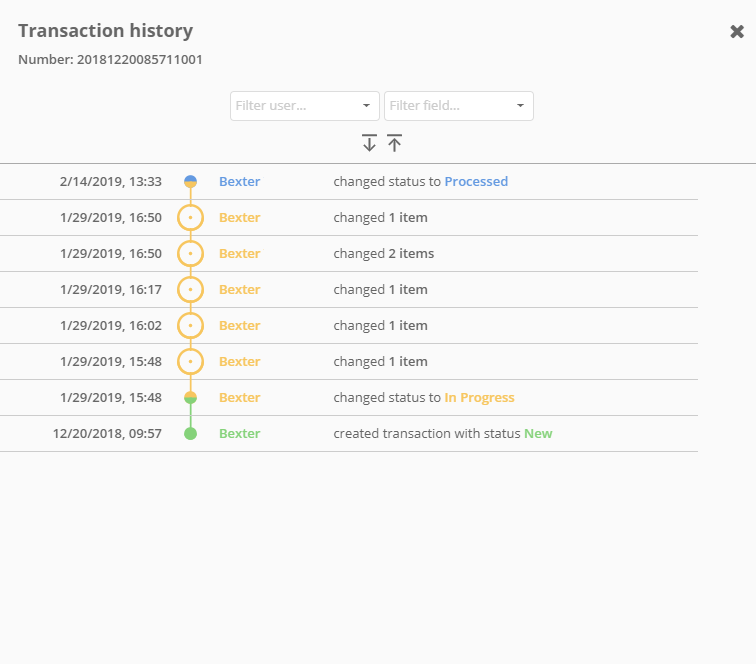
In this window you see that the user 'Bexter' created a new transaction on 20 december 2018. The same user made changes in the items and finally changed the status to 'Processed' on 14 february 2019.
It is also possible to see the changes in more detail. Therefor click on the 'arrow down' as shown with the red frame in the image below. If you want to close the details of the changes, you can simply do this by clicking on the 'arrow up'.
Transaction history in detail
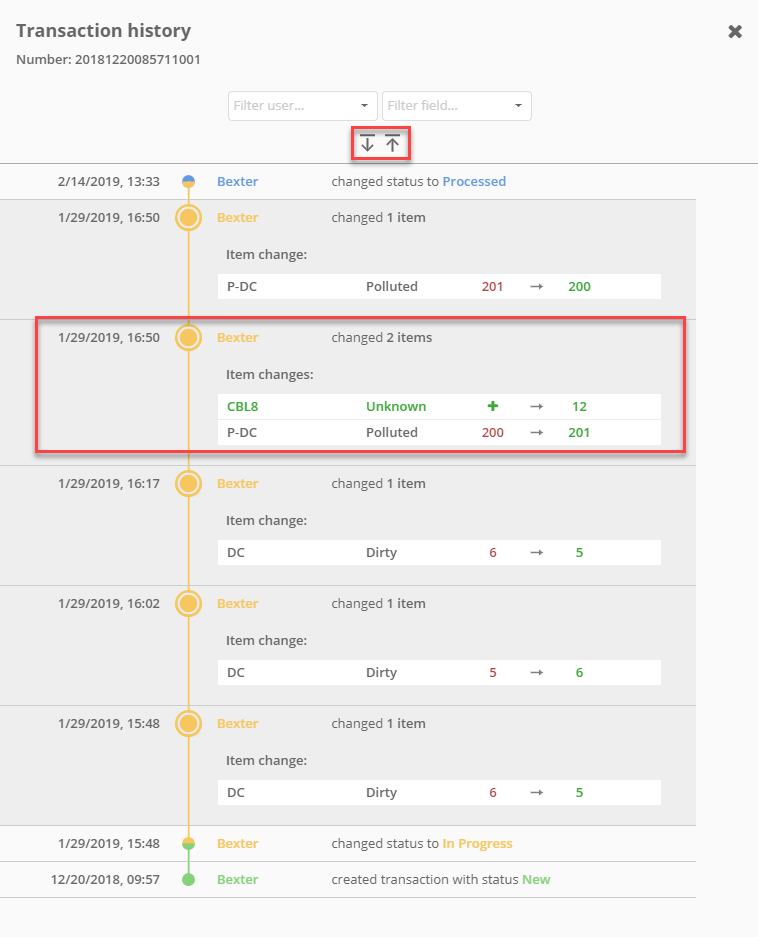
You can see that in this example the item quantities are changed a couple of times. For instance, the item P-DC was changed from 200 to 201 on 29 january 2019. On the same date the item CBL8 was added to the transaction with a quantity of 12.
It is also possible to filter the changes. This can be useful when more users made changes or when a lot of changes have been made during time and you do not want to go through every single change. The filter options are shown on the top of the history window as shown with the red frame in the image below.
Transaction history filters
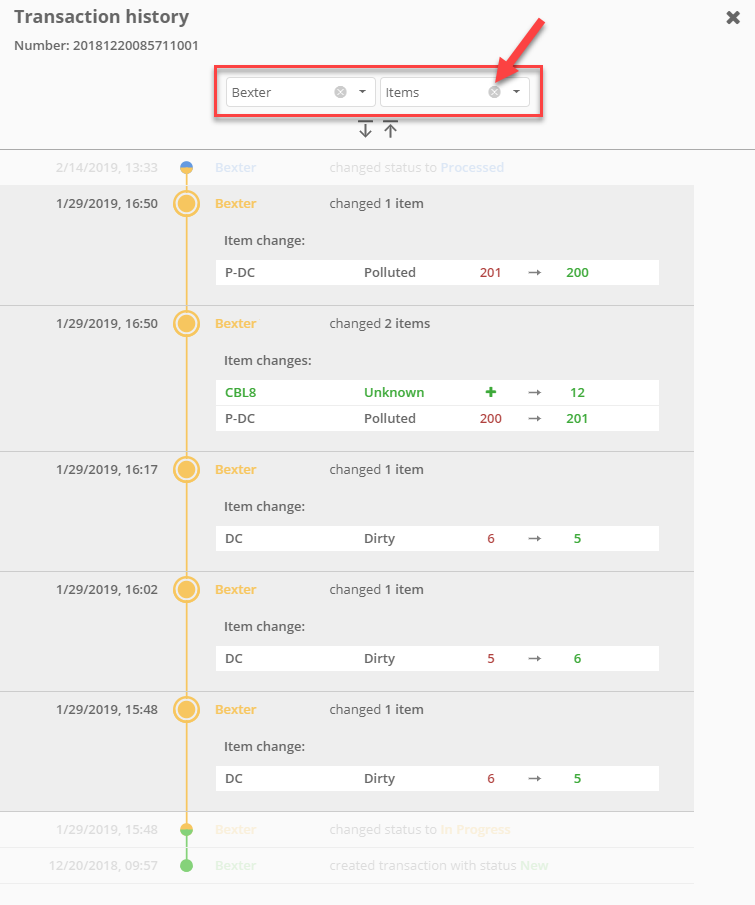
With the first filter you can choose a user. Only changes made by that specific user are visible. The second filter gives you the opportunity to only filter on items. Changes in, for instance the transaction status, will not be visible.
If you want to remove the filter, you can simply do this by clicking on the cross. See the red arrow above.
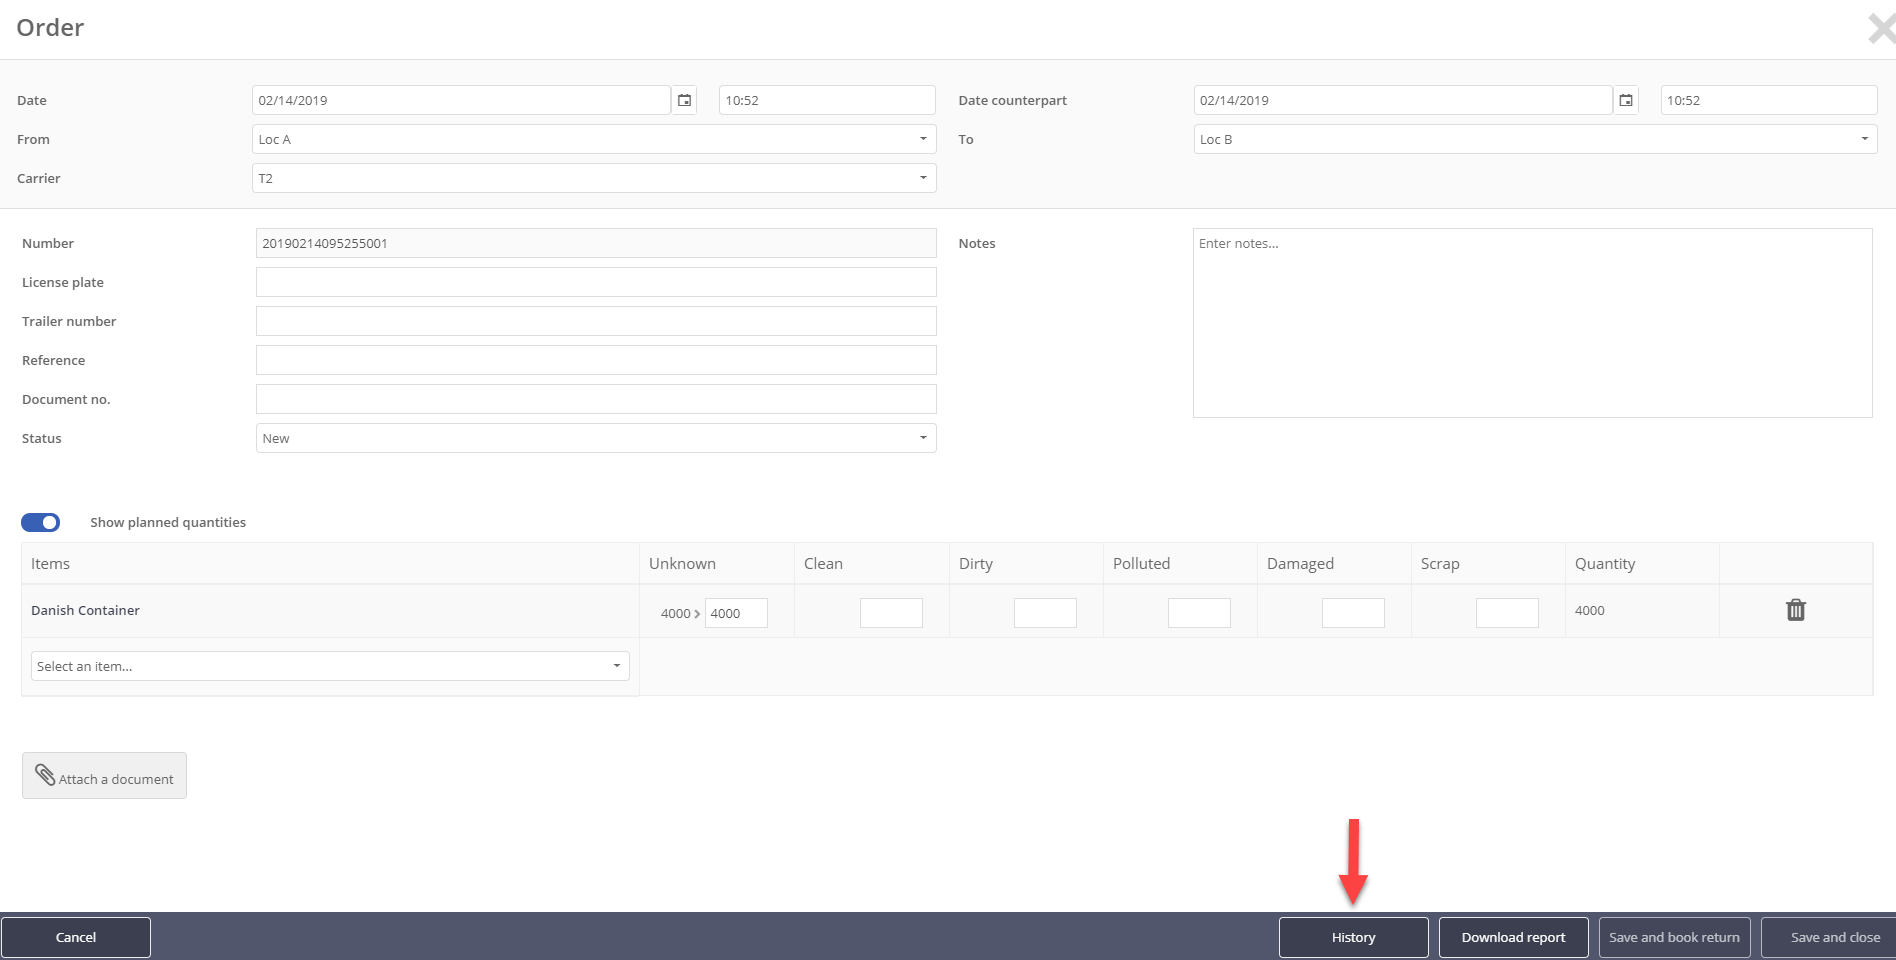
Another way to enter the transaction history window is from the transaction details screen. On the bottom of the screen you see the grey 'History' button, see the image below. Clicking on this button sends you to the same window as described above.
Transaction details history button
Anomaly detection PROPRO+Enterprise
If you have created many transactions over time, there is a chance you will make a typo. This does not only causes confusion and wrong data, but also costs you a lot of time. That is why we decided, to implement 'Anomaly detection'. For instance if you most of the time create a transaction with item A and a quantity of 40, and now because of disctractions or because you are to bussy, your input is 400. This triggers a warning in TrackOnline that tells you that you probably made a mistake. Instead of creating unreliable data, TrackOnline gives you the change to avoid mistakes on time.
 But how does this actually work? In this paragraph we explain a little bit more about this detection method. We also explain why the model is, or is not triggered in your administration and where you can find some information inside of TrackOnline itself.
Background information
Nowadays you read a lot about machine learning, artificial intelligence, algorithms etc. So it will not surprise you that there are a lot of models and ways to choose from. But which of these models and ways are the best for the specific situation? We need to decide which variables do we want to include in the models? How much historic data do we use? And when do we decide if a model is good enough?
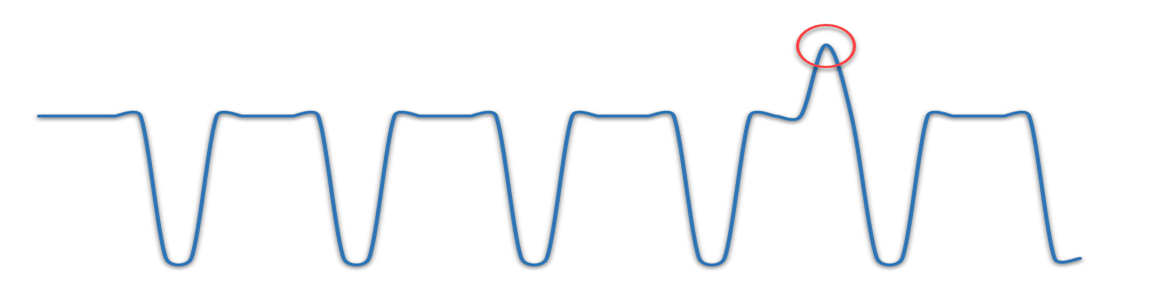
After all the testing the model that we choose to use in TrackOnline is a so-called Decision Tree Regresion model. This model predicts a value based on some decisions. Let me explain this more clearly by using a simplified example.
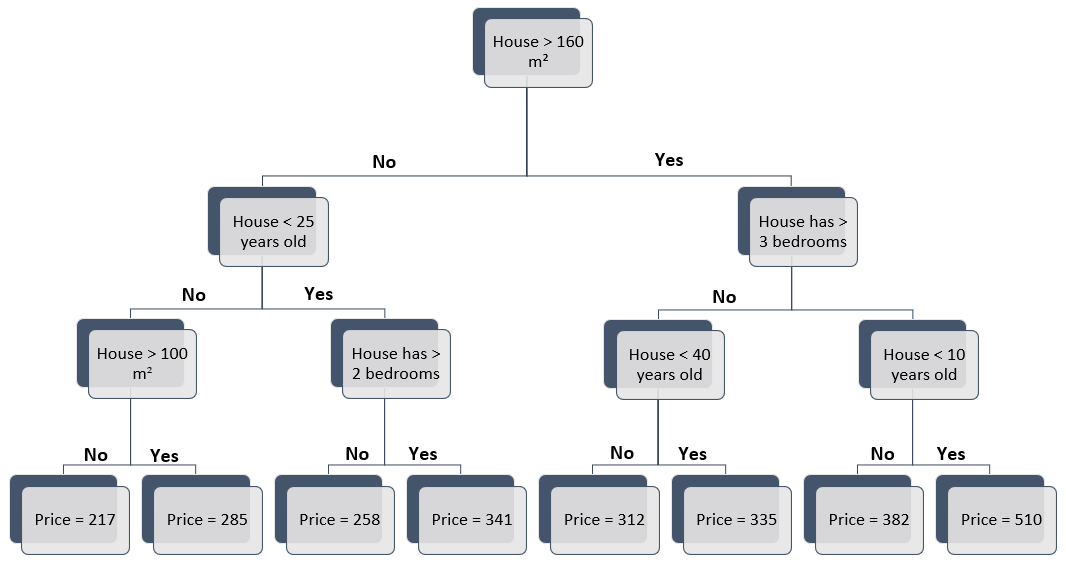
In the image above you see an example of a decision tree to predict the price of a house. The variables that are used here to create a prediction, are the surface of a house, the amount of bedrooms and the age of a house. Based on these variables a decision is made that directs you into one of the branches and further on. Eventually you come at the end of a branch where you find the predicted price of the house. So according to this decision tree, a house larger than 160 square meters, having more than three bedrooms, and built less than 10 years ago would have a predicted price of 510 (thousand USD).
This of course is an over-simplified decision tree, but the principle is kind of the same.
The use in TrackOnline
In TrackOnline we use the following variables in the model to eventually predict the item quantity. These are:
- The combination of the From and To location
- Transactiontype
- Day of the week
- Weeknumber
- Month
- Year
- Itemdefinition
So for instance, if you ALWAYS create a transaction of type Order, from location A to location B, with item C and a quantity of 40, the model will predict a quantity of exactly 40.
I say here specific the word 'ALWAYS' and that is very important. Because if you always do exactly the same thing, the prediction model has an easy job and predicts with 100% certainty the right quantity. However, in most cases this never happens. And that brings us to the subject 'accuracy'.
Accuracy
Because the model can not predict most of the time with a 100% certainty, we calculate a interval around the prediction. This means that if the model predicts a quantity of 40, we tell you as user that the quantity should lay between 35 and 45 (for instance). The width of this interval is depending on the accuracy of the model. In an TrackOnline administration in which only transactions are created with an item quantity of 40, the accuracy of the model is very high. This causes that the prediction interval will be very small.
How more fluctuating your data, how lower the accuracy of the model and how bigger the prediction interval.
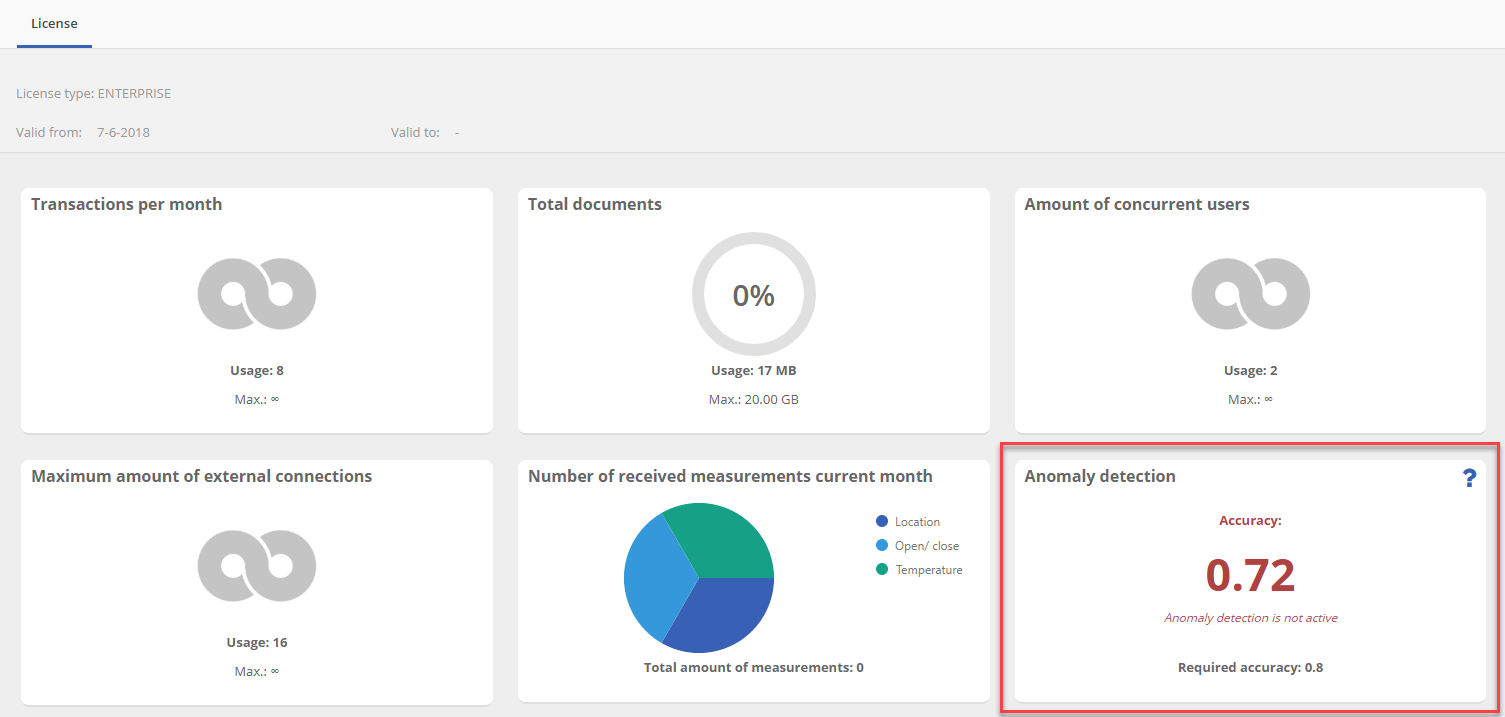
The accuracy is measured as a number between 0 and 1. If the accuracy of the model of your administration is higher than 0.8, the model is active. This means that if an abnormal item quantity is detected when saving a transaction, a pop-up will appear. As shown in the image below.
If you want to know what the accuracy of the model of your administration is, or if you would like to know if the model is active or not, go to configuration menu on the top right of your screen and click on License. Here you find a tile with the anomaly detection model information. See the image below. The model is active if the accuracy value is equal or greater than the required value.
In the image below the accuracy is lower than the required accuracy, so the model is NOT active in this administration.