Base data
Locations
Locations in TrackOnline are the places where you are sending transactions to. Examples of locations can be your own company locations or the locations of your customers/suppliers. When you are sending transactions from and to locations, the locations start to have balances. You can view the balances and transactions of your locations via our reporting tool.
Below we will explain how you can create a location and what details you need to create them in the best possible way. Check also our instruction video about 🎥 Locations.
Create new location
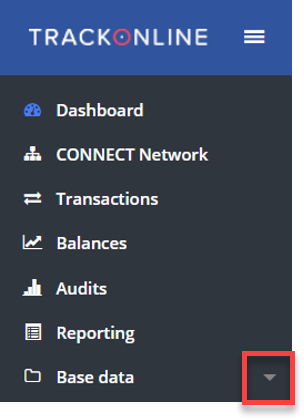
When you want to create a new location in TrackOnline go to 'Base data' and click on the small arrow, as shown in the image 'Base data'.
Base data
Then click on 'Locations' as shown in the image 'Base data locations'.
Base data locations

When you have clicked on 'Locations' you will see the dashboard of your locations. See the image: 'Location dashboard' below.
Location dashboard
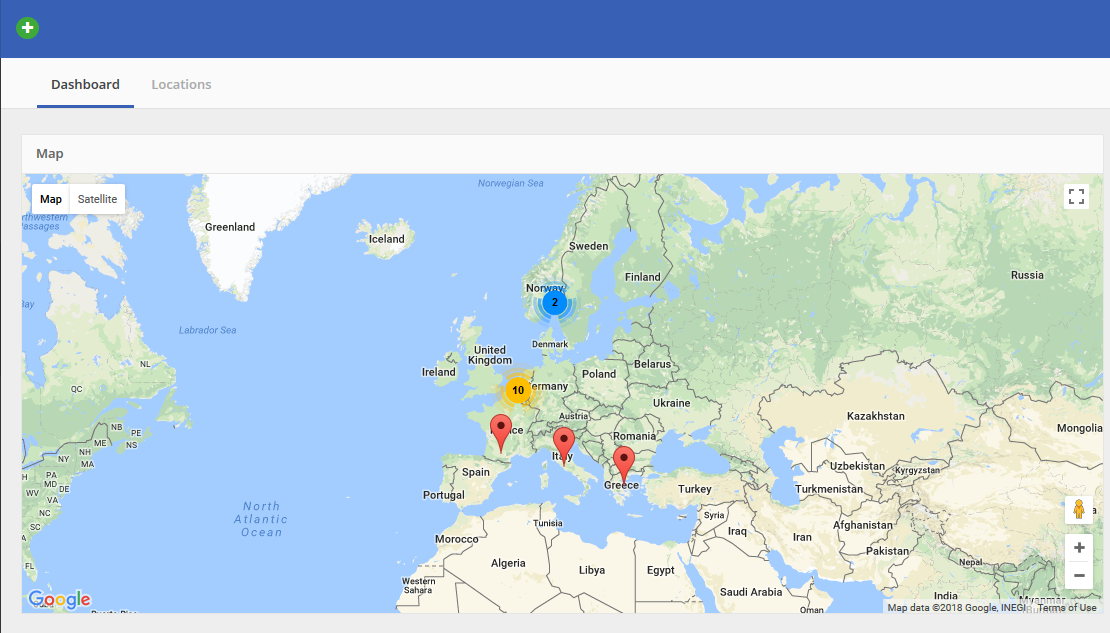
The locations dashboard shows you where your locations are on the map, this allows you to easily navigate to the location in your administration. Also notice that the more you zoom out, locations that are close to each other will cluster, as you can see in the blue and yellow number in the image show you how many locations are in a certain region.
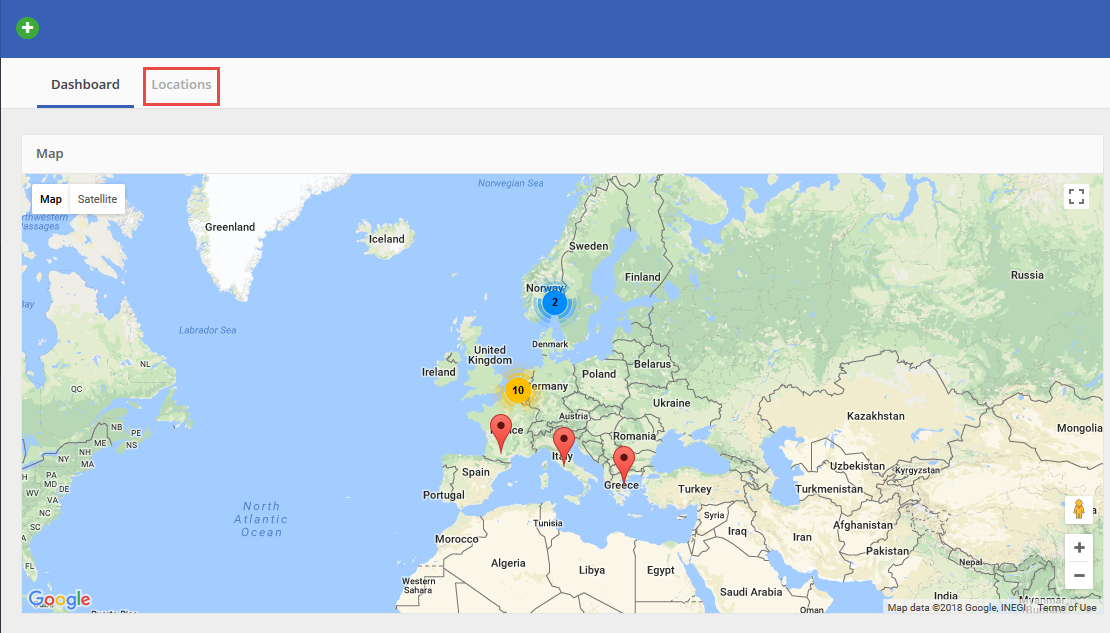
When you want to see a list of your locations you can click on 'Locations', in the red frame, as shown in the image 'Locations dashboard 2'.
Locations dashboard 2
When you have clicked on 'Locations', you will see a list of locations, if you already have locations in your administration, otherwise you will not see any locations yet. See the image below with existing locations.
When you create a new location, you can do that from this screen, see the image: 'Existing locations' below, for an example of a list of existing locations.
Existing locations
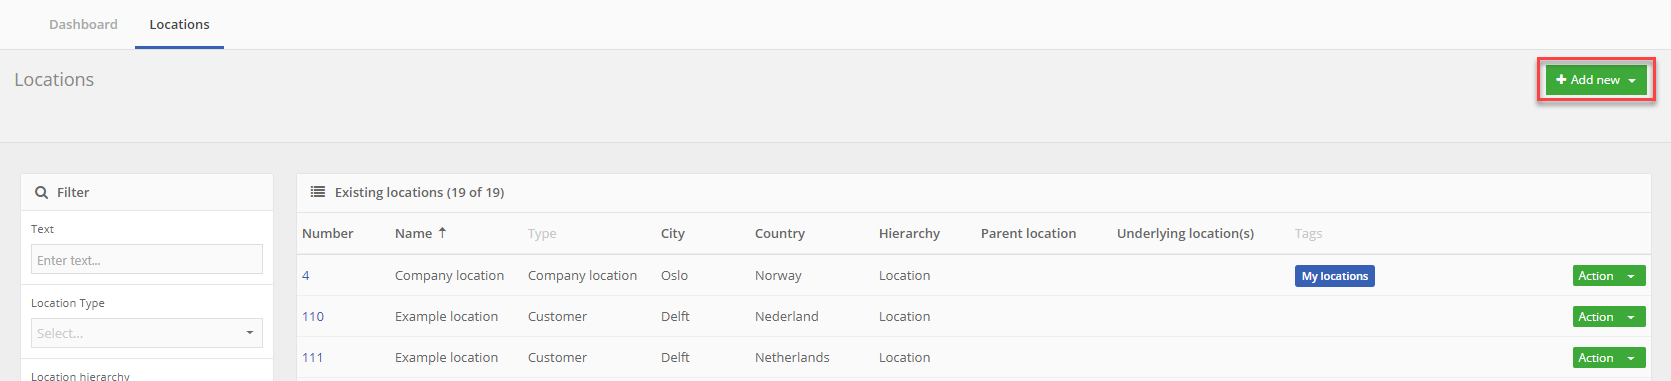
To create a new location, click on the green button '+ Add new', as shown in the red frame. You can choose what kind of location you want to add. In this example there are the options 'Branch office' or 'Location', see the image below (ℹ️ for more information about location settings, click HERE).
Add new button

You will see the following screen.
Detail screen new location
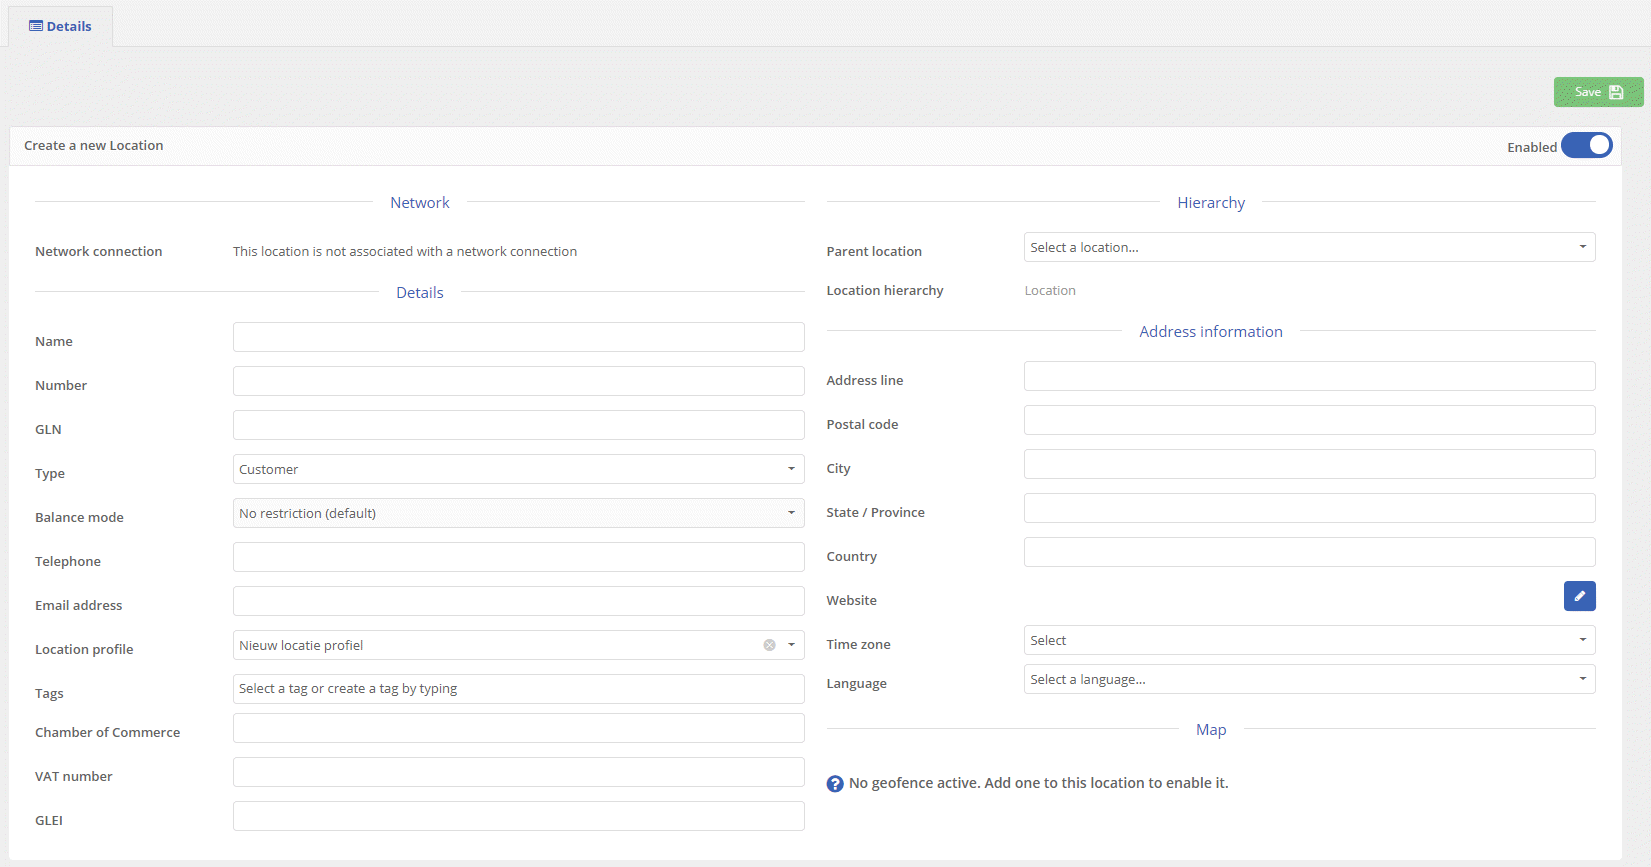
The location detail screen is divided in four sub-headers:
NetworkDetailsHierarchyAddress information
Below we explain these categories in more detail.
1. Network
If the location is part of a connection, it's shown here. You will see the name of the connection, which links you to the right connection when you click on it.
2. Details
Here we are within the location header: 'Details'. In this header you can fill in the details information about the location. Details consists out of multiple fields, every field will be described and explained in short below.
- Name: Is used for the name of a location. For example: 'Company X'
- Number: Is used to identify the location with a number and to filter this location within the filters, you can change this number at any time.
- GLN: Global Location Number. This number is used to identify an unique location.
- Type: Here you can select the type of location. This way you can identify your customers and your own locations more easily.
- Balance mode: Here you can set the balance mode of the location. You can choose:
No restriction (default): The default situation. The location can have balance.Exchange only: The location can only be used in transactions of type 'Exchange'.No balance increasement: The location can NOT have a balance. This means that when you create a transaction in which the 'To-location' is the current location, you will get a message that this is not possible. You can use this option for instance when a location has outstanding bills or an outstanding balance.
- Telephone: Here you can enter the phone number of the company.
- Email address: Here you can enter the email address of the company.
- Location profile: Here you can attach a location profile to this location. A location profile consists out of custom created:
- Workdays
- Holidays
- Item configurations
ℹ️ More information about location profiles can be found HERE.
- Tags: Tags allow you to group several locations, in order to filter locations based on the tag you created. To create a tag, simply enter a tag of your choice and then press enter in the tag field.
Example
You can give several locations the same tag, that way you can filter them easily and even run reports based on those tags. See the image below to get an indication how tags work. In this example we have created the tag 'Customer' but this can be anything of your choice.

- Chamber of Commerce: Here you can enter the number of the chamber of commerce of this customer/location.
- VAT number: Enter the VAT number of your customer here, for billing purposes.
- GLEI: This is the Global Location Entity Identification number.
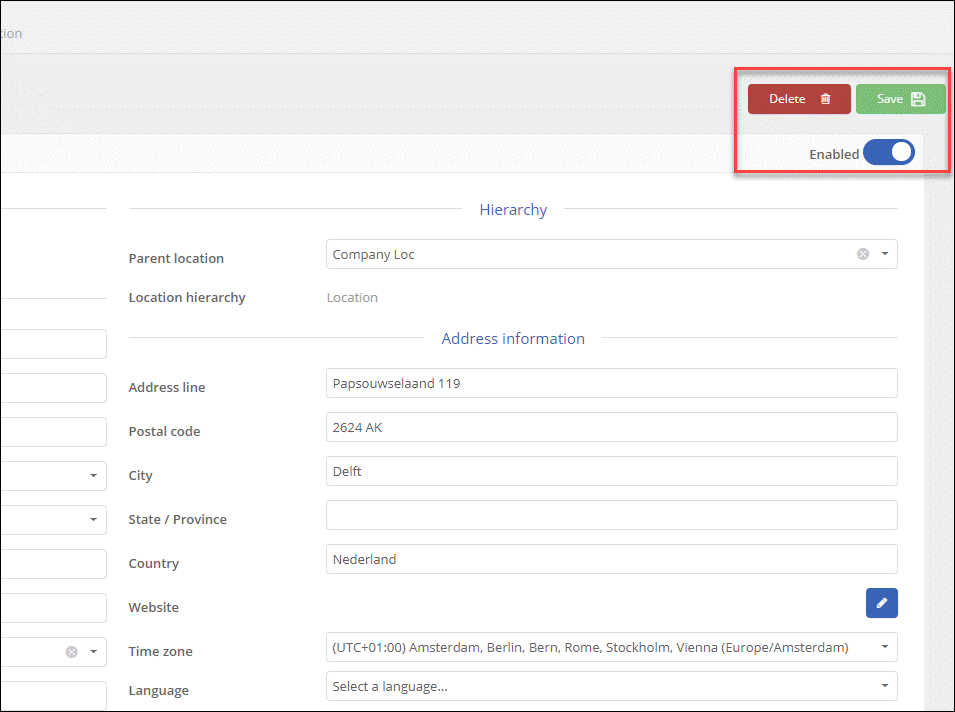
3. Hierarchy
If the location is part of a location network, here you can see the type of location or select the parent location.
- Parent location: Here you can select a parent location. This is the head location in the hierarchy.
- Location hierarchy: This is the type of location that you have chosen when you clicked on the 'Add new' location button.
4. Address information
In this part you can fill in the address information of the location. Below we explain the meaning of each field.
- Address line: Here you can enter the street name and number of this location.
- Postal code: Here you can enter the postal code of this location.
- City: Here you can enter the city, where the location is.
- State/Province: Here you can enter the state/province, where the location is (optional).
- Country: Here you can enter the country, where the location is.
- Website: Here you can enter the website of the location. For instance if the location is company 'Bexter' you can enter the website of Bexter: https://www.bexter.nl/
- Time zone: Here you can enter the time zone for this specific location, in order to make sure the transit times are processed correctly.
- Language: Here you can select a language for this specific location, in order to know in which language you need to communicate with your customer.
Note:
The language of the location is also used when you are sending reports to this customer. The customer receives the report in the chosen language.
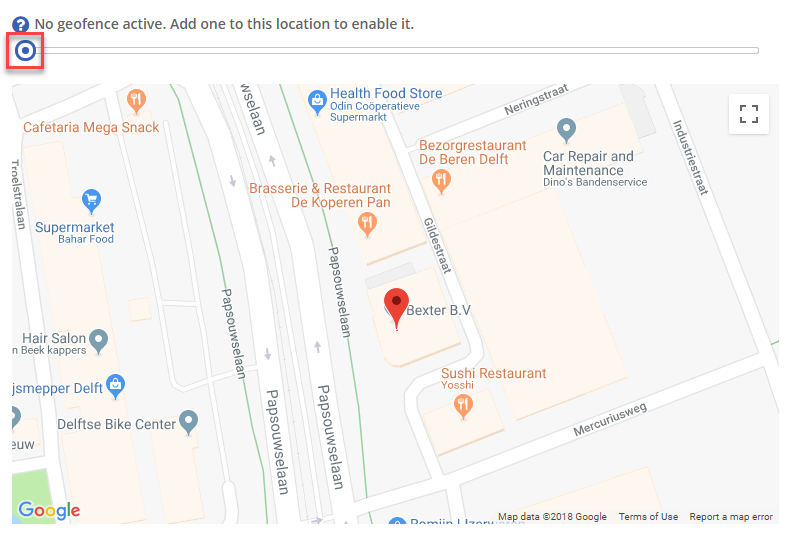
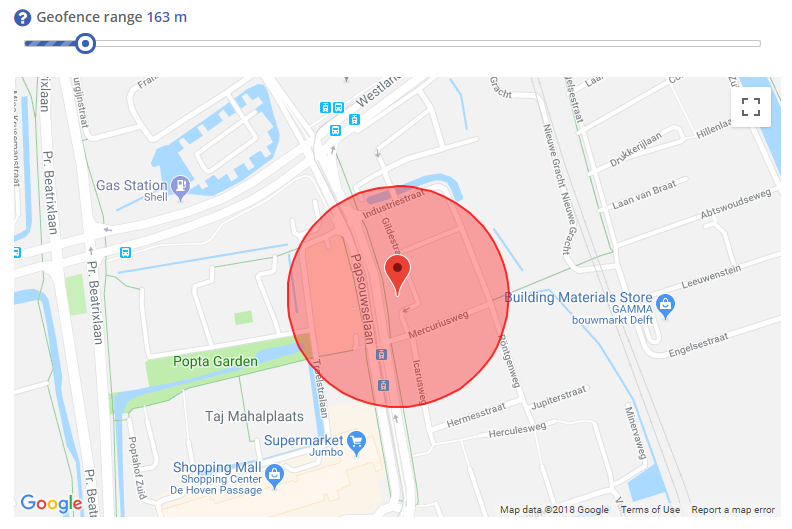
When you have entered all the information for this location, the location will become visible on the map. Above this map you can add a geofence to the location (optional). By moving the slider (see red frame) to the right, the range of the geofence can be set. The setting of the range is shown in the images below.
Detailscreen geofence - Inactive
Detailscreen geofence - Active
Next, to save your changes, click on the  button, on the top right of the screen.
Start balance
When you have clicked on 'Save', TrackOnline will ask you the following question, see the image 'Create a start balance' below.
Create start balance
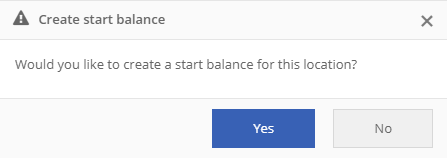
- Select
No, if you do not want to add a start balance (no further action required, go to the next chapter). - Select
Yes, if you want to select a start balance.
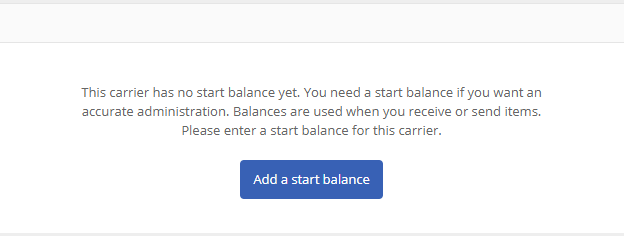
If you select Yes, the following message will be visible, see image: 'Add a start balance'.
Add start balance
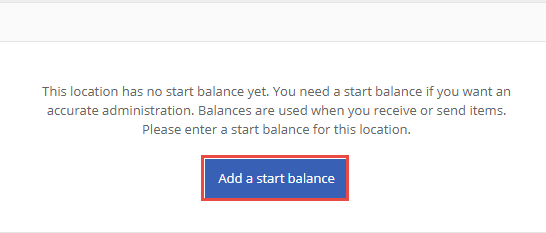
Click on the blue button 'Add a start balance'. Now you see the following screen, where you can select items and quantity. See the image below.
Location-tab: Start balance
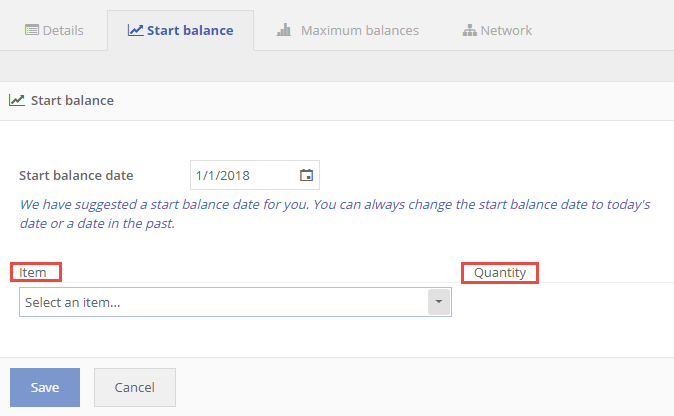
Choose the item(s) that you want to add a start balance for and enter the quantity and then click on the  button.
After you have clicked on 'Save' the image below could be an example how a simple start balance could look like for your new location.
Example start balance

Now you are done with adding your start balance.
Maximum balances
When we continue to 'Maximum balances' you will see the following screen: 'Location-tab: Maximum balances'.
Location-tab: Maximum balances
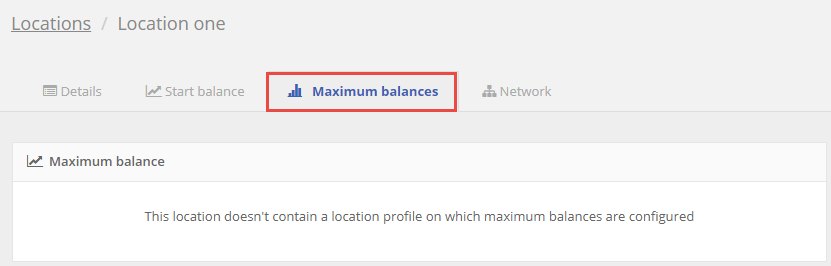
A maximum balance should be configured via location profile.
ℹ️ For more information about location profiles, click HERE.
Network
When we continue to 'Network' you have the ability to add a network of locations to your location. See the image 'Location-tab: Network'
This feature is used for instance when you are using the Customer Portal (ℹ️ click HERE for more info about the Customer Portal). A network of locations, means that when you are in a custom screen of the customer portal, a user can only make transactions with the locations in that network, when the original location is used as the 'from' location. See the customer portal for more details.
Location Network
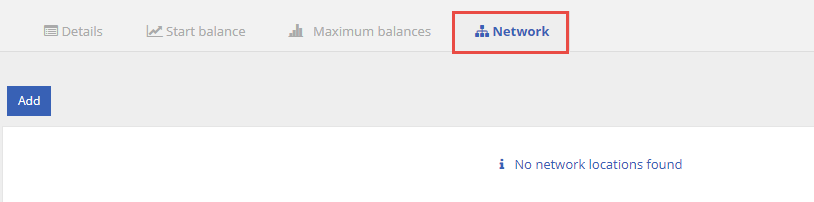
To add a network to this location, click on  .
.
When you click on 'Add' you will see the following screen (below), where you can select a location, to add to the network of the original location. You can select every type of location and carrier that is available in your administration to add to the network. See the image 'Add a network'.
Add a network
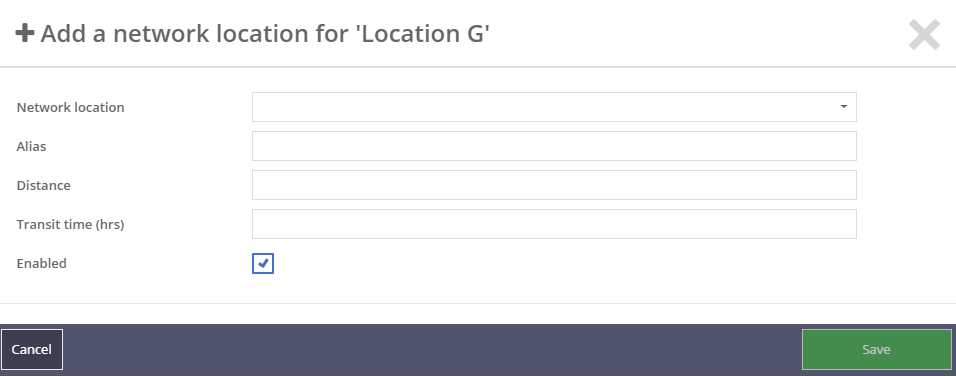
- Network location: Here you can select every type of location and carrier available in your TrackOnline administration, in order to add this location/carrier to your network;
- Alias: Here you can enter a personalized name for this location;
- Distance: Here you can enter the distance between the original and the selected location of the network;
- Transit time (hrs): Here you can enter the transit time in hours. By adding the transit time, your balance will be updated after the transit time of your transaction has expired;
- Enabled: When selected, the location/carrier is visible in your network.
Automation
When clicking on the automation tab, you will be able to access advanced features considering balances.
Transfer balance
The first tile is Transfer Balance. This will allow you to automatically transfer the balance of the current location to any other carrier or location you want.
To add a balance transfer, click on  . This is what you get.
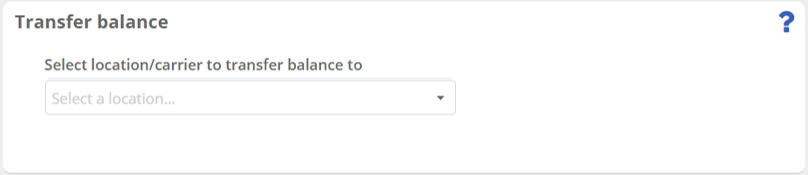
You can now select whatever carrier or location you want in the list in order to automatically transfer the balance the current location to this selected location or carrier.
Other transfer rules
When this carrier is used in automation rules defined somewhere else, they will show up in this tile.
Delete/Disable location
Under some circumstances, it's possible to delete a location. You can do this from the location detail window. There click on the red 'Delete' button on the top right of the screen.
Note!
Deleting a location is ONLY possible when the location does not have a balance.
If the location does have a balance, deleting would impact the balance of other locations and carriers as well. Therefore it cannot be removed from the administration.
Another option then is to disable the location. This is also available from the location detail window. On the top right of the screen you will find the switch to enable or disable the location. See the image below.
When the location is disabled, it is not possible anymore to use the location in transactions or for data sharing.
Delete/Disable location
Merge locations
Merging locations can be useful, when your TrackOnline has multiple external connections. In some cases this can be the situation that you have two locations, that both refer to one and the same location. In this case, you want to merge locations.
Another situation when you would want to merge locations, is when a physical location actually merges with another location, to one geographical location. Or when a transaction flow moves from one location (in your TrackOnline), to another location (in your TrackOnline), which would make one of the two locations redundant, since the transactions and balances are now taken care of by another location.
How to merge a location
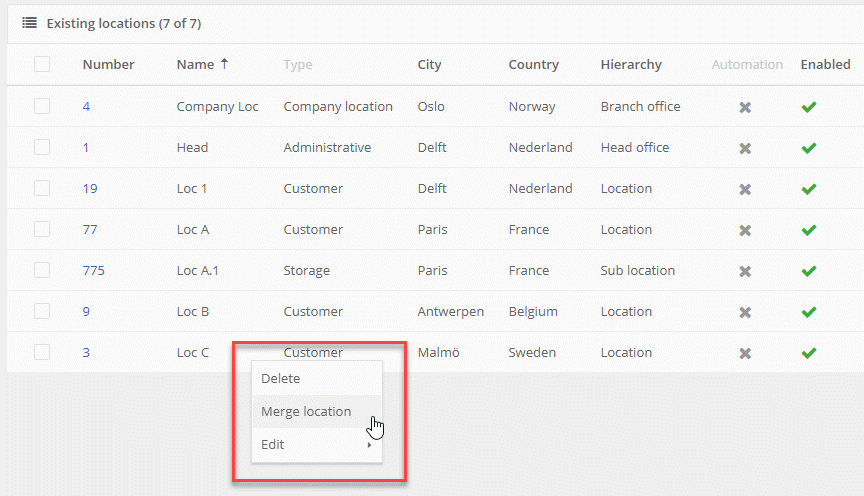
To merge two locations, click on the action button of the location you do not need anymore (since the name and balance of this location will be merged with another location). See the image: 'Action button merge locations'
Menu: Merge location
The locations that are going to be merged, are shown in the image 'Two locations to merge'. In this case, we want to merge 'Location Two' into 'Location One' since they refer to the same location in TrackOnline.
Two locations to merge

As the image 'Two locations to merge' shows, Location One is highlighted with the red frame. This is to indicate that Location One will remain, after we merge the locations together.
After we have clicked on 'Merge location' as shown in the image 'Menu: Merge location', you will see the following pop-up screen 'Merging locations tool' as shown below.
Merging locations tool
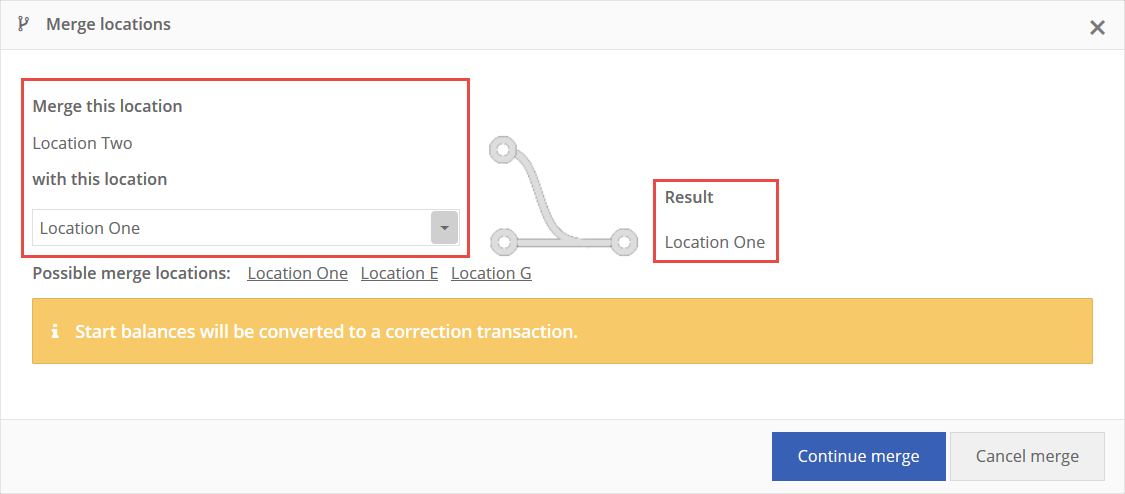
The red frame on the left of the image 'Merging locations tool', shows the flow of the two locations that are going to be merged, you can also note that the result will be 'Location One' as the merged location of locations one and two.
Note:
Start balances will be converted to a correction transaction.
This means that the balance that a location had, in this case 'Location Two', will automatically be transferred to Locations One, in the form of a correction transaction.
Example: If location Two had 10 crates and location One had 20 crates. Then after the merge location One will have 30 crates.
When you click on the blue button 'Continue merge', then the locations, as shown in the image will be merged. You will see a confirmation message in your screen, as shown in the image: 'Confirmation of merging' below.
Confirmation of merging
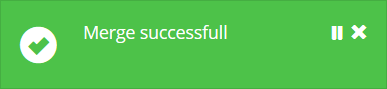
This message means that the locations have merged successfully. Now only 'Location One' remains, as shown in the image: 'Location One merge result' below.
Location One merge result

Carriers
Carriers in TrackOnline work similar to locations, with the exception that carriers are the ones that are transporting a transaction between locations. It is also possible to send a transaction to a carrier.
Note:
If you send a transaction from or to a carrier, the carrier will also build up a balance.
Create new carrier
When you want to create a new carrier (=transporter) in TrackOnline, go to 'Base data' and click on the small arrow, as shown here below in the image: 'Base data'.
Base data
Then click on 'Carriers' as shown in the image 'Base data: Carriers'.
Base data: Carriers

When you have clicked on 'Carriers' you will see the overview/list with carriers. As shown in the image below: 'Carrier overview'.
Carrier overview
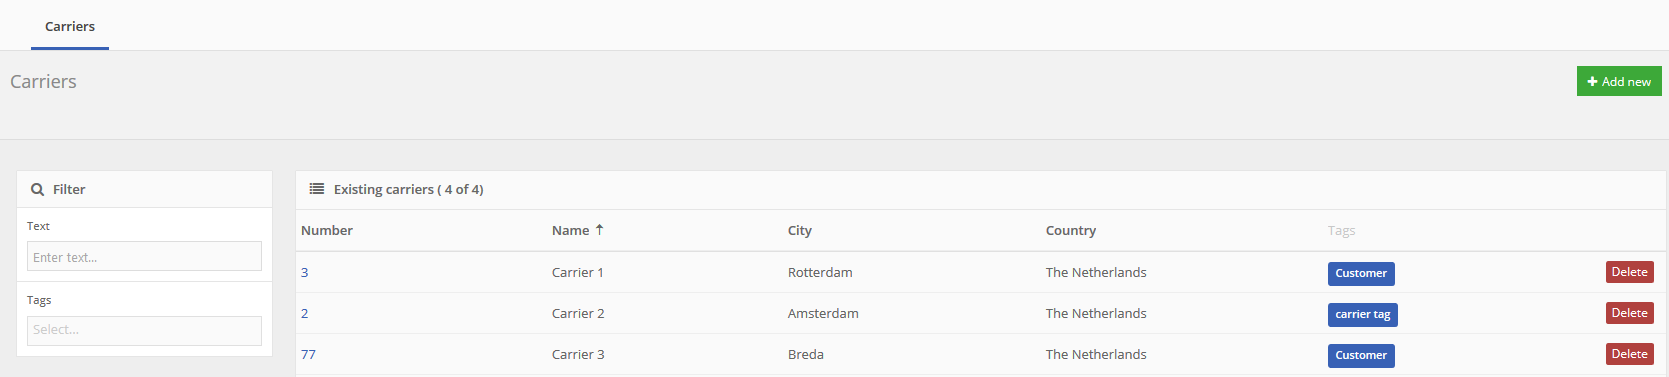
As shown in the image 'Carrier overview', you can see that there are already several carriers in this example. When you start with a new administration, you will not see any carriers here, since none have been created yet. To create a new carrier, or add one more to your existing list of carriers, you can click on the green button on the top right of the screen, as shown in the image 'Carrier overview'.
To create a new carrier, click on the '+ Add new' button. Now you a window similar to the image 'Carrier detail screen' shown below.
Carrier detail screen
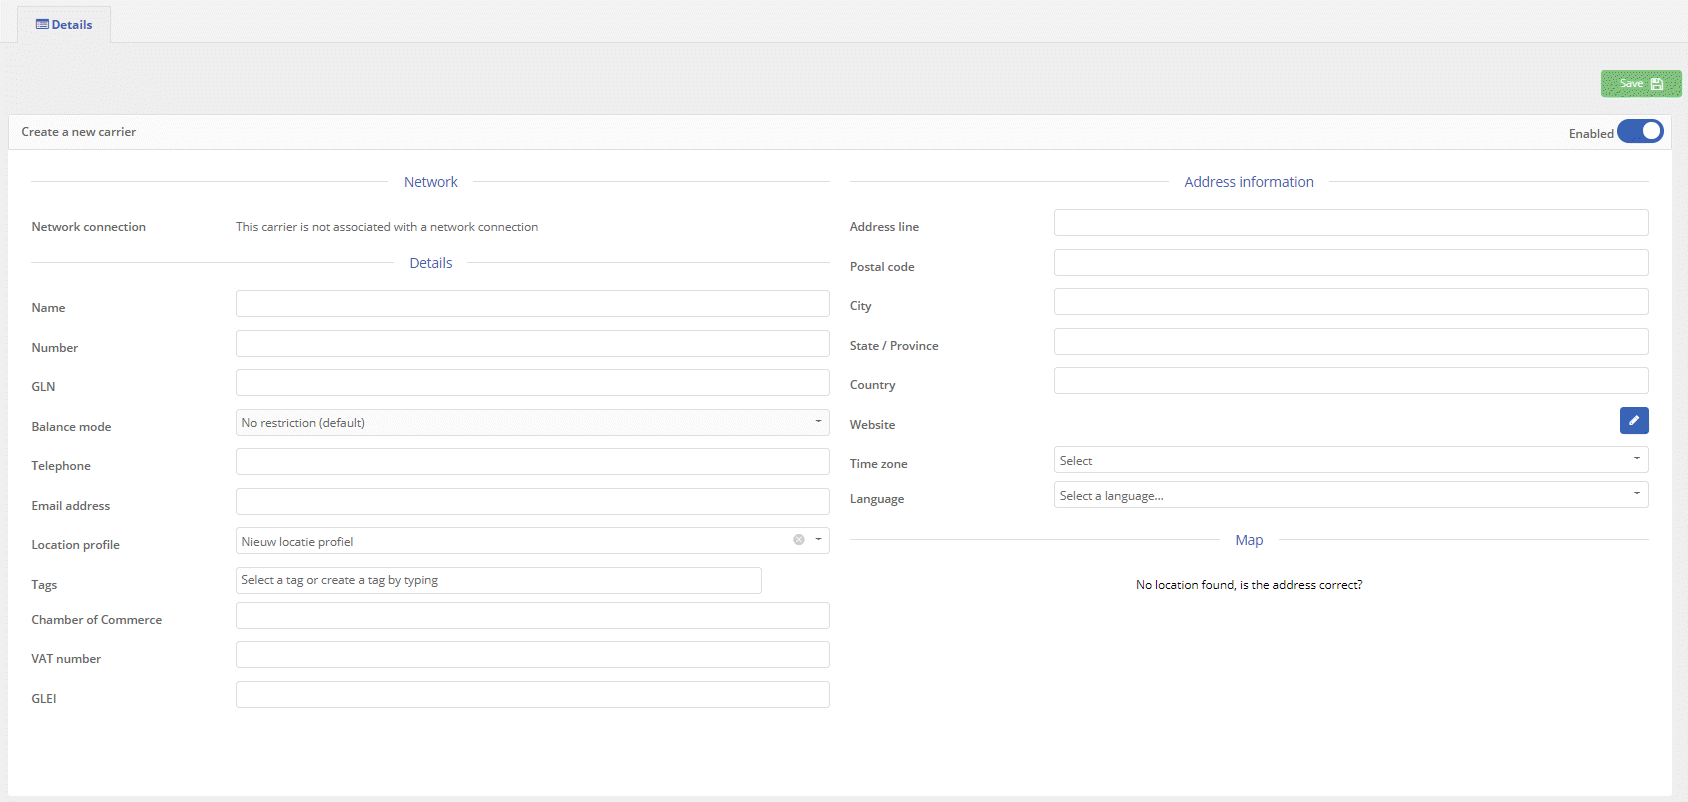
The location detail screen is divided in three sub-headers:
NetworkDetailsAddress information
Below we explain these category's in more detail.
1. Network
If the carrier is part of a connection, it's shown here. You will see the name of the connection, which links you to the right connection when you click on it.
2. Details
- Name: Here you can enter the name of the carrier;
- Number: Here you can enter the number of your carrier;
- GLN: Global Location Number;
- Balance mode: Here you can set the balance mode of the carrier. You can choose:
No restriction (default): The default situation. The carrier can have balance.Exchange only: The carrier can only be used in transactions of type 'Exchange'.No balance increasement: The carrier can NOT have a balance. This means that when you create a transaction in which the 'To-location' is the current carrier, you will get a message that this is not possible. You can use this option for instance when a carrier has outstanding bills or an outstanding balance.
- Telephone: Here you can enter the telephone number of this carrier;
- Email address: Here you can enter the email address of this carrier;
- Location profile: Here you can add a location profile to this Carrier. A location profile consists out of custom:
- Workdays
- Holidays
- Item configurations
ℹ️ Click HERE for more information about location profiles.
- Tags: Tags allow you to group several carriers, in order to filter carriers, based on the tag you created. To create a tag, simply enter a tag of your choosing, then press enter in the tag field.
Example
You can give several carriers the same tag, that way you can filter them easily and even run reports based on those tags. See the image below to get an indication how tags work. In this example we have created the tag 'Customer' but this can be anything of your choice.
:::
- Chamber of commerce: Here you can enter the number of the chamber of commerce;
- VAT number: Here you can enter the VAT number of your carrier;
- GLEI: Here you can enter the Global Location Entity Identification.
3. Address information
Here you can enter the address information of the carrier.
- Address line: Here you can enter the address line of this carrier.
- Postal code: Here you can enter the postal code of this carrier.
- City: Here you can enter the city where the carrier is.
- State/Province: Here you can enter the state/province.
- Country: Here you can select the country for this carrier.
- Website: Here you can enter the website of the carrier. For instance if the carrier is from the company 'Bexter' you can enter the website of Bexter: https://www.bexter.nl/.
- Time zone: Here you can select the time zone for this carrier.
- Language: Here you can select a language for this specific carrier, in order to know in which language you need to communicate with your customer.
Note:
The language of the carrier is also used when you are sending reports to this customer. The customer receives the report in the chosen language.
When all information has been entered, the carrier will be visible on the map on the bottom right. You can now save the information by clicking on the button.
Start balance
When you have clicked on 'Save', TrackOnline will ask you the following question, see the image 'Create a start balance' below.
Create start balance

- Select
No, if you do not want to add a start balance (no further action required, go to the next paragraph). - Select
Yes, if you want to select a start balance.
If you select Yes, the following message will be shown, see image: 'Add start balance'.
Add start balance
Click on the blue button 'Add a start balance'. Now you see the following screen, where you can select items and quantity. See the image 'Carrier-tab: Start balance'
Carrier-tab: Start balance
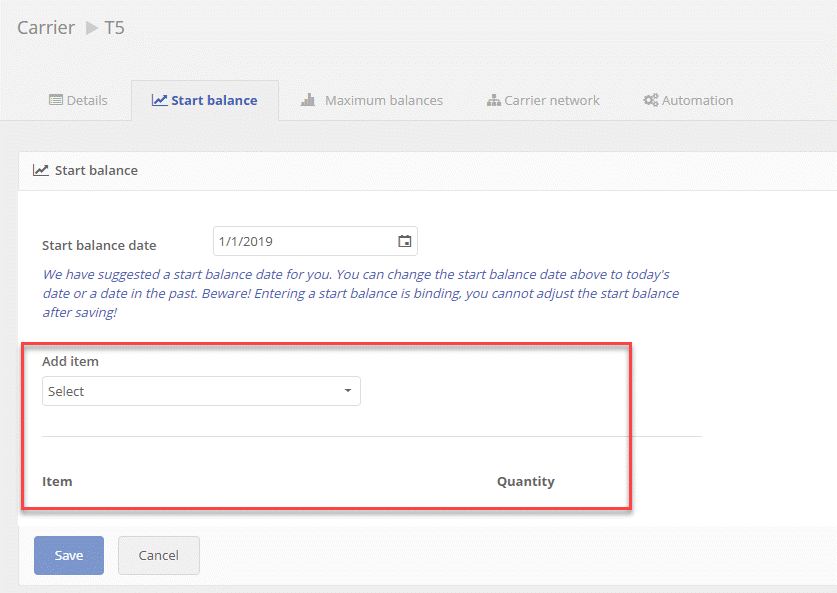
Choose the item(s) that you want to add a start balance for and enter the quantity and then click on the button.
After you have clicked on 'Save' the image below could be an example of how a simple start balance could look like for your new location.
Example start balance
Now you are done with adding your start balances.
Maximum balances
When we continue to 'Maximum balances' you will see the following screen: 'Carrier-tab: Maximum balances'.
Carrier-tab: Maximum balances
A maximum balance should be configured via location profile.
ℹ️ For more information about location profiles, click HERE.
Network
When we continue to 'Network' you have the ability to add a network of carriers or locations to your carrier. See the image 'Carrier-tab: Network'
This feature is used for instance when you are using the Customer Portal (ℹ️ click HERE for more info about the Customer Portal). A network of locations and carriers, means that when you are in a custom screen of the customer portal, a user can only make transactions with the locations or carriers in that network, when the original carrier is used as the 'from' location. See the customer portal for more details.
Carrier-tab: Network
To add a network to this carrier, click on .
When you click on 'Add' you will see the following screen (below), where you can select a location or carrier, to add to the network of the original carrier. You can select every type of location and carrier that is available in your administration to add to the network. See the image 'Add a network'.
Add a network
- Network location: Here you can select every type of location and carrier available in your TrackOnline administration, in order to add this location/carrier to your network;
- Alias: Here you can enter a personalized name for this location;
- Distance: Here you can enter the distance between the original and the selected location/carrier of the network;
- Transit time (hrs): Here you can enter the transit time in hours. By adding the transit time, your balance will be updated after the transit time of your transaction has expired;
- Enabled: When selected, the location/carrier is visible in your network.
Automation
When clicking on the automation tab, you will be able to access advanced features considering balances.
Transfer balance
The first tile is Transfer Balance. This will allow you to automatically transfer the balance of the current carrier to any other carrier or location you want.
To add a balance transfer, click on . This is what you get.
You can now select whatever carrier or location you want in the list in order to automatically transfer the balance of the current carrier this location or carrier.
Transfer balance to carrier
This setting will make the carrier responsible for balance when it is used in a transaction. An automatically created transaction will transfer the balance from the 'to location' to the carrier.
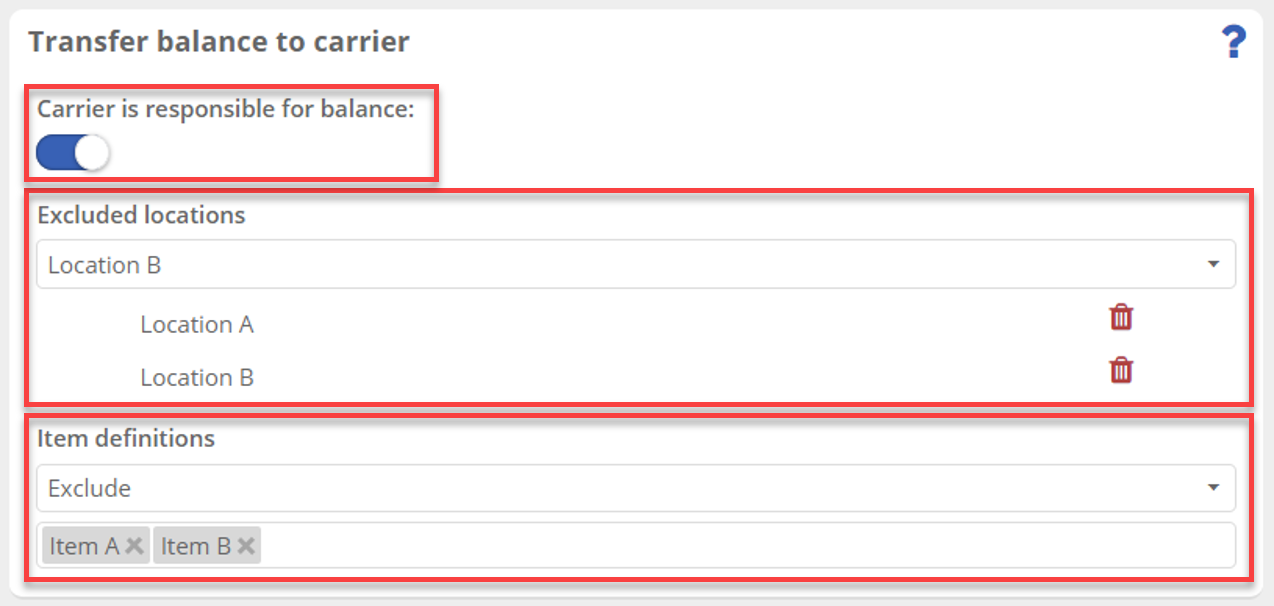
Furthermore, you can exclude locations from automatically transferring their balance to the carrier by selecting the locations under Excluded locations. You can also exclude items just below under Item definitions when choosing Exclude from the list and by adding items. If you want to build a whitelist instead, you can choose Include and add items as well.
Other transfer rules
When this carrier is used in automation rules defined somewhere else, they will show up in this tile.
Delete/Disable carrier
Under some circumstances, it's possible to delete a carrier. You can do this from the carrier detail window. There click on the red 'Delete' button on the top right of the screen.
Note!
Deleting a carrier is ONLY possible when the carrier does not have a balance.
If the carrier does have a balance, deleting would impact the balance of other locations and carriers as well. Therefor it cannot be removed from the administration.
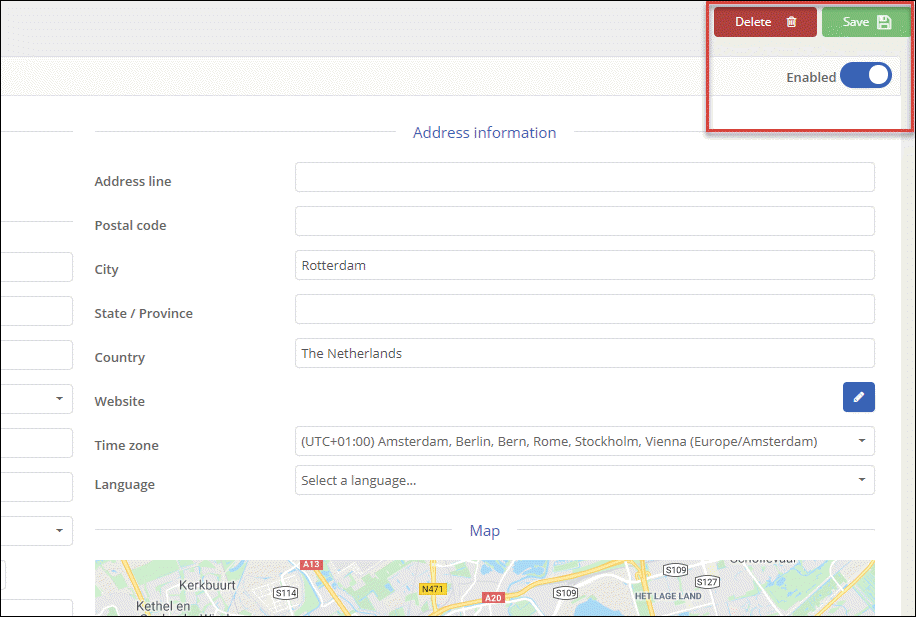
Another option then is to disable the carrier. This is also available from the carrier detail window. On the top right of the screen you will find the switch to enable or disable the carrier. See the image below.
When the carrier is disabled, it is not possible anymore to use the carrier in transactions or for data sharing.
Delete/Disable carrier
Merge carriers
Merging carriers can be useful, when your TrackOnline has multiple external connections. In some cases this can be the situation that you have two carriers, that both refer to one and the same carrier. In this case, you want to merge carriers.
Another situation when you would want to merge carriers, is when a physical carrier actually merges with another carrier, to one geographical carrier. Or when a transaction flow moves from one carrier (in your TrackOnline), to another carrier (in your TrackOnline), which would make one of the two carriers redundant, since the transactions and balances are now taken care of by another carrier.
How to merge a carrier
To merge two carriers, click with the right mouse button on the carrier you do not need anymore (since the name and balance of this carrier will be merged with another carrier). See the image: 'Menu: merge carriers'
Menu: merge carriers
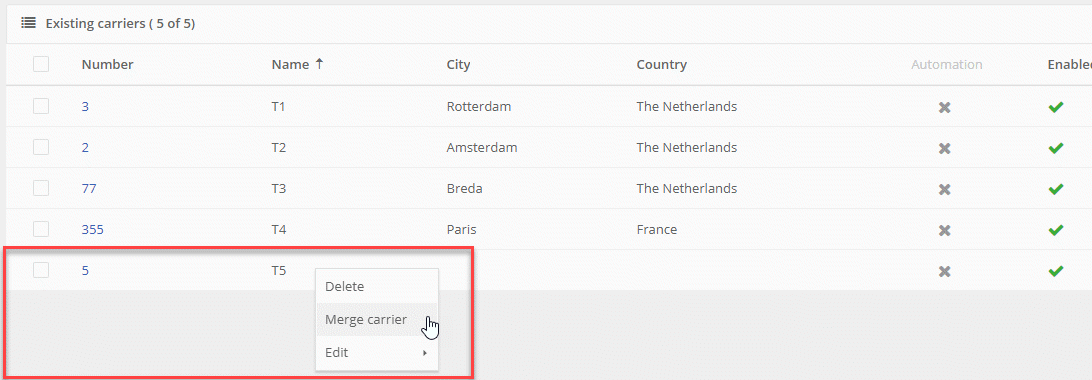
The carriers that we are going to merge, are carrier T5 with T3 since they refer to the same carrier in TrackOnline. Carrier T3 will remain after we merge the carriers together.
After we have clicked on 'Merge carrier', you will see the following pop-up screen 'Merging carriers tool' as shown below.
Merging carriers tool
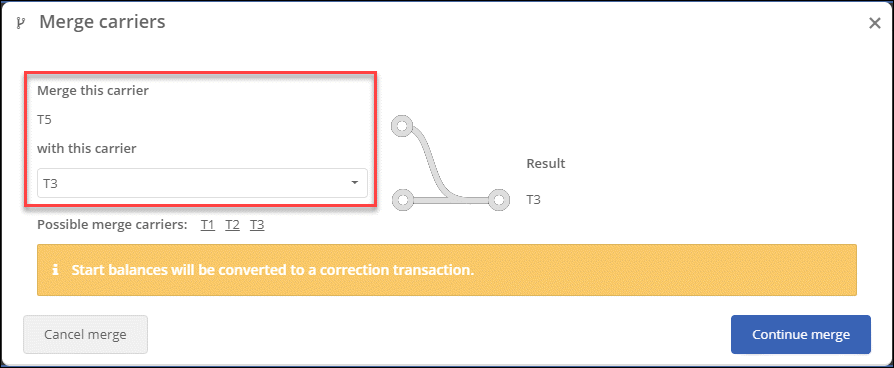
The red frame on the left of the image 'Merging carriers tool', shows the flow of the two carriers that are going to be merged. You can also note that the result will be carrier T3 as the merged carrier of carrier T5 and T3.
Note:
Start balances will be converted to a correction transaction.
This means that the balance that a carrier had, in this case carrier 'T5', will automatically be transferred to carrier 'T3', in the form of a correction transaction.
Example: If carrier T5 had 10 crates and carrier T3 had 20 crates. Then after the merge carrier T3 will have 30 crates.
When you click on the blue button 'Continue merge', then the carriers as shown in the image, will be merged. You will see a confirmation message in your screen, as shown in the image: 'Confirmation of merging' below.
Confirmation of merging
This message means that the carriers have merged successfully. Now only carrier T3 remains.
Items
Items in TrackOnline are the subject of every transaction. Items can be any type of returnable transport item (RTI). Examples of RTI's are:
- Pallets
- Containers
- Trolleys
- And so on...
Check also our instruction video about 🎥 Items.
Items overview
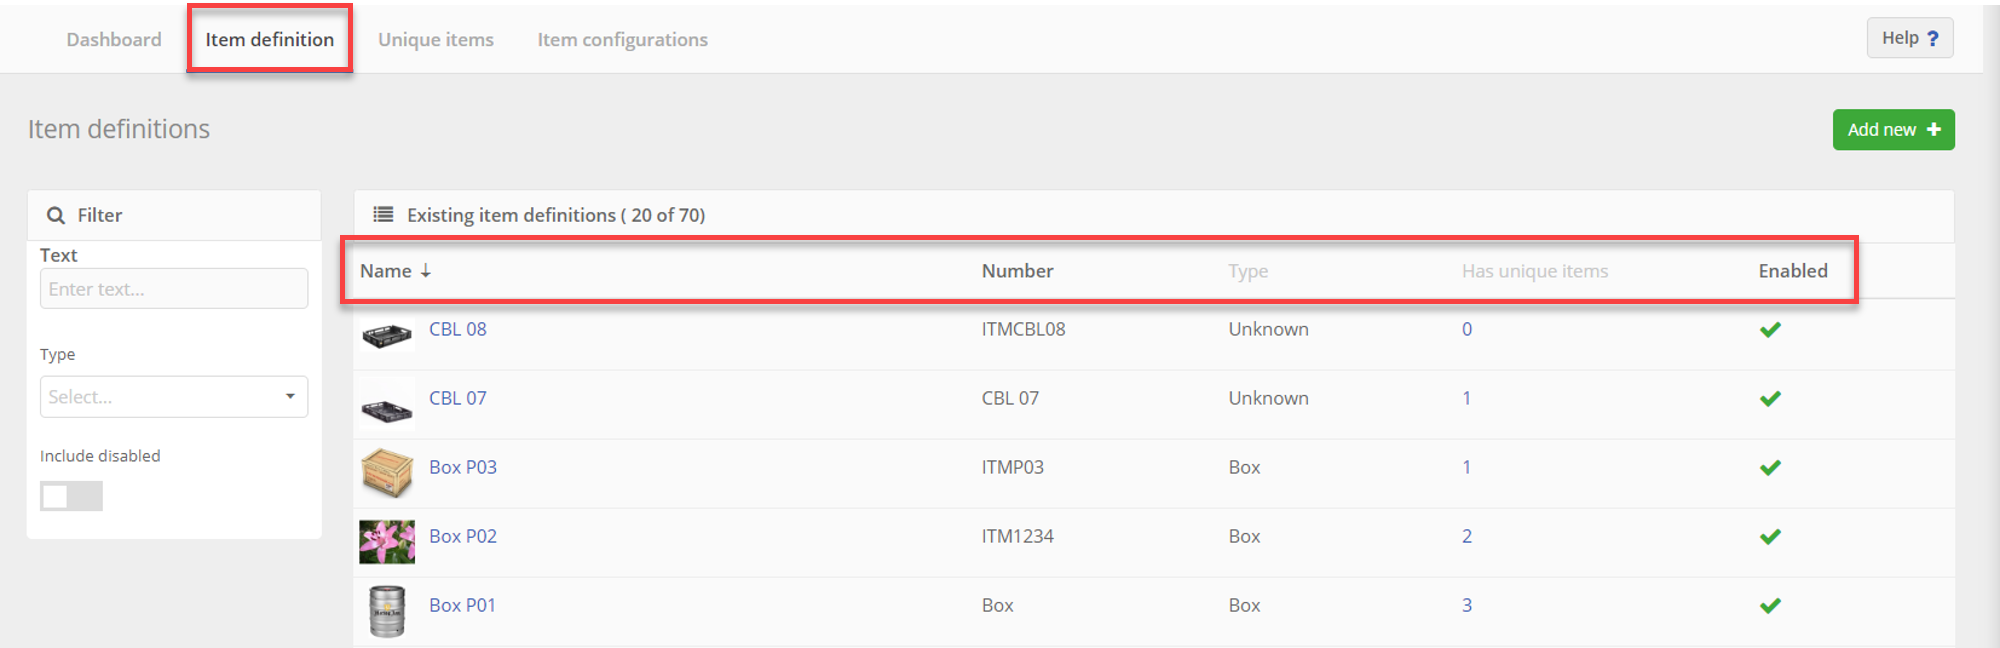
If you want to see an overview of the items, go to 'Base data' on the left side of the screen and click on 'Items', as shown here below.
Base data: Items
When you have clicked on 'Items', you will see the item dashboard first, as shown in the image below 'Items dashboard empty'.
Items dashboard empty
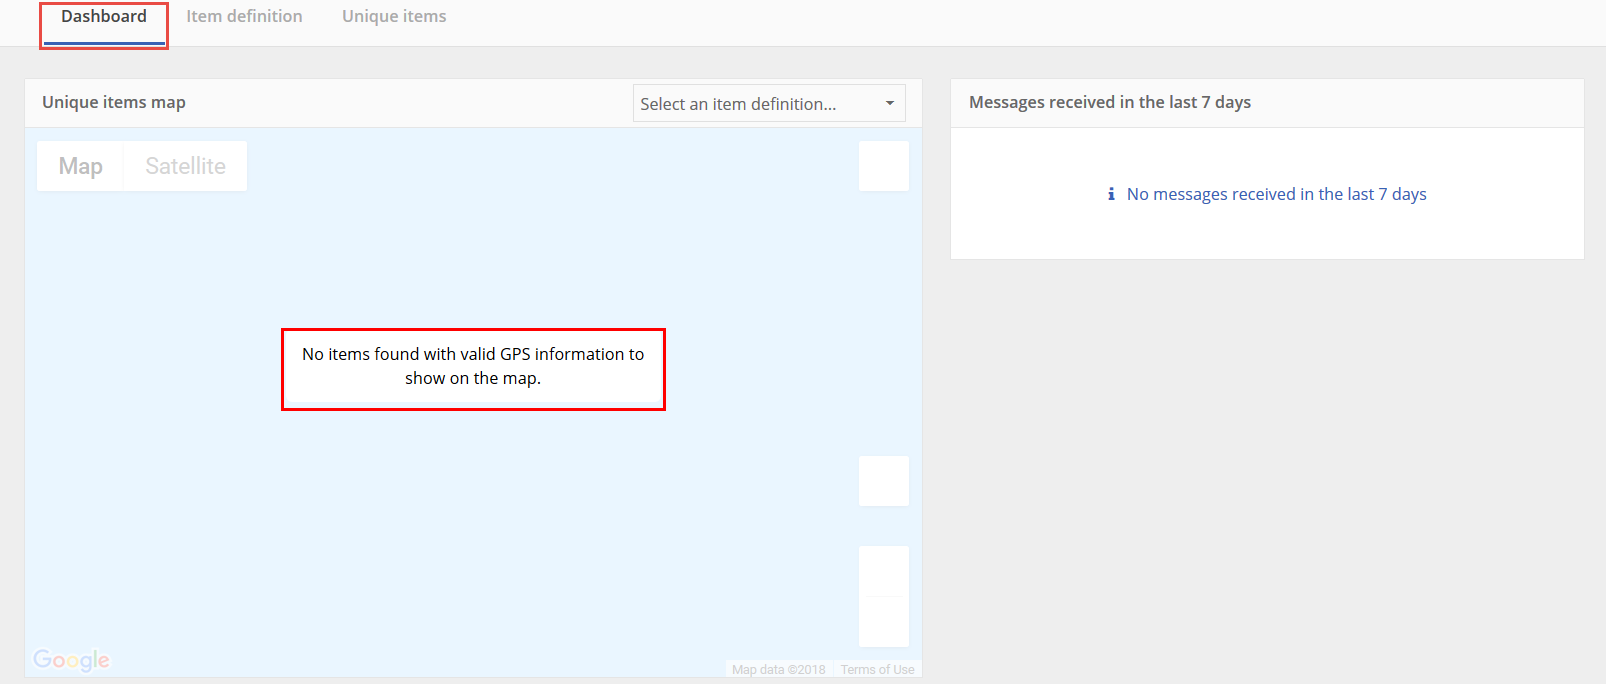
Notice that there is no information visible in the items dashboard. This is due to the fact that the information for this dashboard is gathered via our IoT module. Basically, this means that you will see real-time information about the location of your items on this map, where currently the message “No items found with valid GPS information to show on the map” is projected in the red frame. Along with graphs and charts, regarding the information provided by the IoT devices. For an example, see the image: 'Items dashboard example'. As shown below.
Items dashboard example
In order to leave the dashboard, click on the top of the screen on 'Item definitions', as shown in the image 'Item definitions overview'.
This screen provides an overview of all the existing items in your current administration, the image below, already has some examples, but in the case you haven't entered any items in your administration yet, the overview will not show any items. The overview provides you with 'name', 'number', 'types', 'has unique items' and 'Enabled/Disabled' in columns. These columns help you to quickly identify your items. Furthermore, the 'name' and 'number' columns can be used as a filter. You can click on the unique items count to get an overview of the existing unique items of this kind, more details HERE.
Item definitions overview
New item
In order to create a new item in TrackOnline when you are in the 'Item definitions overview screen', click on the  button, on the top right part of the screen, as seen in the image 'Item definitions overview'.
When you have clicked on the button, you will see the following screen, shown in the image: 'item detail screen'.
Item detail screen
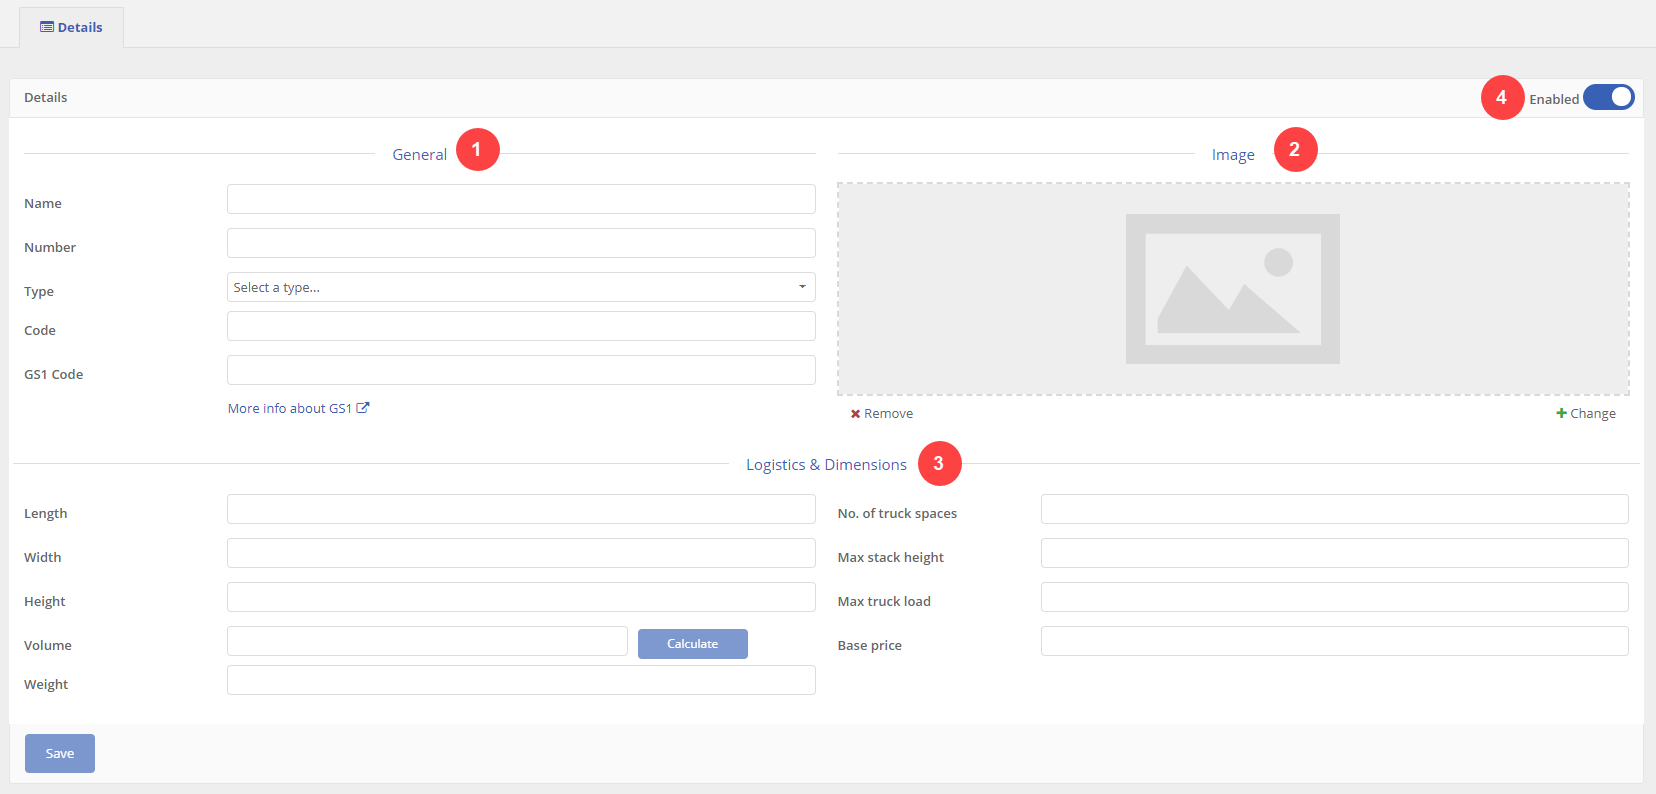
The image 'Item detail screen' will be discussed in four parts:
- General
- Image
- Logistics & Dimensions
- Enabled switch
1. General:
This part consists out of several fields, every field will be discussed individually.
- Name: Enter the name of the item, try to make the name as recognizable as possible for your counterparts.
- Number: Here you can enter a number for your items, for administrative and filter purposes.
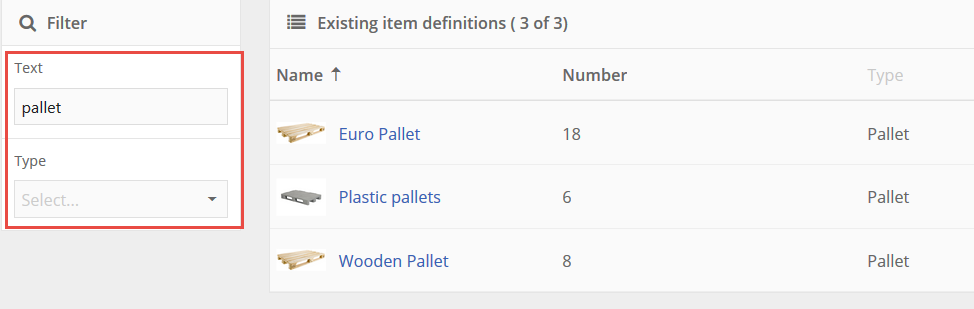
- Type: Here you can choose from 13 different item types, to identify your items. The types can be used to both recognize and filter them in reports and the item definition overview. To filter your items, use the filter on the left of the screen, as shown in the image below 'Item filter example'.
Item filter example
- Code: Code consists out of a short version of the name of the item. Example: an item called: plastic pallet, can have a code PP (Plastic Pallets). This in order to recognize items, besides the names. This name will also be visible in the transaction overview window.
- GS1-code: Here you can fill in the GS1-code of the item. A GS1-code is an international uniform standard number for the indication of an item. This makes it easy to share data. With this link you can find more information about GS1-codes and a list of GS1-codes in the BeNeLux.
Note:
If you want to share transactions, it is required that the items in the transaction have a GS1-code.
2. Image:
Here you can upload an image that reflects the item. So you will see the image in combination with the item name, in the 'item definition overview'. To upload an image, click on the '+ Change' link. As shown in the image below.
Change item image
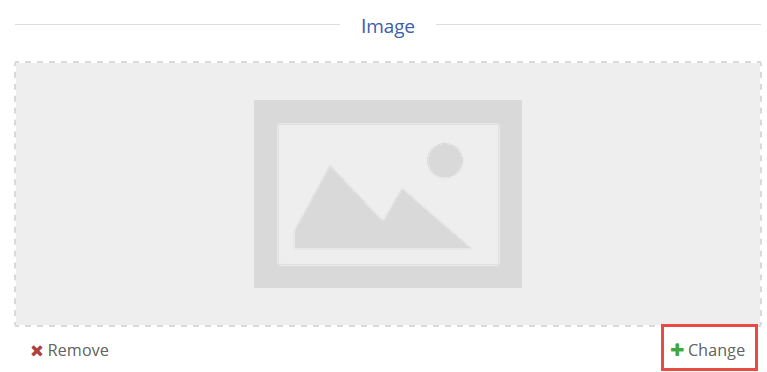
To remove an item image, click on 'x Remove', on the left of the image 'change item image'.
3. Logistics & Dimensions:
Here you can enter all kinds of specifics regarding the item, such as:
- Length
- Width
- Height
- Volume
- Weight
And dimensions with regard to the carrier, such as:
- Number of truckspace
- Max stack height
- Max truck load
- Base price
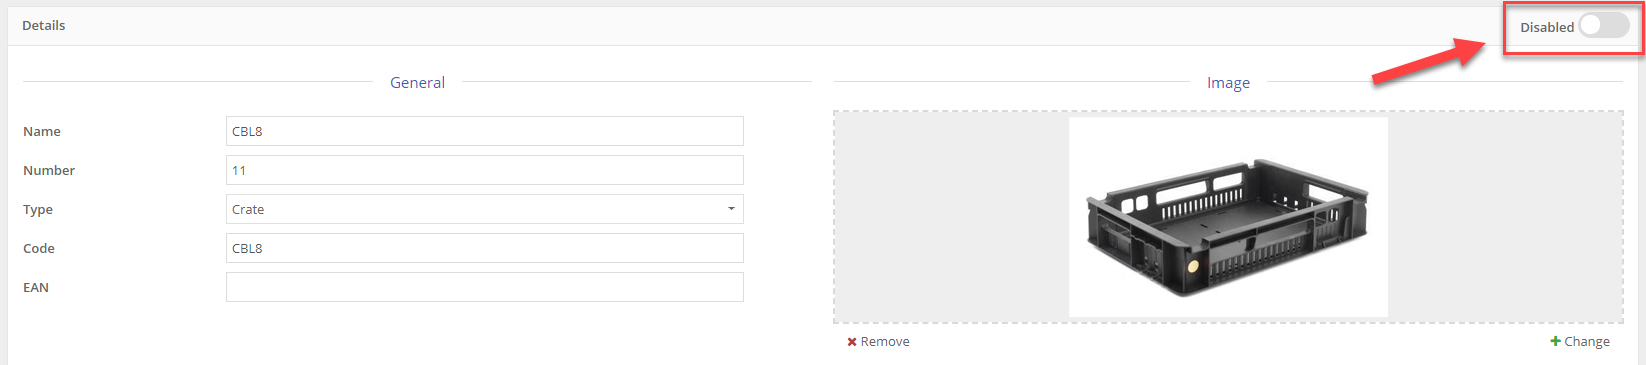
4. Enabled switch
On the top right of the screen you find an enabled switch. You can use this switch if you want to disable an item.
For example, when you no longer send a specific item, but still have transactions in your administrations that does contain this item and you want to keep these transactions. In the image below you see an item that is disabled and can not be used anymore when making transactions. This item is also no longer visible in the transaction window.
Item disabled
When you have entered all the data for your new item, you can confirm the data by clicking on the button, on the bottom of the screen.
When you have clicked on save, you can see your new item in the 'item definitions overview' and you can start making transactions with this item.
Item definitions overview
Unique items
What are unique items
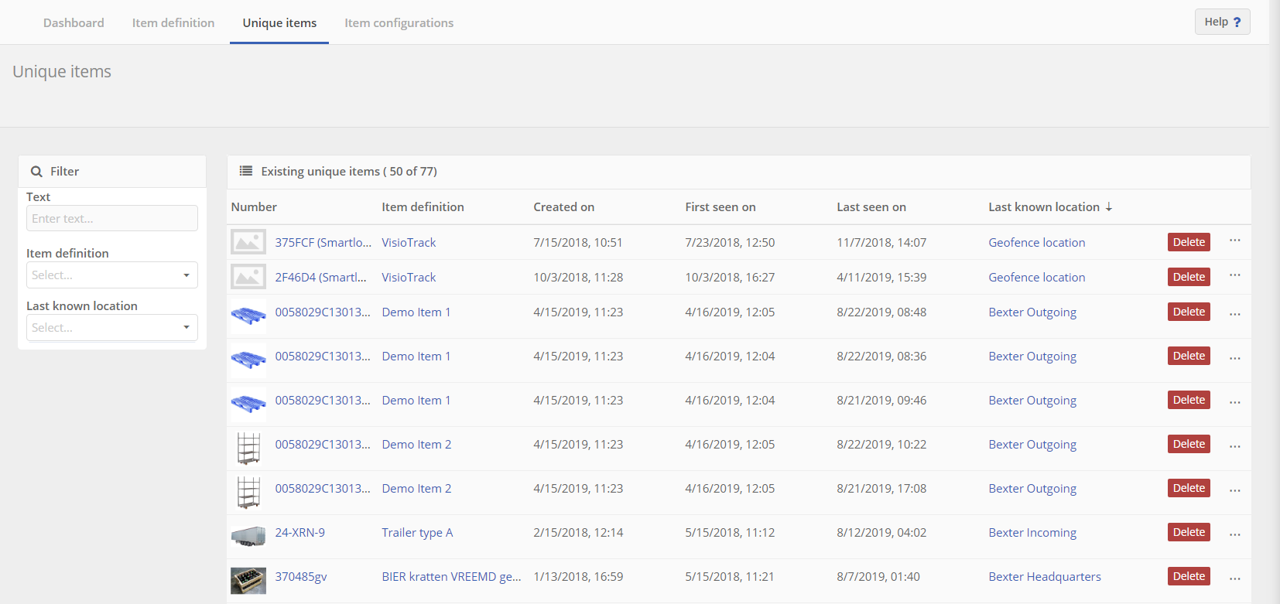
A unique item is an instance of an item definition. It is a unique identifier that can be established by giving an item a unique number. Creating a unique item can be done by applying identifiers like barcode, RFID or IoT devices. Unique items can be found at 'Base data' > 'Items'. Then click on the tab 'Unique items' to see the unique items that are registered in your TrackOnline administration. See the image 'Unique items tab' below.
Unique items tab

Creating unique items in the mobile app
Creating a unique item can only be done via the mobile application of TrackOnline (app). When logged in into the app, you can select the menu option 'Unique items'. Here you will see an overview of the unique items that have already been created.
By selecting the '+' icon you will be able to create a new unique item. Select the item definition wherefore you want to create a new item. Enter or scan the unique number of the item. You are now able to save this new item or you can add a IoT device.
Entering the unique identifier of a device will give you the possibility to look at real-time sensor data generated for that item such as:
- Location (longitude/ latitude coordinates)
- Temperatures
- Open/Close events
When finished, you are able to select 'Save unique item' or 'Save and new', what will open a new empty form. Click HERE for more information about the mobile application of TrackOnline.
Viewing unique items
All your created unique items are visible in TrackOnline. Click on the tab 'Unique items' when you are in Base data > Items. Also see the image 'Existing unique items list' below.
Existing unique items list
Here you can see, search and sort the unique item data, like:
- Number;
- Item definition;
- Created on;
- First seen on (only filled when IoT devices are used);
- Last seen on (only filled when IoT devices are used);
- Last known location (only filled when IoT devices are used and geo-zones have been created for locations).
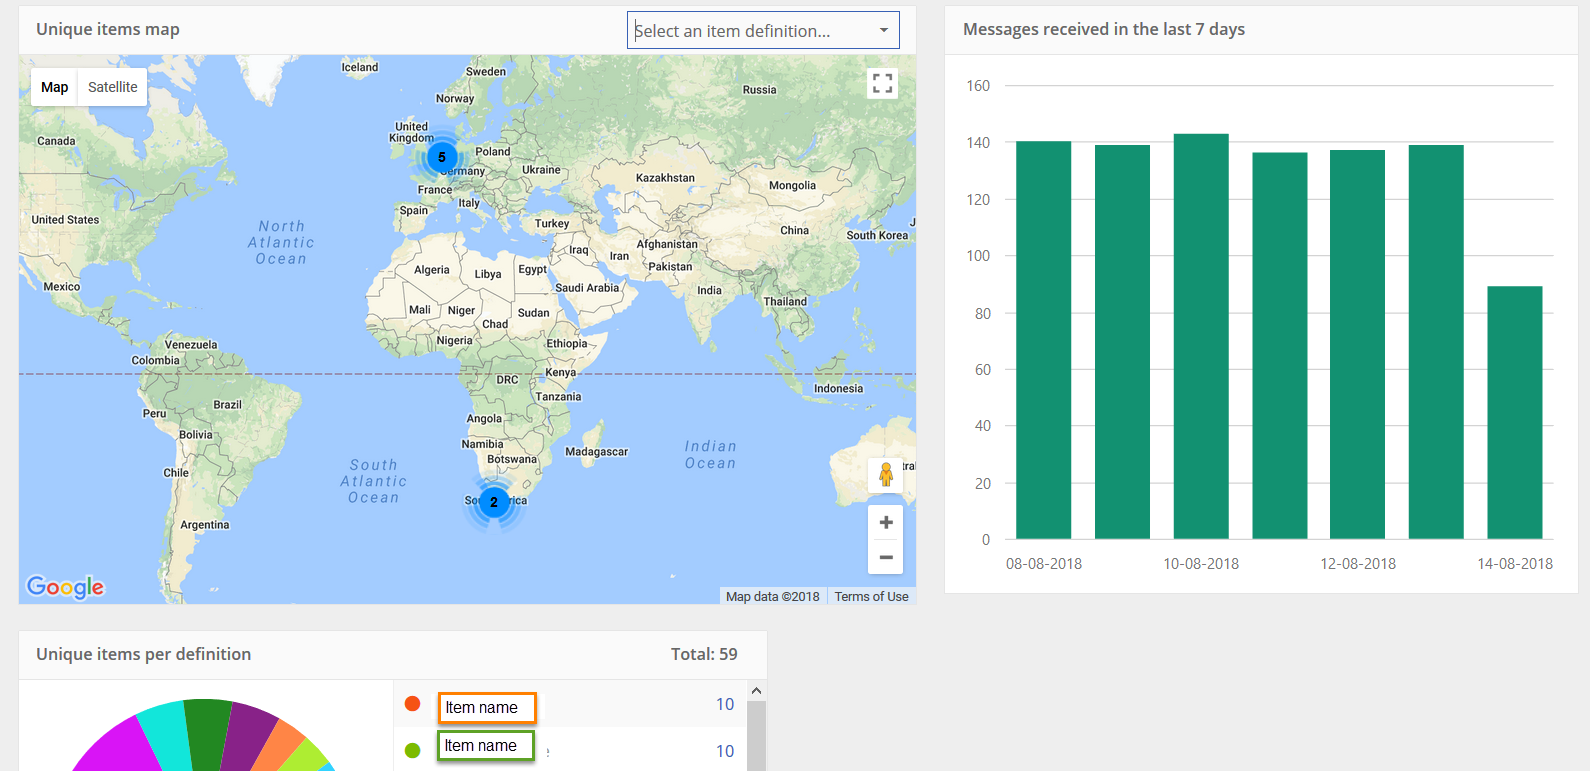
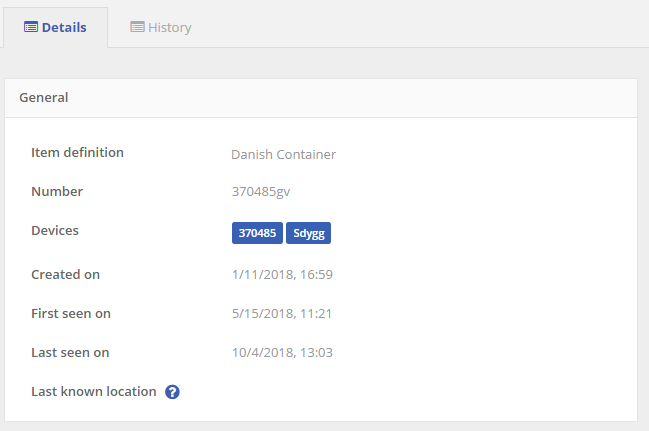
Selecting a unique item by clicking on the number will give you a more detailed view of that particular item. The detail tab shows some general data and IoT data when applicable. Also see the image 'General data' below, where you can see an example of how the data is shown.
General data
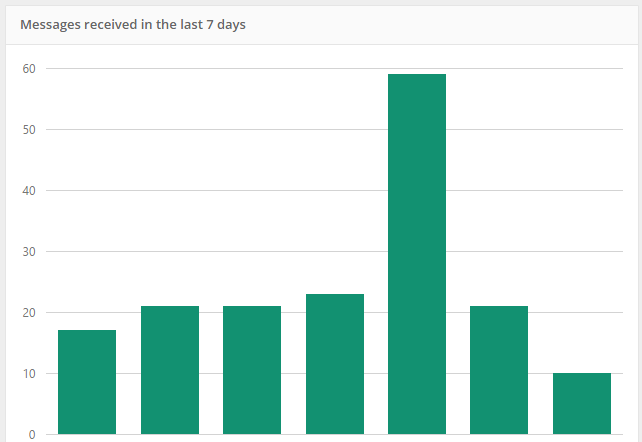
When IoT devices are applicable, the number of messages received over the last seven days for this unique item is shown, see the image 'messages received example'.
Here you can see that there are fluctuations of the messages that have been received by this device. This could mean that the device was in a more remote area for the first four days of the week, with less connection points to communicate with. Where there is a peak on Friday with almost 60 messages.
Messages received example
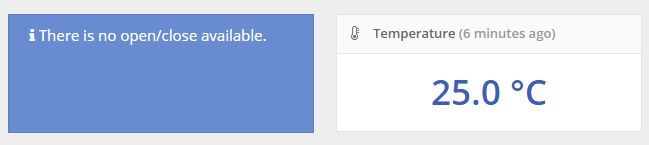
When IoT devices are applicable, a last known temperature and/or a last known open/close event can also be shown in the dashboard of TrackOnline. An example is shown in the image 'Open/Close and temperature' below.
Open/Close
An open/close sensor allows you to know if the door of your container has been opened, this helps you to detect thefts.
Open/Close and temperature
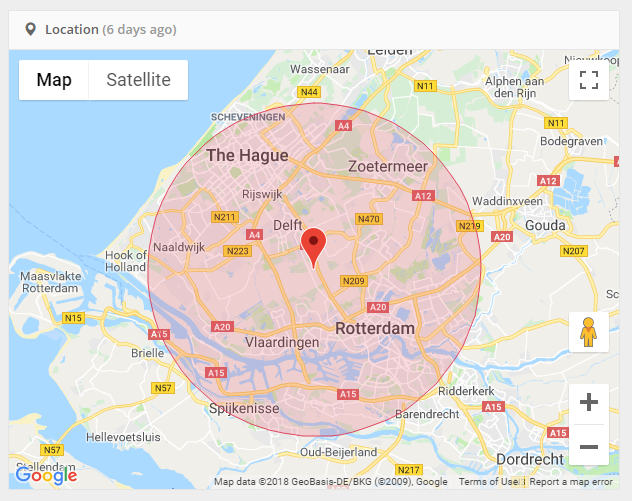
In addition to that, when IoT devices are applicable, you can also view the last known location and radius. The range of this radius can vary per device and can sometimes be custom set to a larger or smaller range. See the image 'Device range example' below.
Device range example
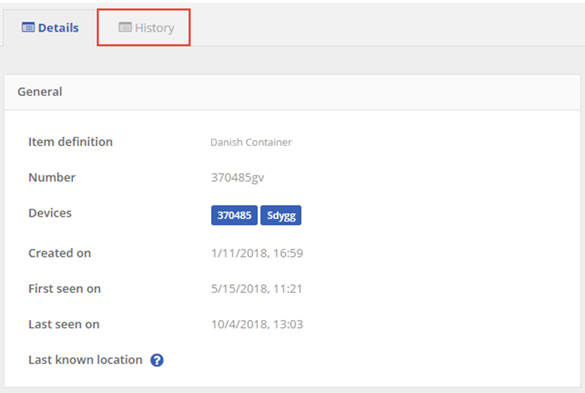
Next to the 'Details' tab, you have the option to select the tab 'History'. See the image 'History tab'.
History tab
Here the user will find a more detailed view on IoT data that has been received for that particular unique item. The view consists out of a date picker (from/to) and three views that react to the selected period. Also see the image 'History of a device'.
- An overview of the received messages;
- Temperature overview;
- Location breadcrumb view.
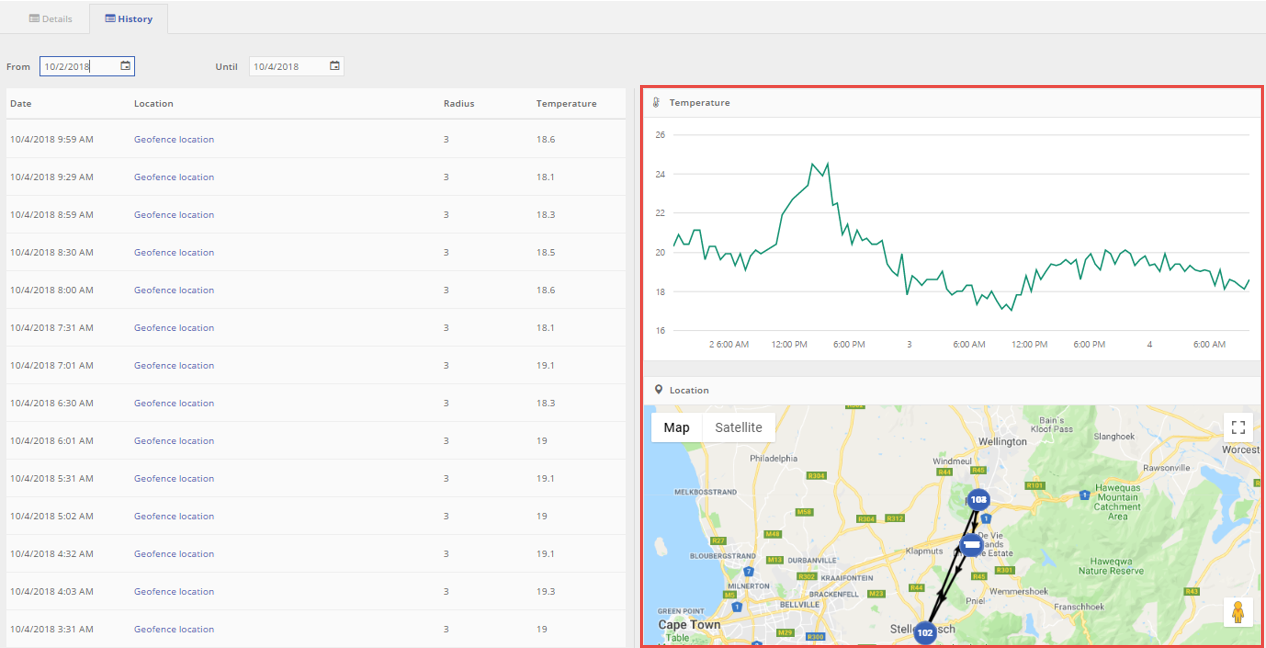
History of a device
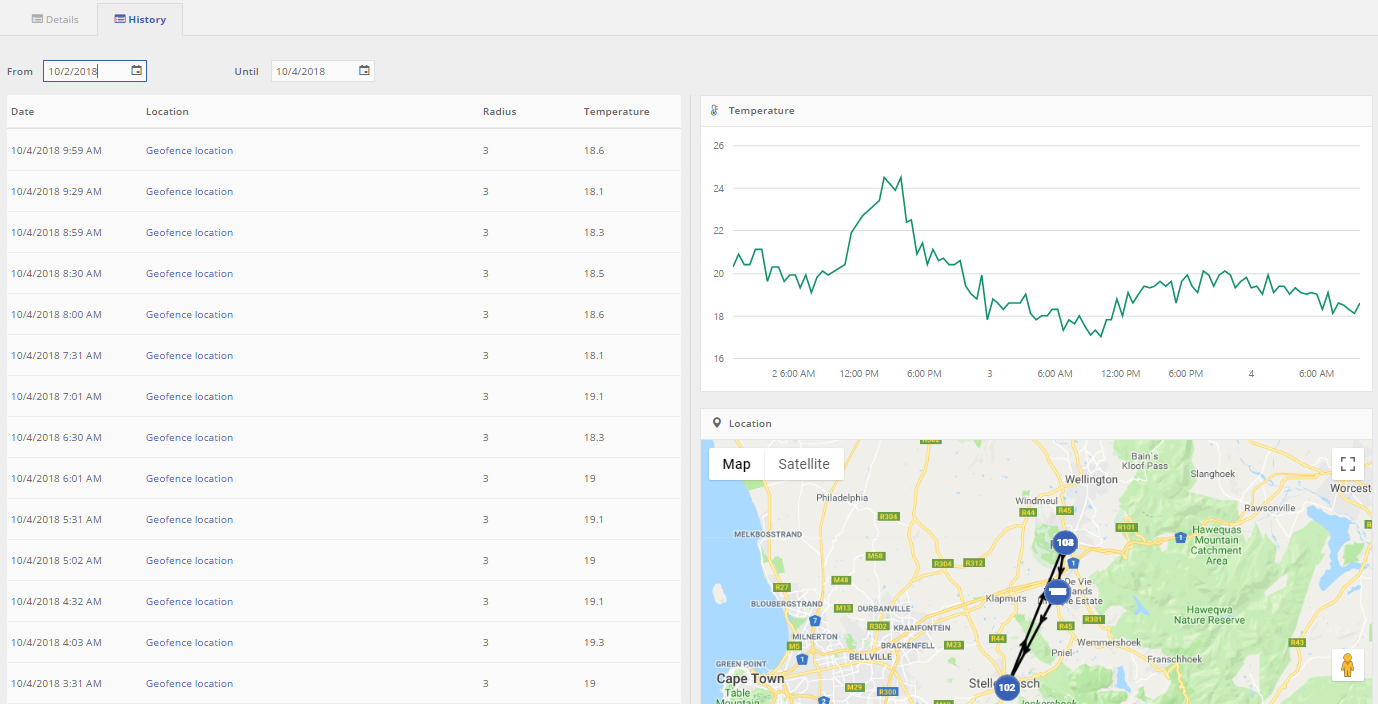
The messages overview as shown in the image 'Messages overview device history', shows when the data was received, at what location (latitude/longitude or known locations when geo-zones are applied), with what radius and temperature at that moment.
Messages overview device history
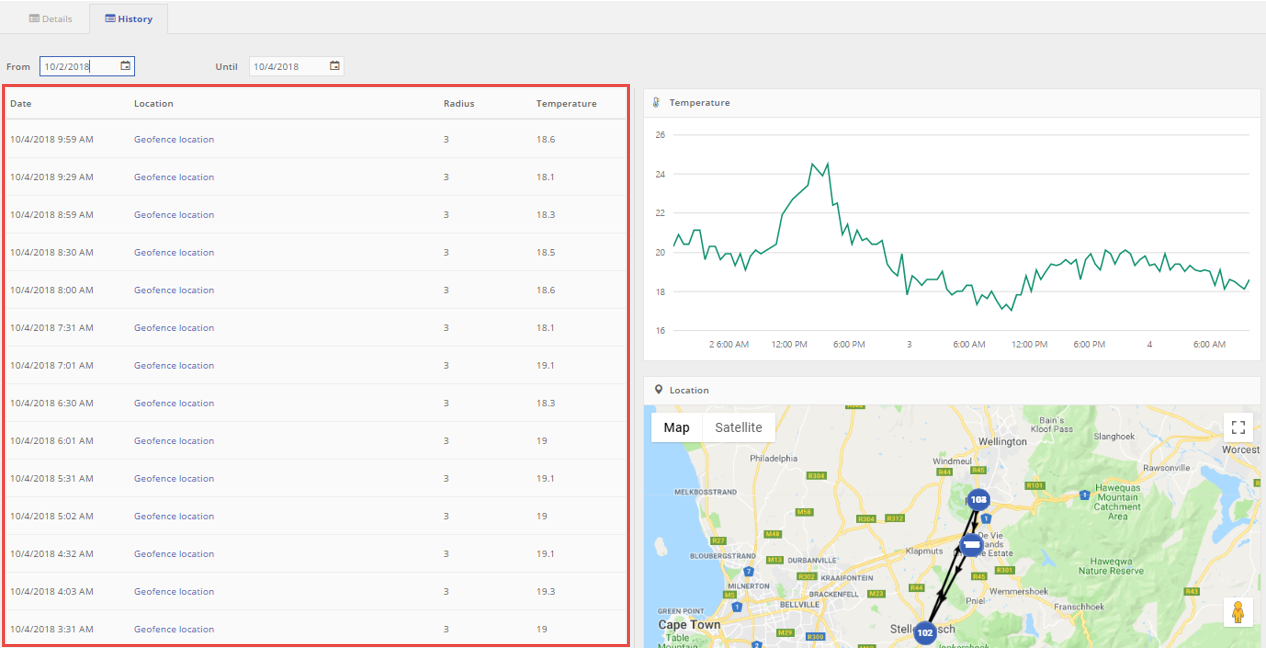
Next to the messages, the data is visualized in a temperature graph and a google maps breadcrumb view. The number shown in the map correspond with the messages list where the highest number is the most recent location within the selected period and the lowest number is the oldest. See the image 'Visualized historic data' below.
Visualized historic data
Temperature
Thanks to a temperature sensor, you can easily detect if the shipment was in a too cold or too warm area. This helps to avoid loosing delicate goods such as food.
Delete unique items
If you would like to delete a unique item, you can do this from the unique items overview, shown in the image below.
Delete unique items from overview
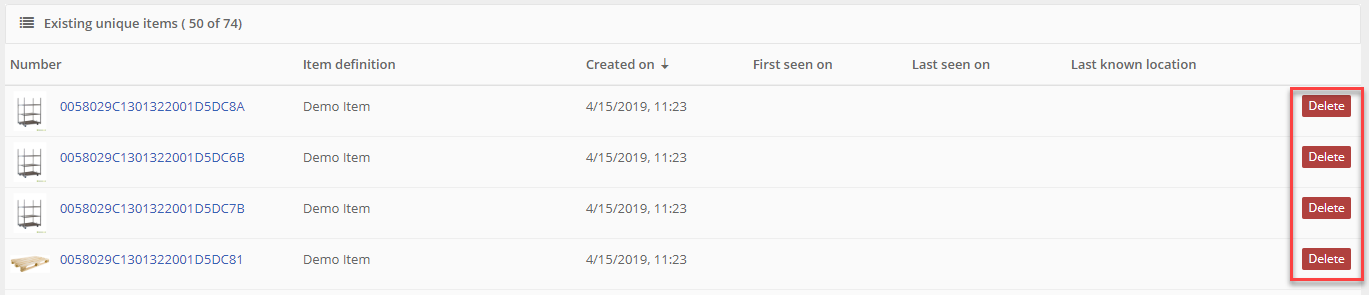
On the right side of the screen you see for each unique item a  button, marked with the red frame in the image above. If you would like to delete an item, click on this button. You will see a message as shown in the image below.
Delete unique item message
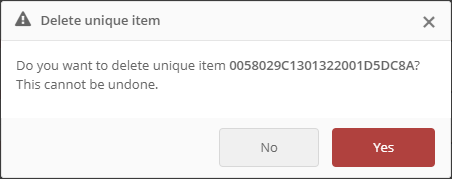
Click 'Yes' to confirm that you want to delete the unique item. If you changed your mind and you don't want to delete the item anymore, click 'No'. You will then return to the unique items overview window.
Note:
This action is not valid for every TrackOnline user. This depends on your permissions.
Item configurations
From the items window you can also access the 'item configurations' tab, see the image below. You can create or edit your item configurations here. ℹ️ Click HERE for more information.
Item configurations tab
