Configuration
You can find configuration in the ‘Gear wheel’ icon on the top right part of your screen. See the image 'Gear wheel' below.
Gear wheel

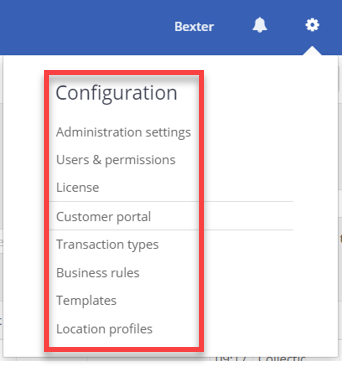
Configuration consists out of 8 different topics. These topics appear when you click on the gear wheel. The 8 topics are shown in the image 'Configuration topics' below.
Configuration topics
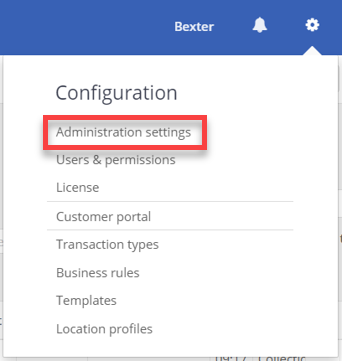
Administration settings
Administration settings can be found by clicking on the ‘Gear wheel’ and then on ‘Administration settings’, see the image below.
Topic Administration settings
When you have clicked on ‘Administration settings’, you will see the general overview of your administration. See the image ‘General administration settings’ below.
General administration settings
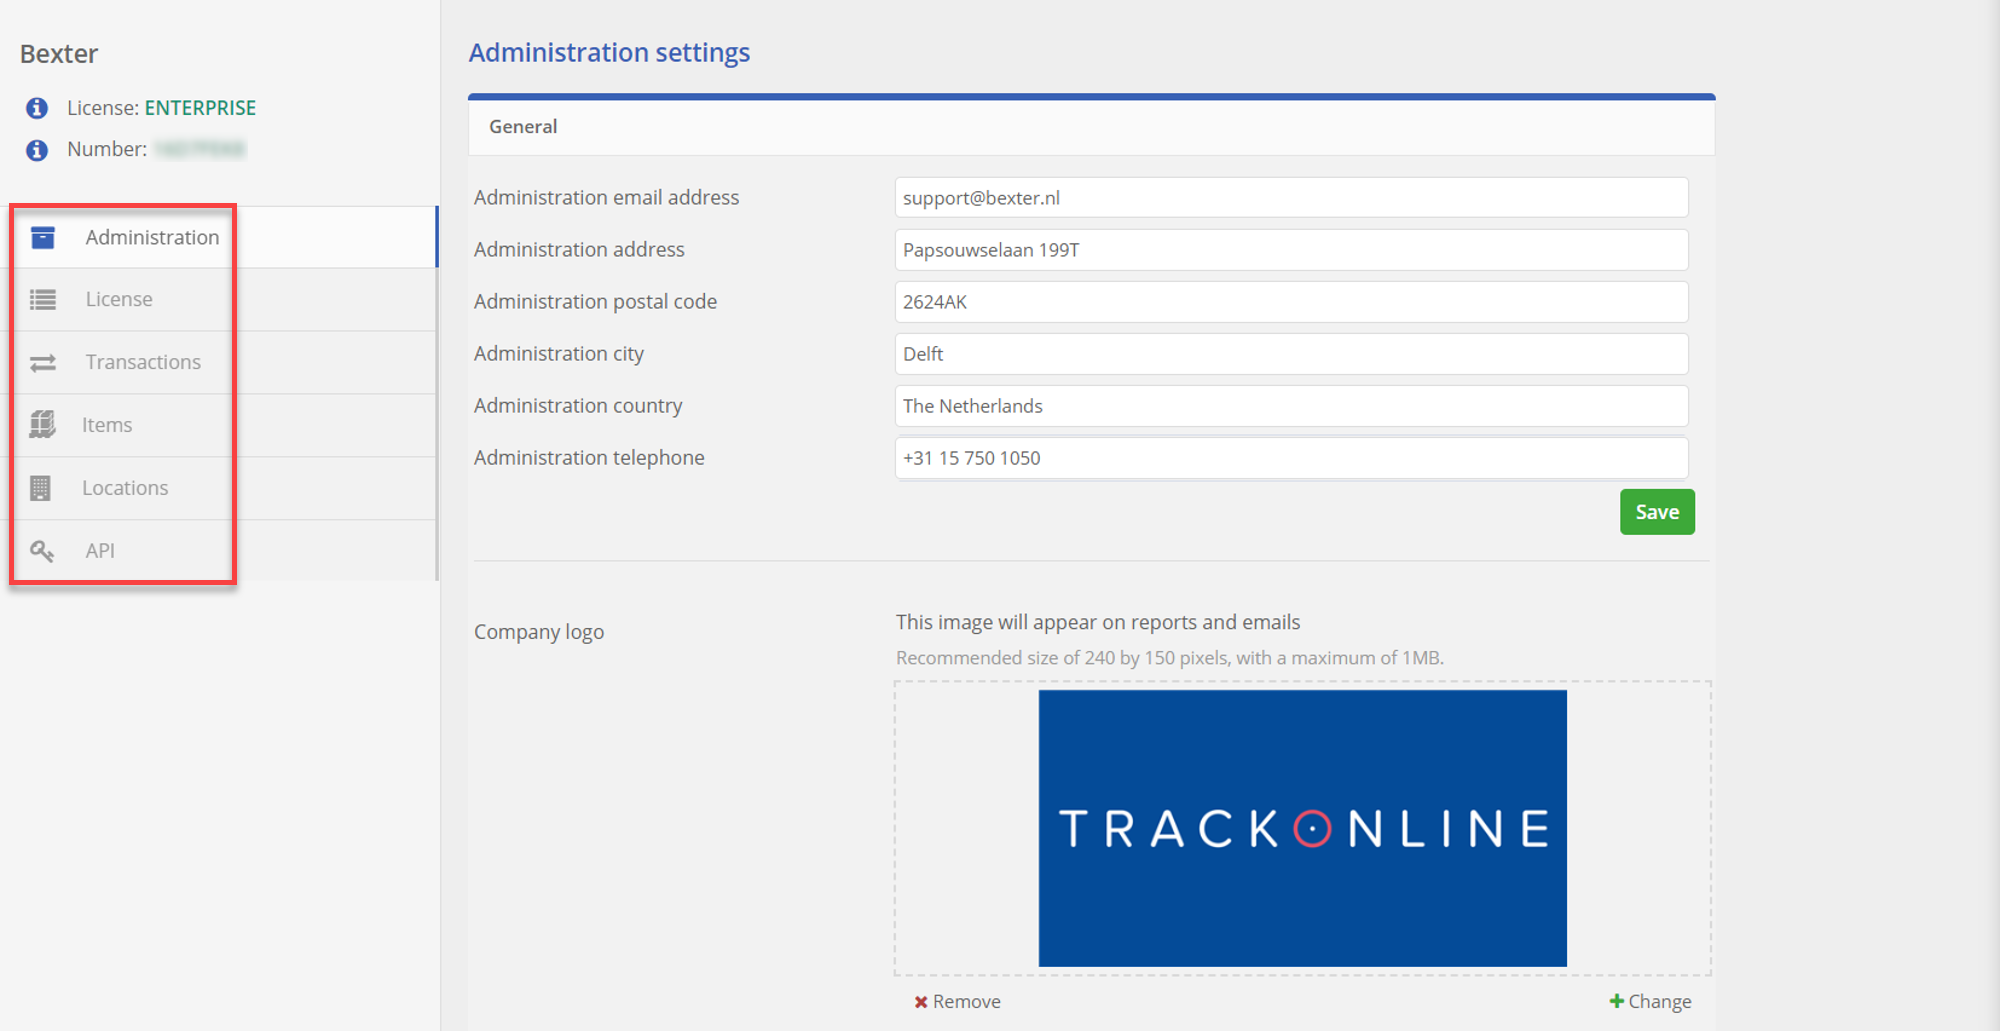
The general overview, as seen in the image ‘General administration settings’, shows us five topics. Which will each be discussed individually.
- Administration
- License
- Transactions
- Items
- Locations
- API
Administration
In the sub-header 'Administration', as shown in the image above: ‘General administration settings’, you can fill in the administration settings. Only the administration email address is required. This email address is used for instance when you are connecting to other TrackOnline administrations. This is the email address that is receiving the invite email.
In this window you can also add your company logo. The logo will be visible on reports that are generated in TrackOnline. This way, you can send reports to your customers with your company logo.
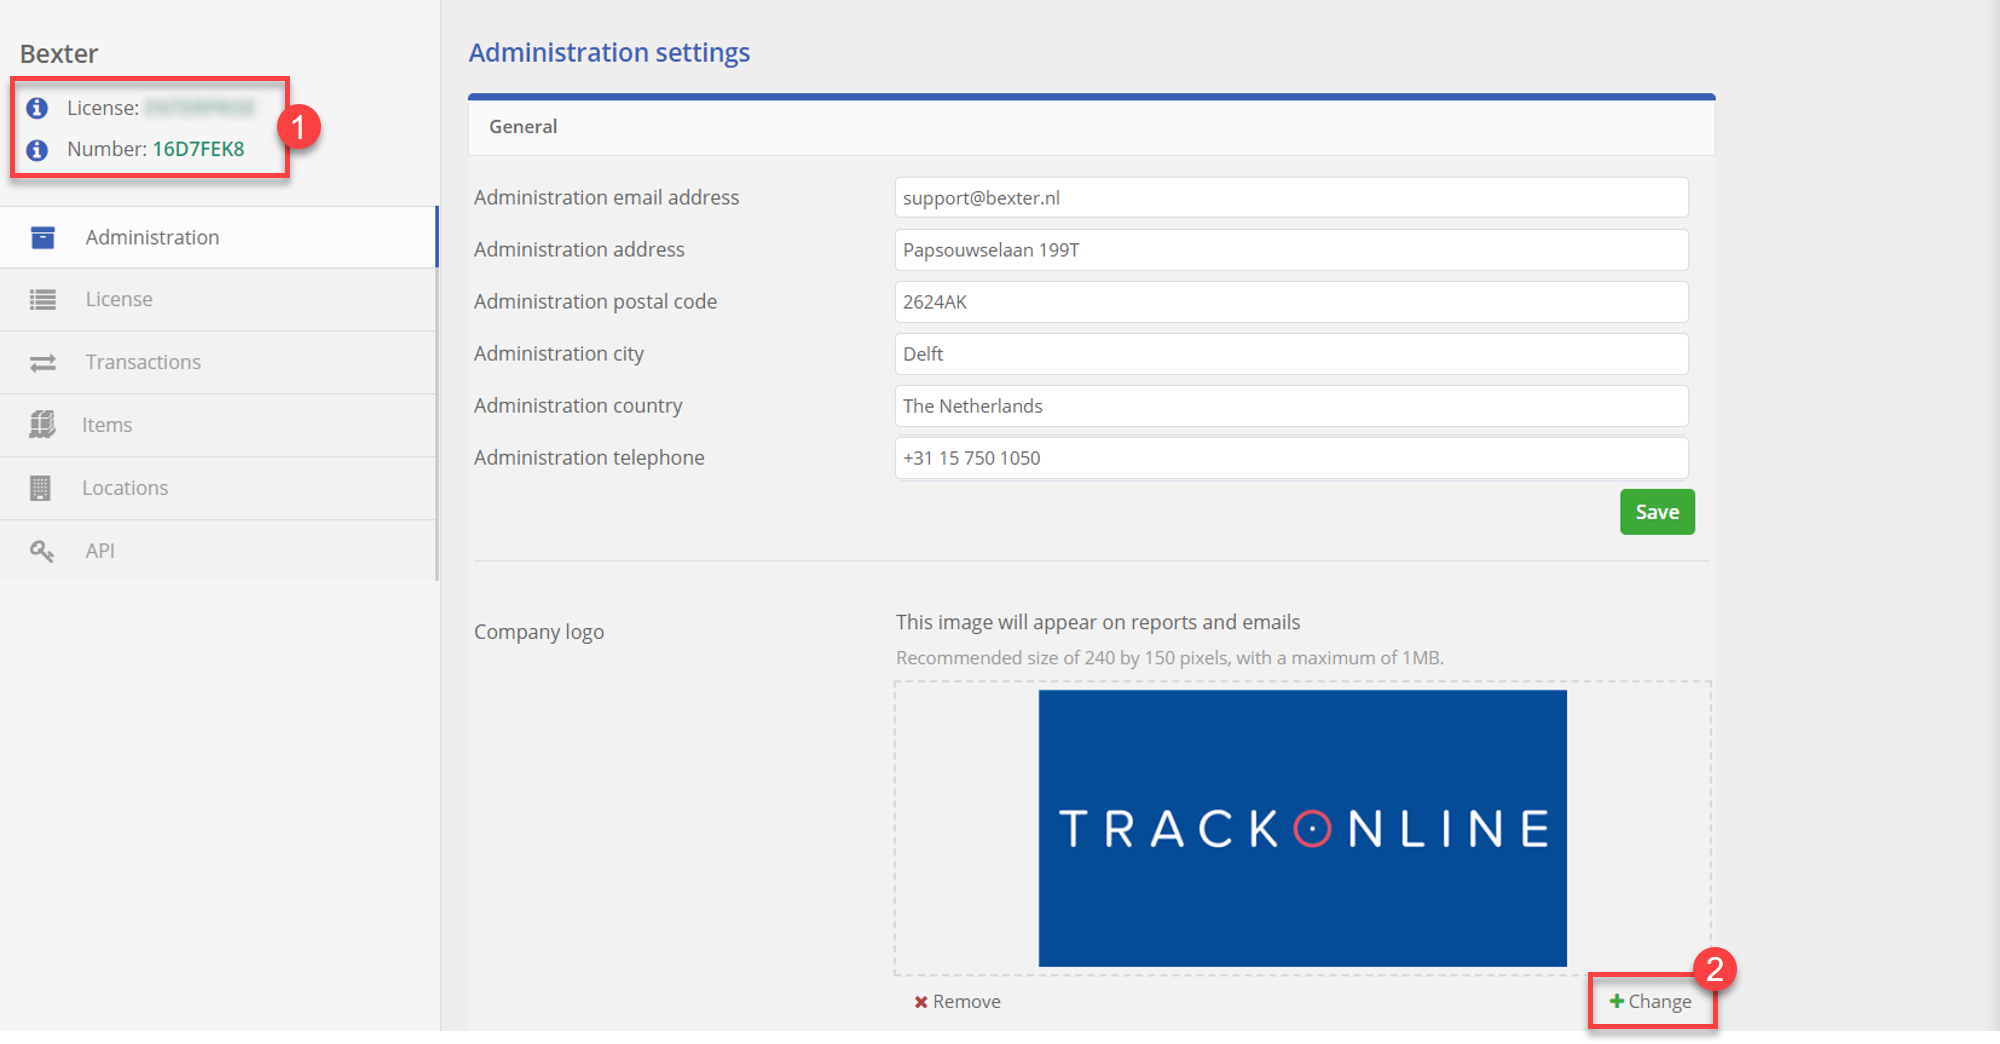
In the image: ‘Administration settings details’, you see the number 1 and 2. At number 1: You can see your:
- License type: In this case it is an Enterprise license. A license type tells you how much functionality is available in your TrackOnline administration.
- Number: This number is unique per TrackOnline administration. This number is also essential to connect your TrackOnline administration with other TrackOnline administrations.
At number 2: You can add an image. We recommend to add an image that reflects your company/business, such as a logo. If you click on ‘Remove’ the picture image will be removed again and will no longer be visible on the reports.
Administration settings details
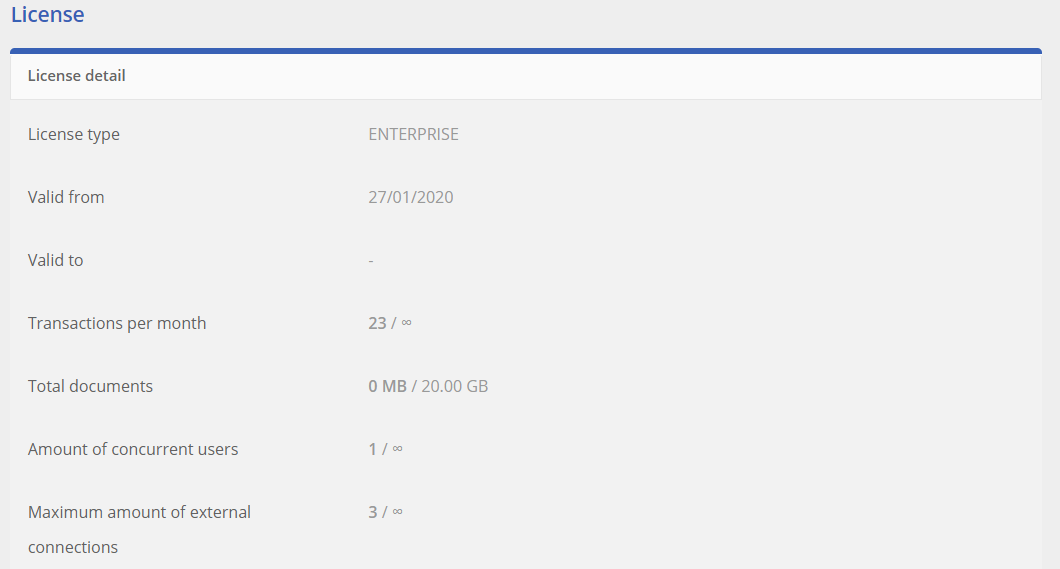
License
In the sub-header 'License', you can see what you are granted with your license and how much data you have already used this month. You can learn more about what is included in the licenses HERE.
Extended user amount
Licenses have a limited number of users, 3 for Start, 5 for Pro and 8 for Pro+. If you want to add more users, you can either upgrade your license to a higher tier or buy a users pack. Email us for more information.
Transactions
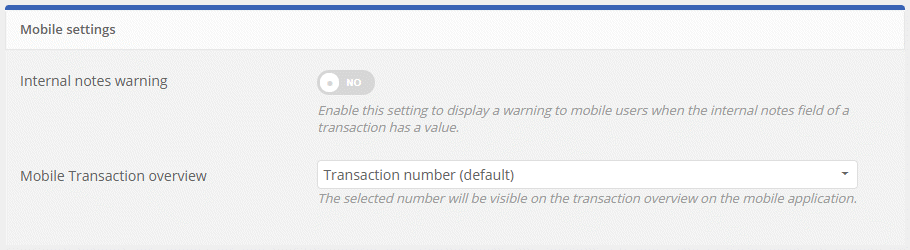
In the sub-header 'Transactions' you can choose to enable or disable Internal notes warnings, see the image below. This are notes that are written in the internal notes field in individual transactions. If this button is enabled and the internal notes field has a value, the mobile user gets a warning.
Here you can also select the number that you want to show as transaction number in the mobile app. You find this in the dropdown menu 'Mobile Transaction overview', see the image below. The app user sees this number on the transaction overview. You can choose the numbers: Transaction number (default), Reference number and Document number.
Mobile settings
On the same page, you have the option to configure the format of the transaction number. This number is visible on the details of a transaction and on the transaction overview. In the image below an example is shown.
Transaction number settings
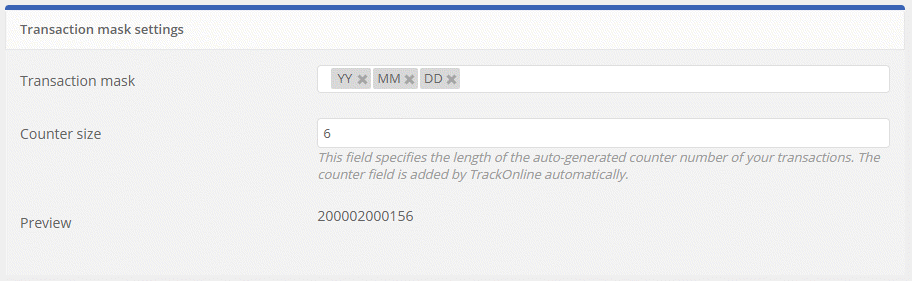
In this example we have chosen to select a transaction mask of first 2 numbers of the year, followed by 2 numbers of the month and then 2 numbers of the day. The counter size is set to 6. Now an example appears.
Note!
The example does NOT show the current moment. However, the example does show the final length of the number.
Next if we create 2 transactions on the 7th of january in the year 2020, the transaction numbers look like:
Transaction number format example
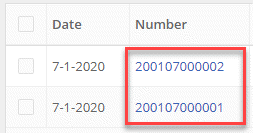
The numbers 1 and 2 at the end of the transaction numbers, are automatically generated by TrackOnline itself and show the order in which the transactions were created.
Items
The sub-header items, as shown in the image ‘Administration Items’ below, gives you information about the item conditions in your TrackOnline administration. In the image ‘Administration Items’, you can see that the 'Use item conditions' is switched on ‘Yes’.
Administration Items
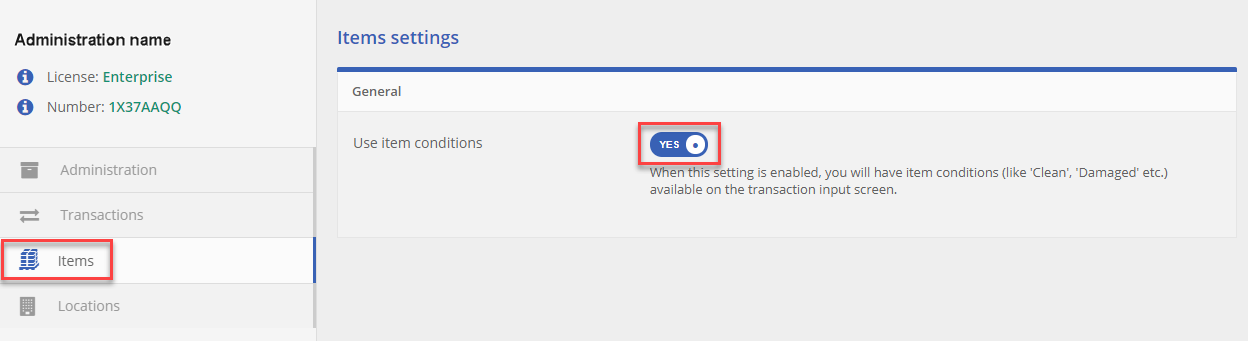
When the ‘Use item conditions’ switch is turned on ‘Yes’, as shown in the image ‘Administration Items’, you will be able to see the different items conditions in TrackOnline when making a transaction.
Example when
Use item conditionsis switched onYes:
Use item conditions ‘Yes’

When you have the switch set in the ‘Yes’ setting, you will see the following information when you are making a transaction, see the image 'Example of item conditions 'Yes''.
Example of item conditions 'Yes'

Example when
Use item conditionsis switched onNo:
Use item conditions ‘No’

When you have the switch set in the ‘No’ setting, like in the image ‘Use item conditions ‘No’’, then you will only see the quantity of the selected items, like in the image ‘Example of item conditions 'No'’.
Example of item conditions 'No'

Now you can see that the item conditions are not visible when you make a transaction.
Locations
The sub-header locations, as shown in the image ‘Administration Locations’ below, gives you information about the location settings in your TrackOnline administration. Here you can create a tree-like hierarchy in TrackOnline for your locations, with a parent location and underlying location(s). This structure is also used in reports. As default, you see a ready to use hierarchy, but you can also fill-in your own name.
Administration Locations
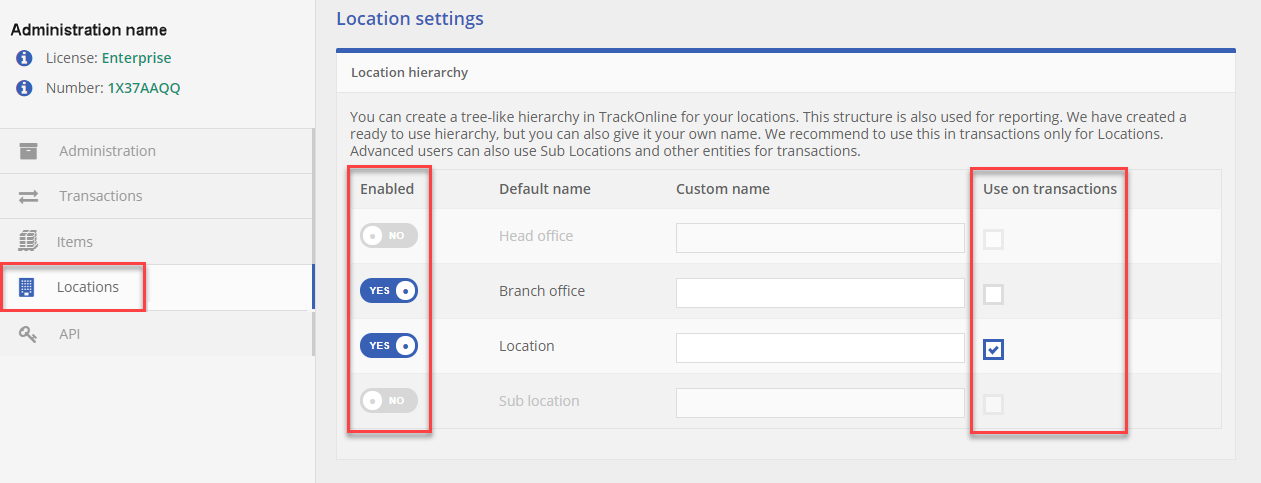
In this example image, you see that the 'Branch office' and 'Location' are switched on ‘Yes’. This means that, when you make a new location, you can choose if this location is a Branch office or a 'normal' location (ℹ️ click HERE if you want more information about creating a new location). This image also shows checkboxes under the column 'Use on transactions'. When a box is checked, this means that you can book transactions on this location. If the box is not checked, the location will not be visible in the list of locations when you make a new transaction.
API PRO PRO+ Enterprise
This part can be used if you would like to have external access to your TrackOnline data, using an external REST Api.
ℹ️ Click HERE for more information.
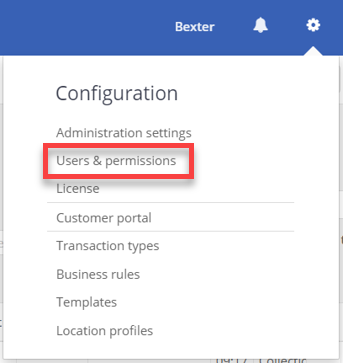
Users & permissions
Add a new user
Users & permissions can be found by clicking on the ‘Gear wheel’ and then on ‘Users & permissions’, see the image below.
Topic Users & permissions
'Users & permissions' allow you to configure the existing users in your administration and add new users. In addition to that, you can give users specific roles and certain rights. Users can also be invited from here. Within users & permissions, there are three sub-headers to where you can navigate.
- Users
- Invites
- User groups
Each sub-header will be discussed below.
Users
To view/edit your users, click on the sub-header 'Users' as shown in the image.
Users sub-header

In this sub-header you can see an overview of all the existing users in your administration. By default, the user that you have used to log in with, is the first user in your overview.
Add a new user
TrackOnline allows you to have multiple users for your administration. To add a new user, click on the  button. Only a user with 'Administrator' rights is allowed to add and remove users.
When you have clicked on the add new button, you can enter the details of the new user and add the settings for this user. In the image below both both ‘Details’ and ‘Settings’ are highlighted by a red frame.
Create a new user
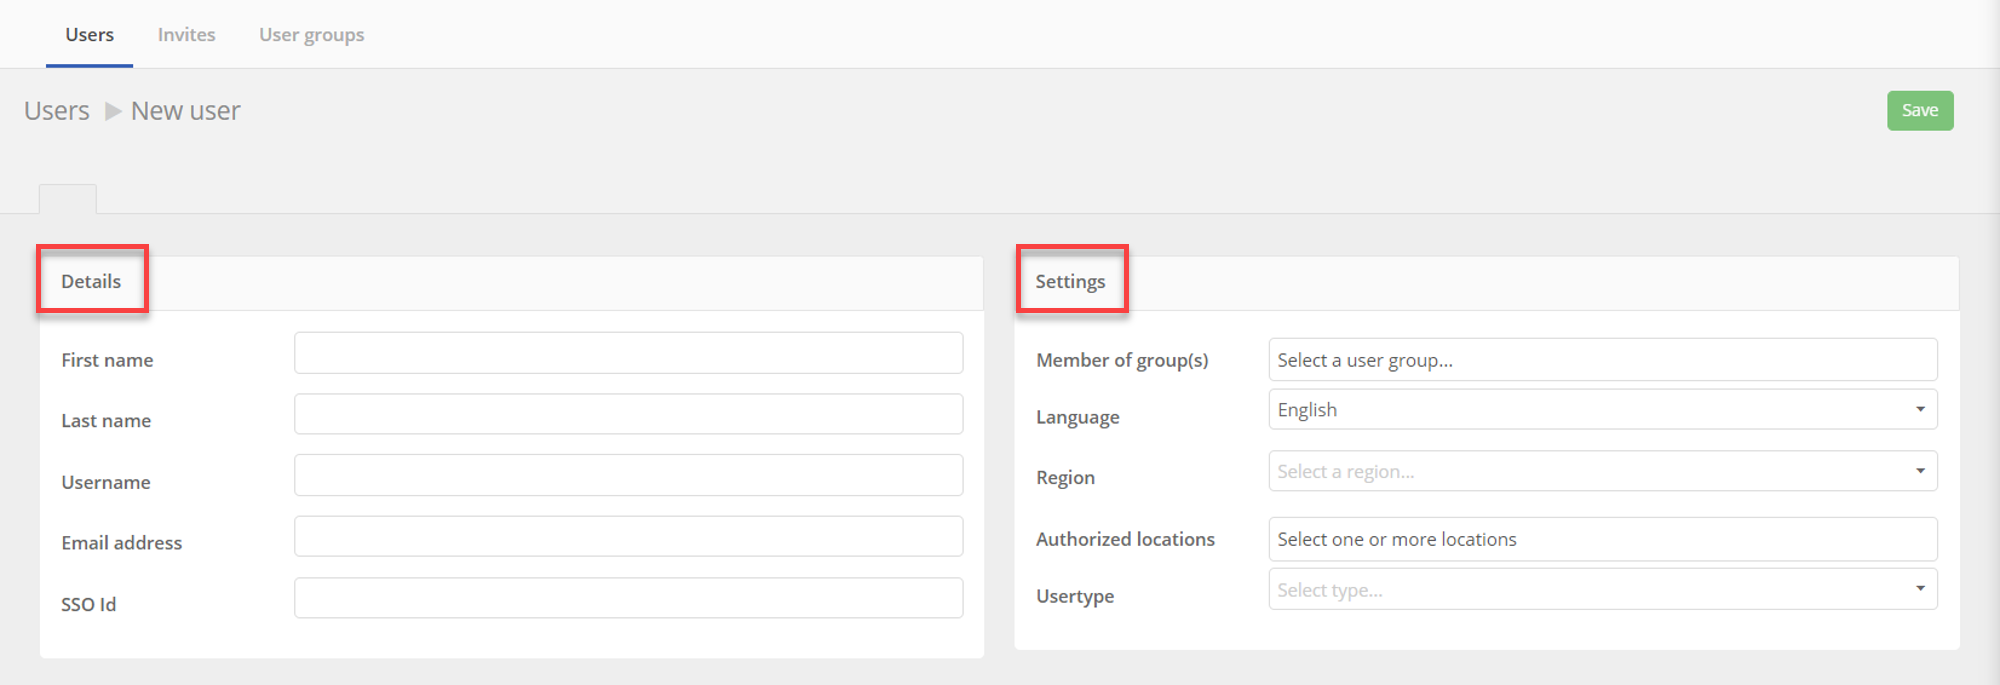
Details
Here you can enter the relevant information about the user, such as:
- First name: The first name is the name that is used to identify the user within TrackOnline;
- Last name: Optional;
- Username: The username is the name that is used to log in;
- Email Address: The email address of the user, is linked to the username. For example, when the user requests a new password, this is the email address that will receive that message;
- SSO Id: An id used for single sign on authentication.
Settings
- Member of group(s): Here you can select the user groups (click HERE for more information), that fit the activities and responsibilities of a specific user;
- Language: Select the language for the user;
- Region: Select the region for the user, impact the date/time view (European continental (DD/MM/YYYY) or the United States (MM/DD/YYYY));
- Authorized locationsPRO+Enterprise: Here you can set locations for the users. He will only be able to see transactions and balances with these locations;
- User type: Here you can set the department of the user within your organization;
- Can login: If the box is checked, the user can login. If the box is not checked, the user cannot login. See images: 'Can login: Yes' and 'Can login: No' below.
Can login: Yes

Can login: No

When everything has been set to your preferences, you can confirm your changes by clicking on the  button, on the top right of the screen.
Invites
To invite users, click on the 'Invites' sub-header as shown below. Check also our instruction video about 🎥 Invited users.
Invites sub-header

The sub-header 'Invites' allows you to invite users, based on their email address. In the first screen, you can see the overview of all the users you have invited so far. As in the image 'Invites overview' below, no user has been invited yet.
Invites overview

In order to invite a user, click on on the right of the screen.
When you have clicked on 'Add new', you will see the screen, as shown in the image 'Invite new user' below.
Invite new user
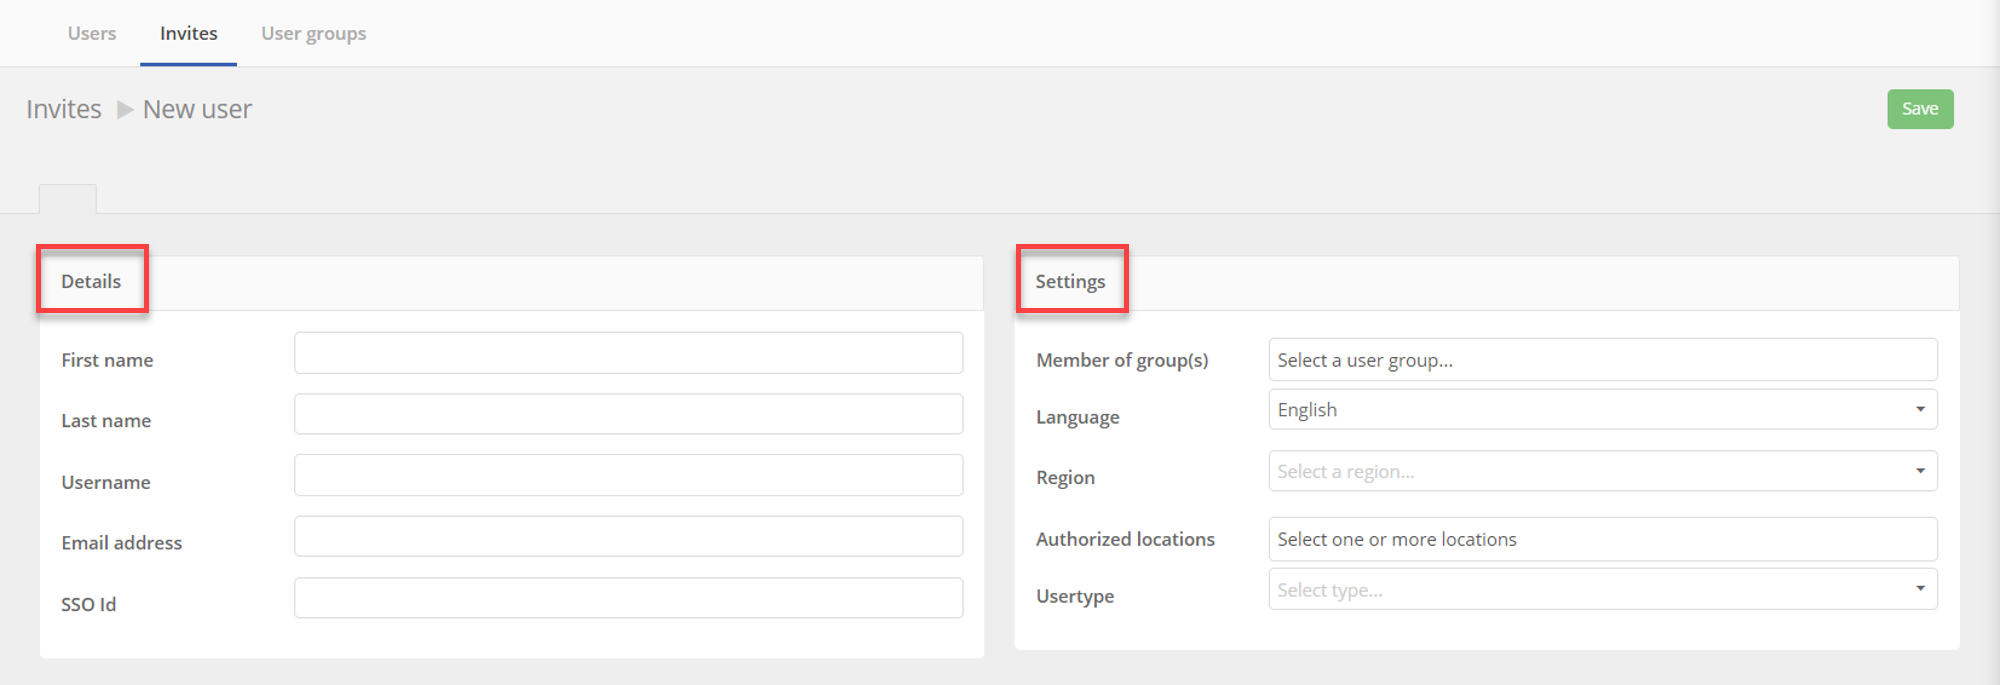
Details
Here you can enter the relevant information about the user, such as:
- First name: The first name is the name that is used to identify the user within TrackOnline.
- Last name: Optional.
- Username: The username is the name that is used to log in.
- Email Address: The email address of the user, is linked to the username. For example, when the user requests a new password, this is the email address that will receive that message.
- SSO Id: An id used for single sign on authentication.
Settings
- Member of group(s): Here you can select the user groups (click HERE for more information), that fit the activities and responsibilities of a specific user;
- Language: Select the language for the user;
- Region: Select the region for the user, impact the date/time view (European continental (DD/MM/YYYY) or the United States (MM/DD/YYYY));
- Authorized locationsPRO+Enterprise: Here you can set locations for the users. He will only be able to see transactions and balances with these locations;
- User type: Here you can set the department of the user within your organization;
- Can login: If the box is checked, the user can login. If the box is not checked, the user cannot login. See images below.
When everything has been set to your preferences, you can confirm your changes and send the invitation by clicking on the button, on the top right of the screen.
When the invitation has been sent, you can see the invitation in your overview. An example would be like the image, 'Existing invites' below.
Here you can see we invited the user ‘Tom’. This user now has received an invitation to login TrackOnline and to create their own password. Also notice the 'Action' button on the right of the image, where you can either delete or resend the invite.
Existing invites

Usergroups
To create a new usergroup, click on the 'Usergroups' sub-header as shown below.
Usergroups sub-header

Usergroups in TrackOnline allows administrators to give users specific rights and roles, based on the usergroup there are being placed in. For example, the usergroup ‘Administrators’ has all the options in the application, whereas the user group ‘Core Readers’ can only access certain features. User groups such as ‘Administrators’ and ‘Core Readers’ are in TrackOnline by default, but you can also create your own user group, with the rights and roles of your preference.
In the overview you will see an image similar to the image below, 'Existing usergroups'.
Existing usergroups

Here you see the usergroups that are default in the administration. You can also see the members that are in this usergroup. In this example you can see that 'John' is in all three usergroups, where 'Frank' and 'Tom' are only part of the Core Readers.
It is possible to put users in multiple usergroups at once. As you can see in the usergroup 'Core Readers' as shown in the image 'Existing usergroups'.
Explanation for this specific case: So in this case is 'John' allowed to change configurations of other users and the application, whereas 'Frank' and 'Tom' are only allowed to read and view data, but not alter it.
Creating a new usergroup
In order to create a new usergroup, you click on the green '+ Add new' button on the right of the screen while you are in the ‘Usergroups’ sub-header. see the image: ‘Sub-header usergroups’. To create a new usergroup click on the button.
When you have clicked on the ‘+ Add new’ button, you need to fill in a name for your new usergroup.
In this case we will create a usergroup called: ‘SuperUser’. See the example below.
Example:
We want to create a usergroup for the so called: 'SuperUsers' that can change and modify everything in the application, EXCEPT audits.
When you click on '+ Add new', you will see the following screen, as shown below.
Create usergroup

When you have entered the name, you can click on ‘Save’, to confirm this usergroup. Then if you click on 'Permissions', you will see the screen with permissions, as shown in the image ‘Usergroups permissions’.
Usergroup permissions
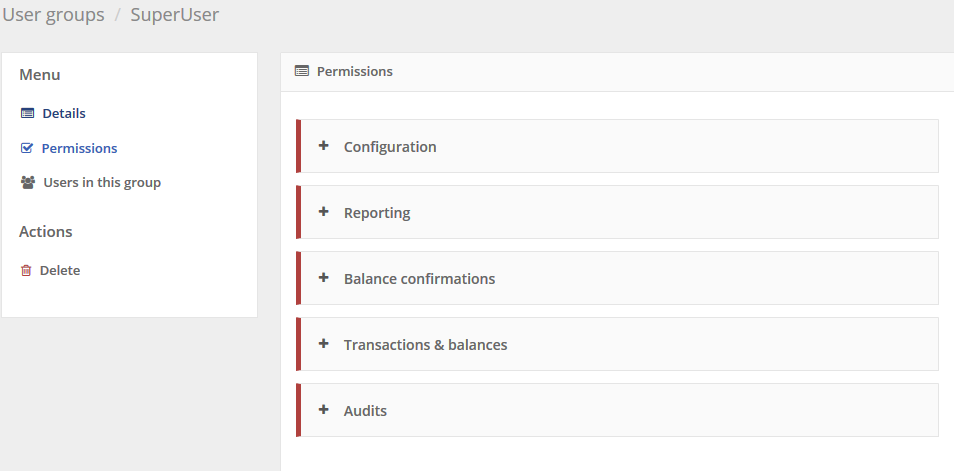
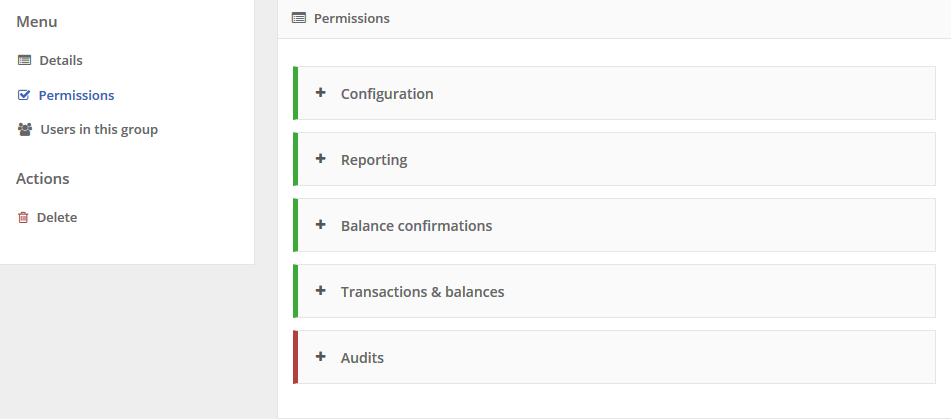
Now you see various options to allow specific rights to this usergroup. Every topic will be discussed individually below.
- Configuration: Here you can give a usergroup the right to view and create in TrackOnline. Such as create and view a user, or create and view a location. Also the ability to delete data from the application. To view all the options, click on the '+' as shown in the image below: '+_configuration'.
+ Configuration

- Reporting: Here you can give a usergroup the rights to create, view and modify the reports that TrackOnline can generate. To view all the options, click on the '+', like in the image below: '+_reporting'.
+ Reporting

- Balance confirmations: Here you can give a usergroup the rights to create, modify and delete balance confirmations between your administration and your clients/customers. To view all the options, click on the ‘+’.
- Transactions & balances: Here you can give a usergroup the rights to create, modify, delete and view balances and transactions. To view all the options, click on the ‘+’.
- Audits: Here you can give a usergroup the rights to create, modify and delete audits of the internal stocks. To view all the options, click on the ‘+’.
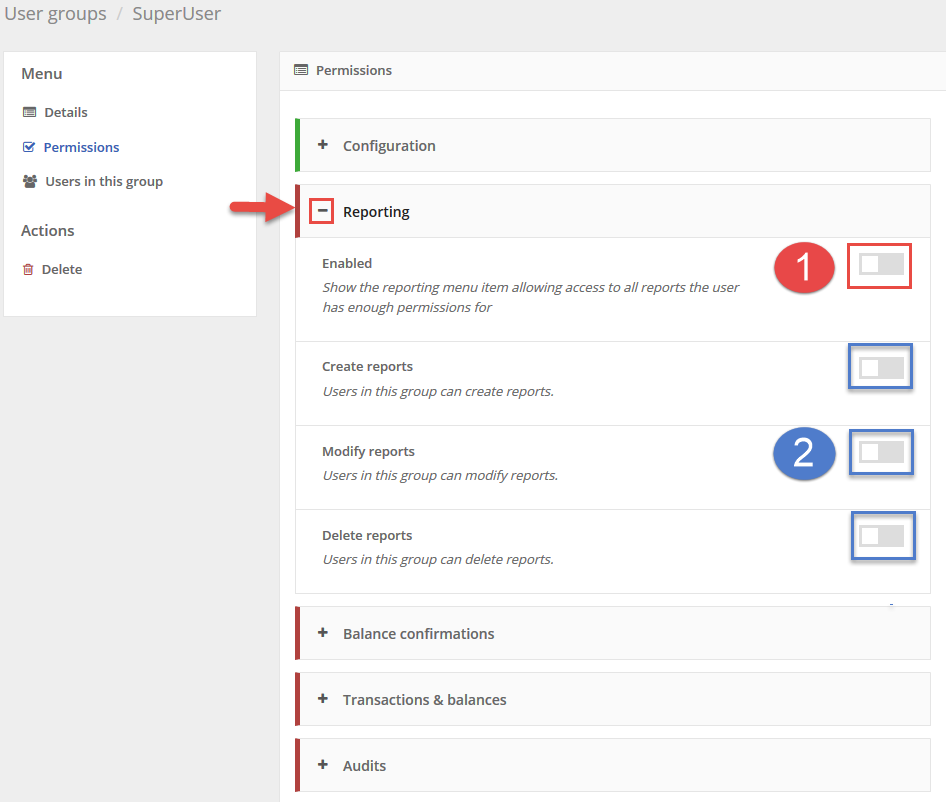
The image below, ‘Usergroups permissions details’, is illustrated how to enable specific rights and roles for a usergroup. The first step is to collapse the menu, by clicking on the ‘+’, where the red arrow is pointing.
Then you click on ‘Enabled’ (1), where the first step in the red frame is highlighted. After you have switched the button, it will turn blue. When you have enabled step 1, you can select the specifics in step two, the blue frames.
Usergroup permissions details
When you are finished with giving the specific rights and roles to this usergroup, you can have something like the image below ‘permissions example’. As you can see, all the permissions are enabled, for this group, except audits. Just like the example we discussed earlier. This means that all the topics are enabled for this usergroup, except audits.
Permissions example
Adding users to your group
The next step is to add users to your usergroup. Click on the arrow, in the red frame, to select a user. As shown in the image ‘Users in this group’.
Users in this group
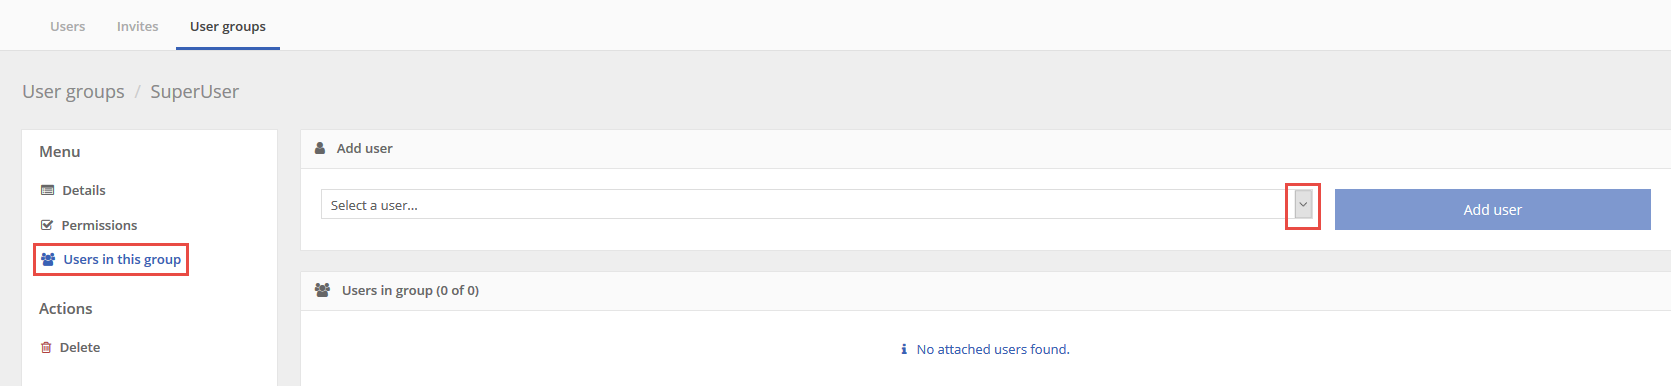
When you click on the arrow, to select a user, you will see all the users currently in your TrackOnline administration. In this case I want to select the user Leeroy Jenkins, to be in this usergroup. See image ‘add user’.
Add user

When you have selected the user you want to add to this group, click on the blue  button.
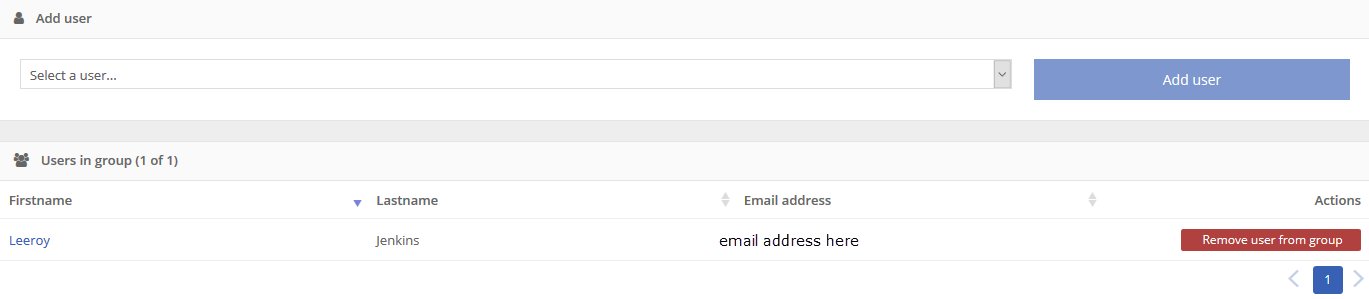
When a user has been added, you will see this user in the list, as shown in the image below.
First user in the new usergroup
Notice that you can add as many users in a user group as you want. Users can also be in multiple usergroups at once. See the image below as an example.
Example multiple users in a group

The users can also be removed easily from a group, simply by clicking on the red button ‘Remove user from group’ as shown in the image above.
Deleting a usergroup
When you are in the details of a usergroup, you also have the option to delete this group. Simple click on ‘Delete’ as shown in the image: ‘delete usergroup’.
Delete usergroup

Another option to delete a usergroup is to delete them from the ‘existing user groups’ overview. See the image ‘delete usergroup from overview’. To go to this overview, click on the subheader ‘usergroups’. Then you will have the following option, when you click on the green ‘Action’ button. As shown in the image: ‘Delete usergroup from the overview’.
Delete usergroup from the overview

License
License can be found by clicking on the ‘Gear wheel’ and then on ‘License’, see the image below. 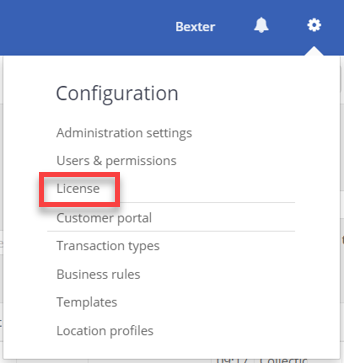
The topic license gives you information about your TrackOnline administration. Here you can see:
- License type
- General information
When you have clicked on 'License' you will see an overview screen, where you can find various information. See the image: 'License information overview'.
License information overview
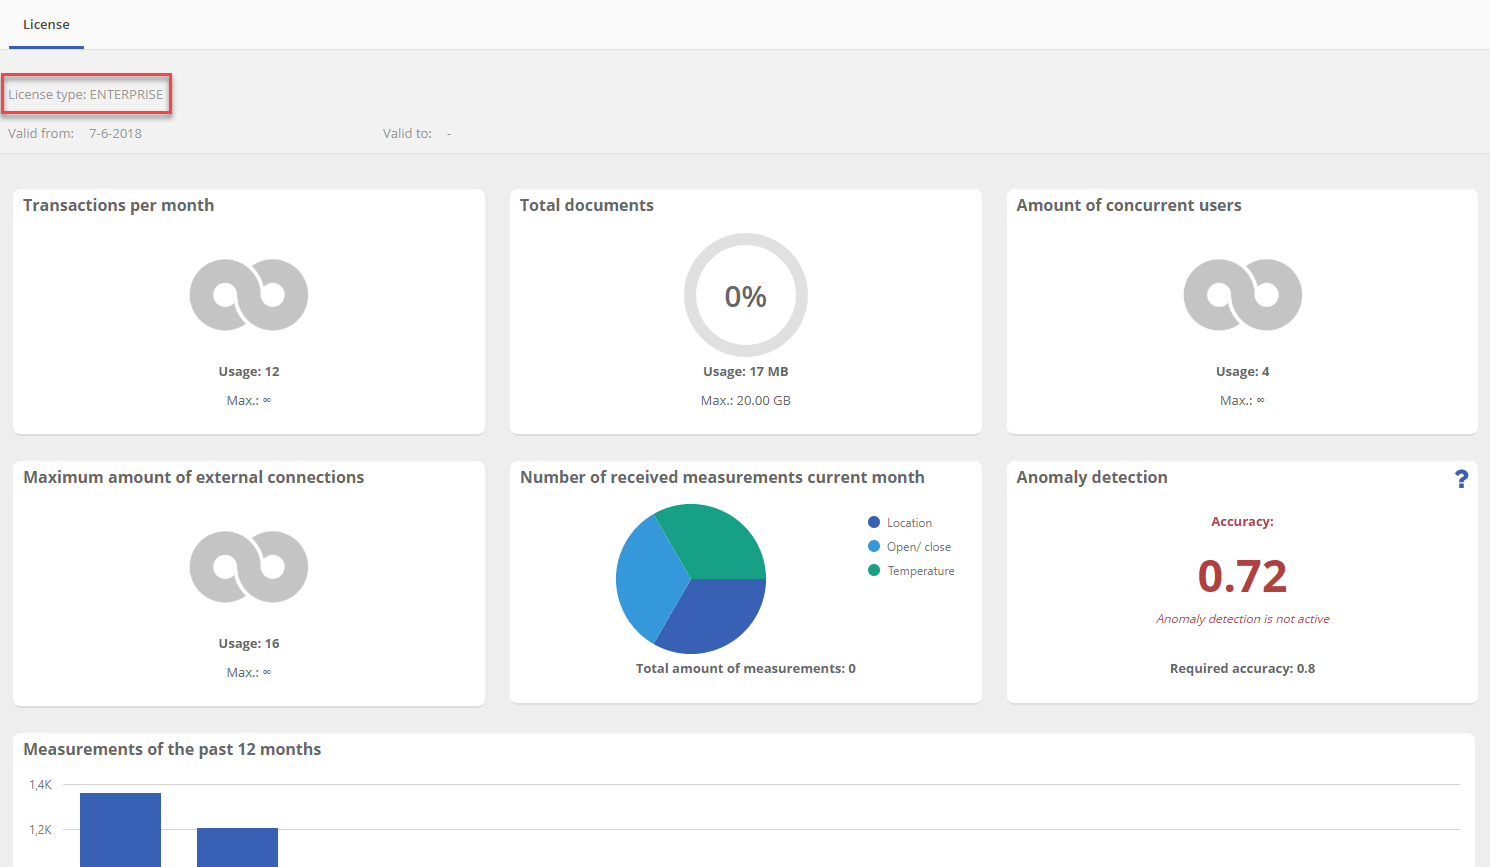
- Transactions per month: Here you can see the number of transactions that you did this month. Depending on your license type, you can see how many transactions you have left for this month.
- Total documents: Here you see the data usage of your document, currently you can see this administration used 17 MB of 20 GB that is available, for documents alone.
- Amount of concurrent users::This means the amount of users that can be logged in simultaneously in the TrackOnline application at once. You can see the usage, which refers to the current amount and the maximum, which is infinite in this example. The maximum depends on your license type.
- Maximum amount of external connections: This refers to the maximum amount of external connections with third party systems, via API's. Depending on your license you will see a maximum amount. You can also see how many connections with third parties are already in place.
- Number of received measurements current month: The number of received measurements current month is specifically for users of the 'IoT-functionality' of TrackOnline. Here you can see in a graph from how many times IoT-tags have sent their location data, open/close information and temperature. In the bottom graph you can also see the measurements of the past 12 months.
- Anomaly detection: Here you see the accuracy value of the anomaly detection model of your administration. You also see if the model is active or not. If the accuracy value is equal or greater than the required accuracy value, the model is active. More information about anomaly detection, you find HERE.
Extended user amount
Licenses have a limited number of users, 3 for Start, 5 for Pro and 8 for Pro+. If you want to add more users, you can either upgrade your license to a higher tier or buy a user pack. Email us for more information.
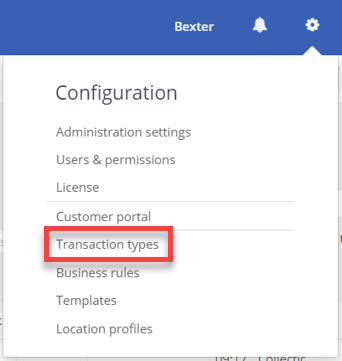
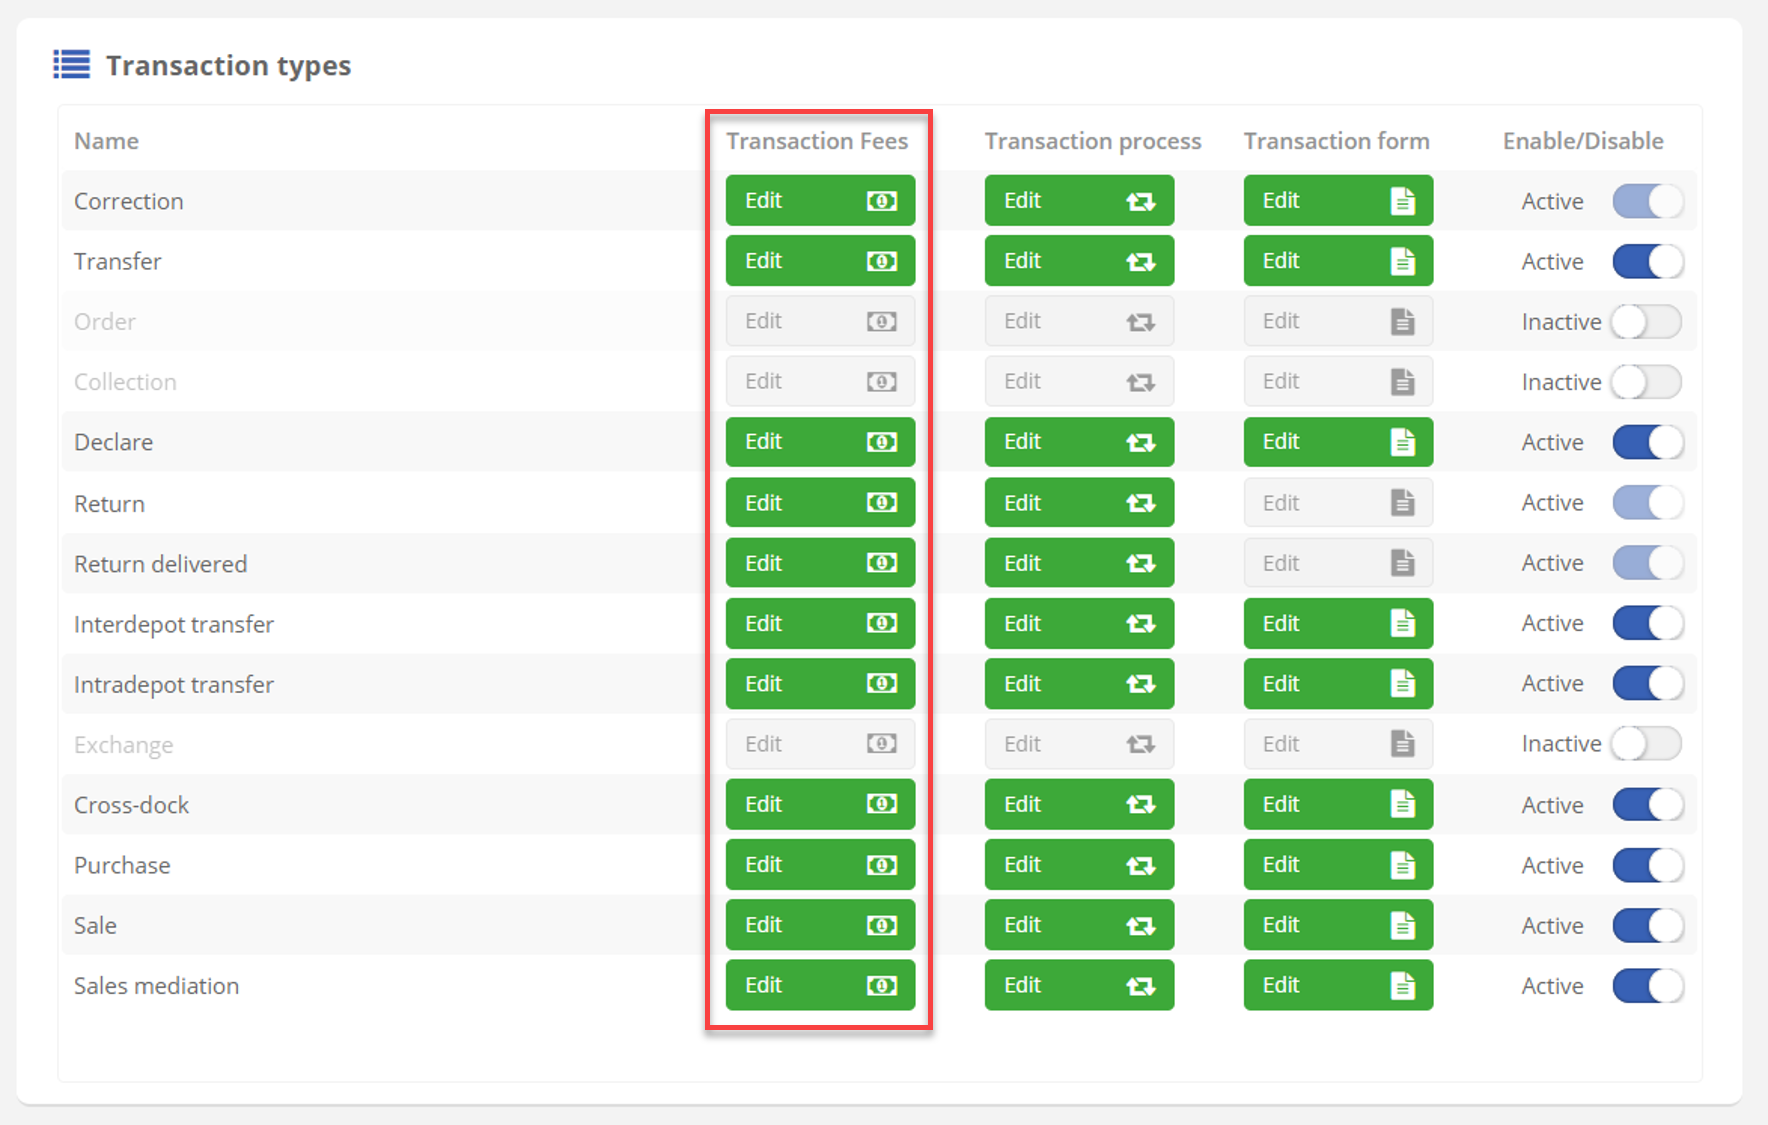
Transaction types
Transaction types can be found by clicking on the ‘Gear wheel’ and then on ‘Transaction types’, see the image below.
Topic Transaction types
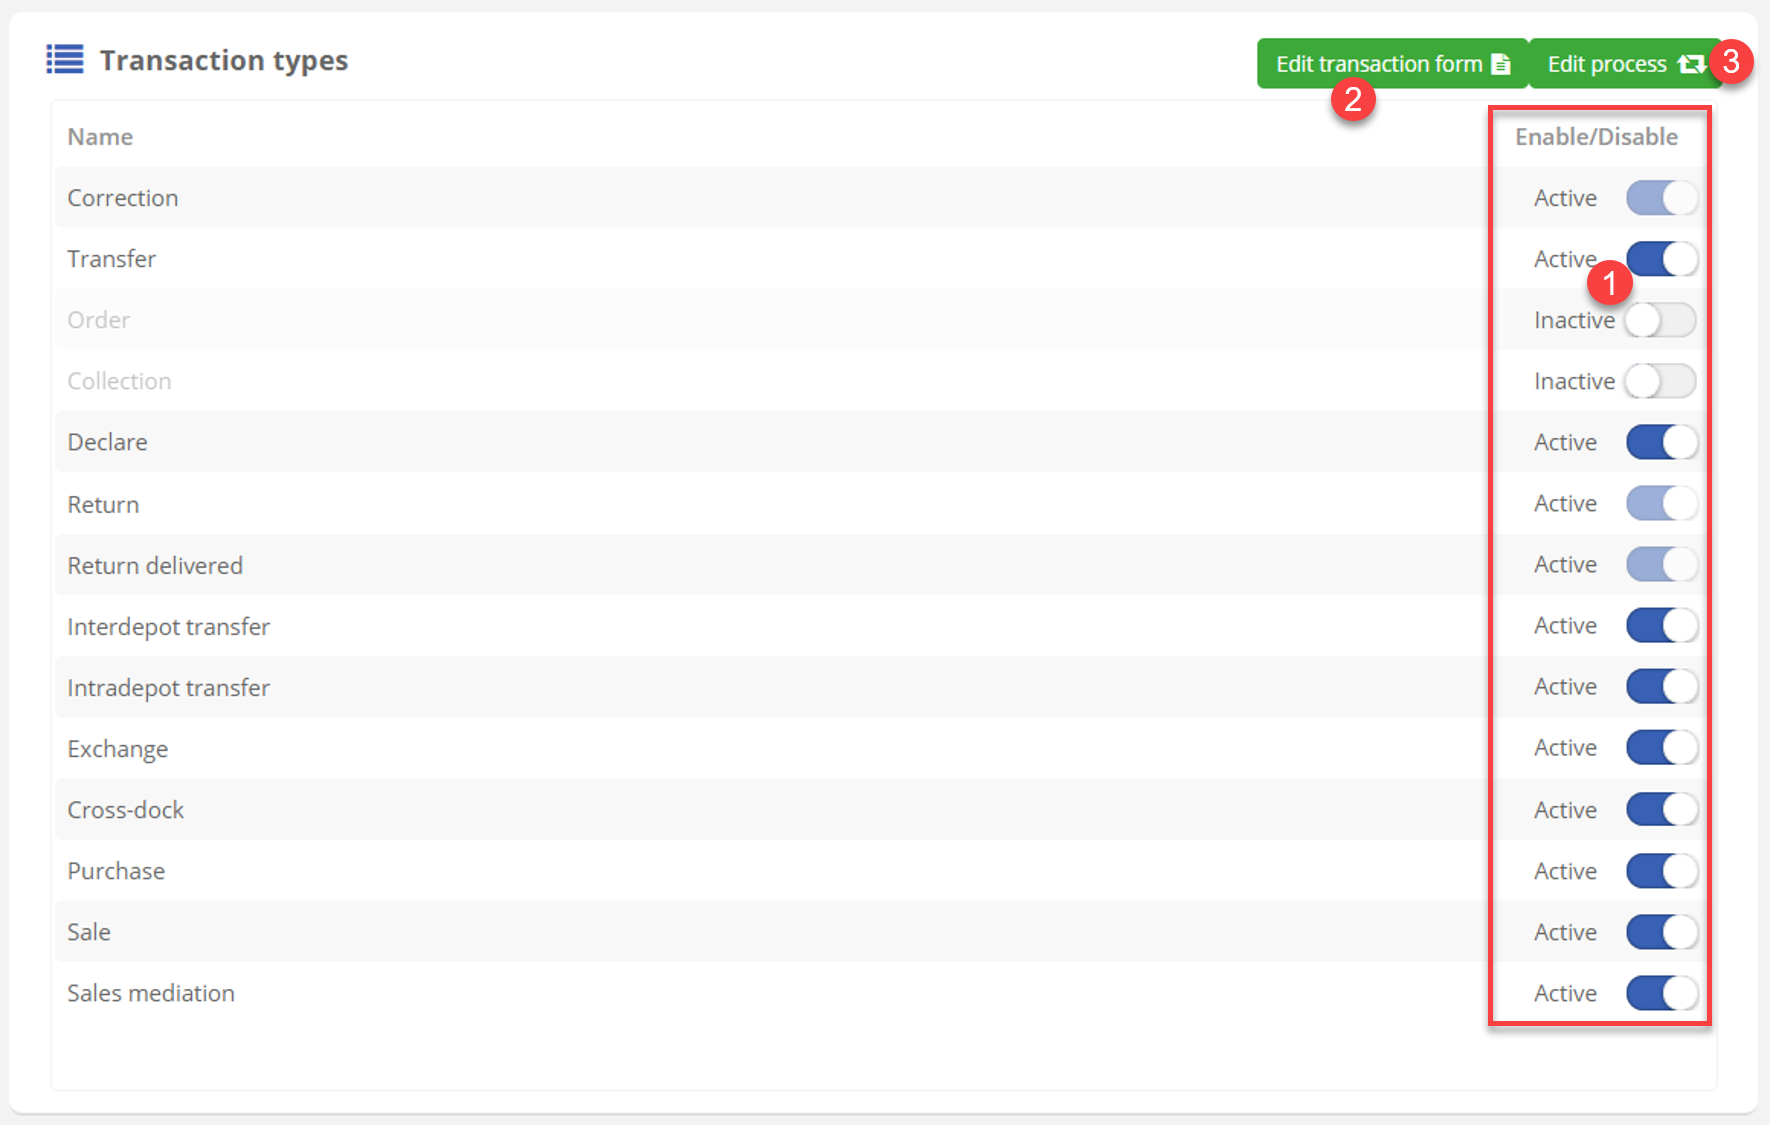
The transaction types settings let you customize which transactions types are available in your TrackOnline and the transaction forms (see Transactions). Available settings may differ depending on you licence.
Start licence
Pro, Pro+ and Enterprise licences
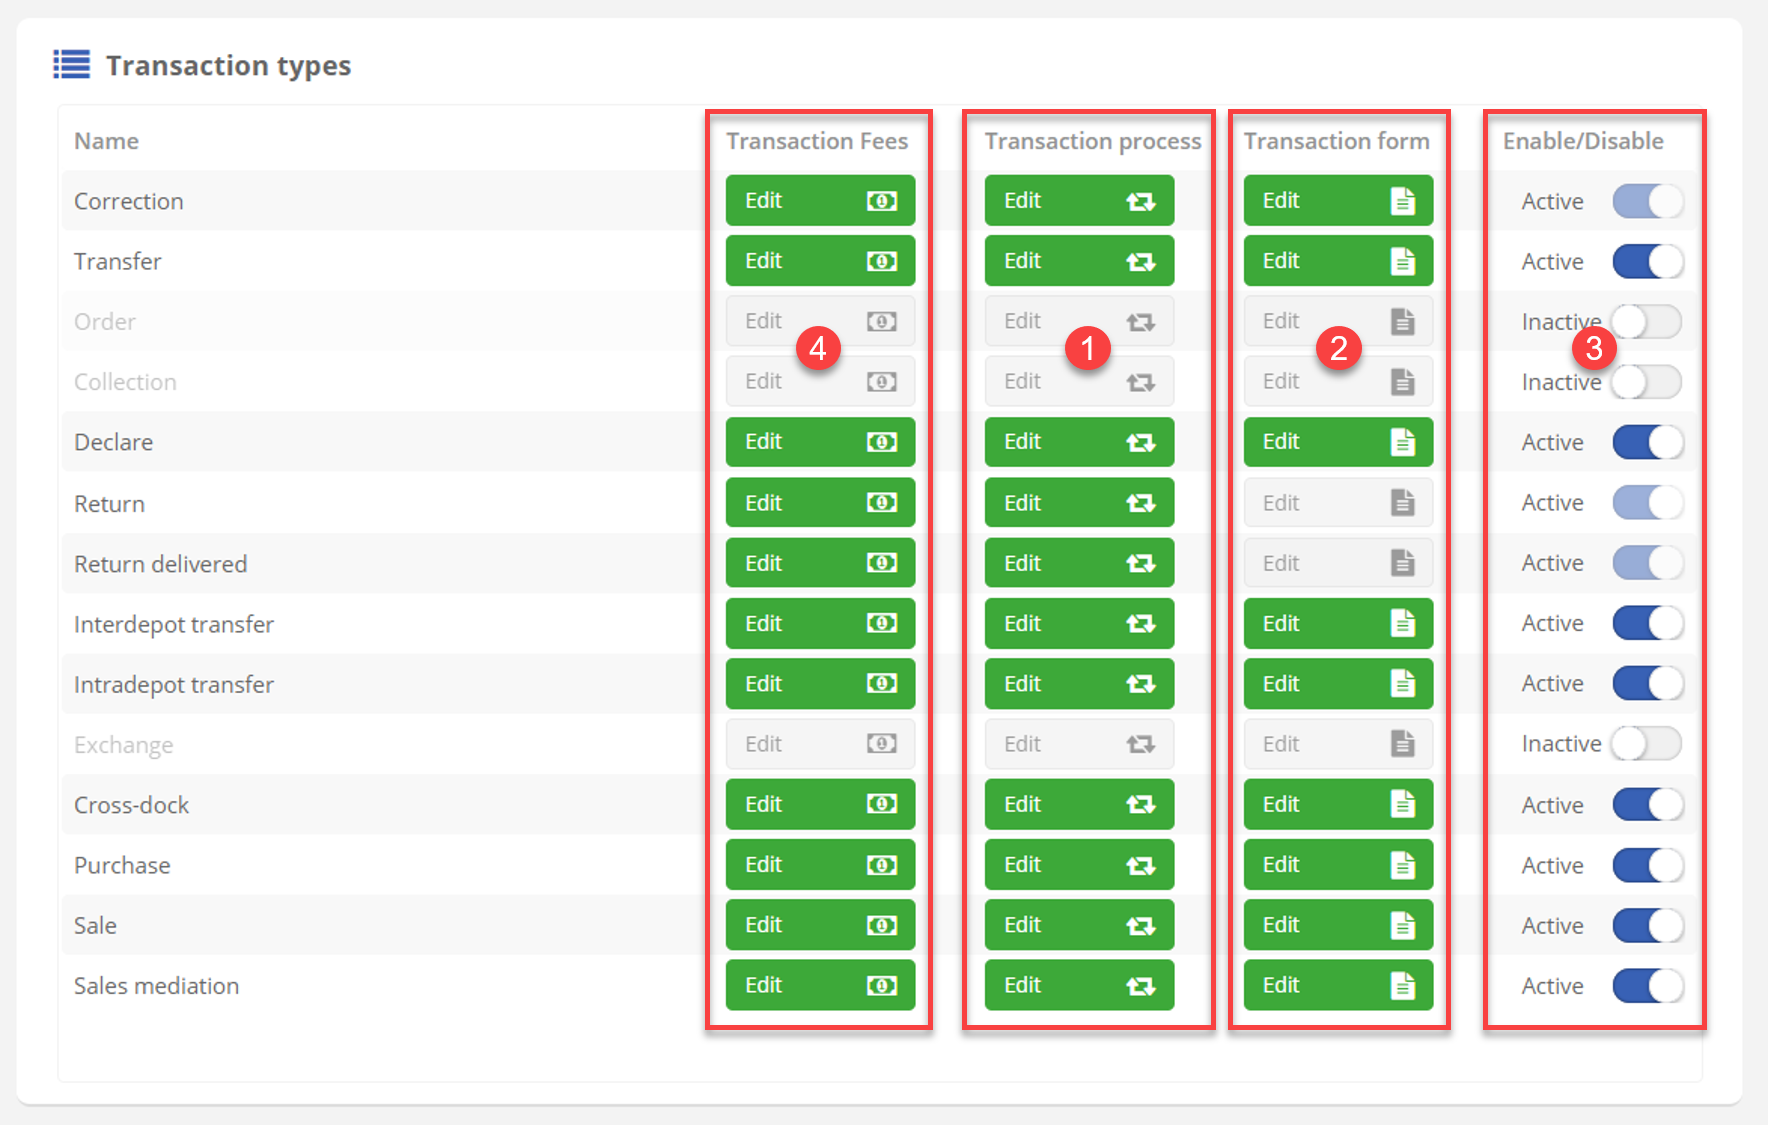
- Here you can edit the status process for the transactions. This will be discussed in details in the next paragraph.
- Here you can customize the transaction form. This is only possible for enabled transaction types. The form editing functionality is explained HERE.
- Here you can enable or disable transaction types. Only
Correction,ReturnandReturn deliveredare mandatory and can't be disabled. - Here you can edit the fees configuration for each transaction type. Fees are discussed in details HERE.
Status process editing
TrackOnline allows you to configure the status process for your transaction to fit your business flow. At the top, you can edit the name and number of the process and additionally provide further information in the description.
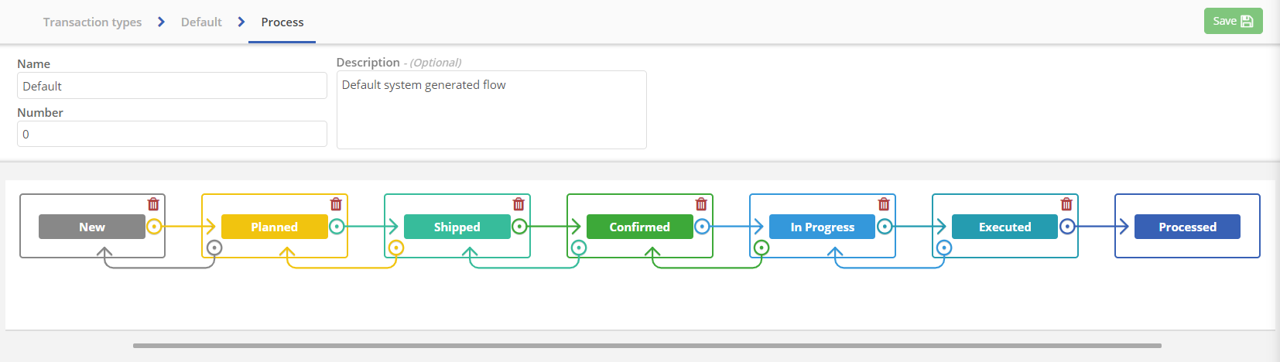
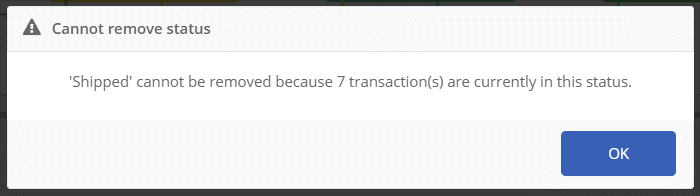
At the bottom half, you can edit the actual status process flow. Therefor, click on the  icon to delete one step in the process. You will only be allowed to delete a status if no transactions in your administration use it. Otherwise, you will see the following message.
When you delete statuses of the process,  icons appear. You can click on them to add a removed status at the place you want.
Processed, Cancelled & Declined
The status declined Processed is not removable and you are not able to add statuses after, it should always be the final status of a transaction. Declined and Cancelled are also not available as they should be available at any part of the process.
Use case
Let's say you need to configure the following process : New > In progress > Shipped > Processed.
First, remove Planned, Confirmed and Executed as they are not used in your process flow. This will look like below.

As you can see, we still need to invert the statuses In progress and Shipped. Therefor, remove Shipped. Then, click on the icon between In progress and Processed and choose Shipped. Finally, the process looks like below, as expected.

Transaction form editing
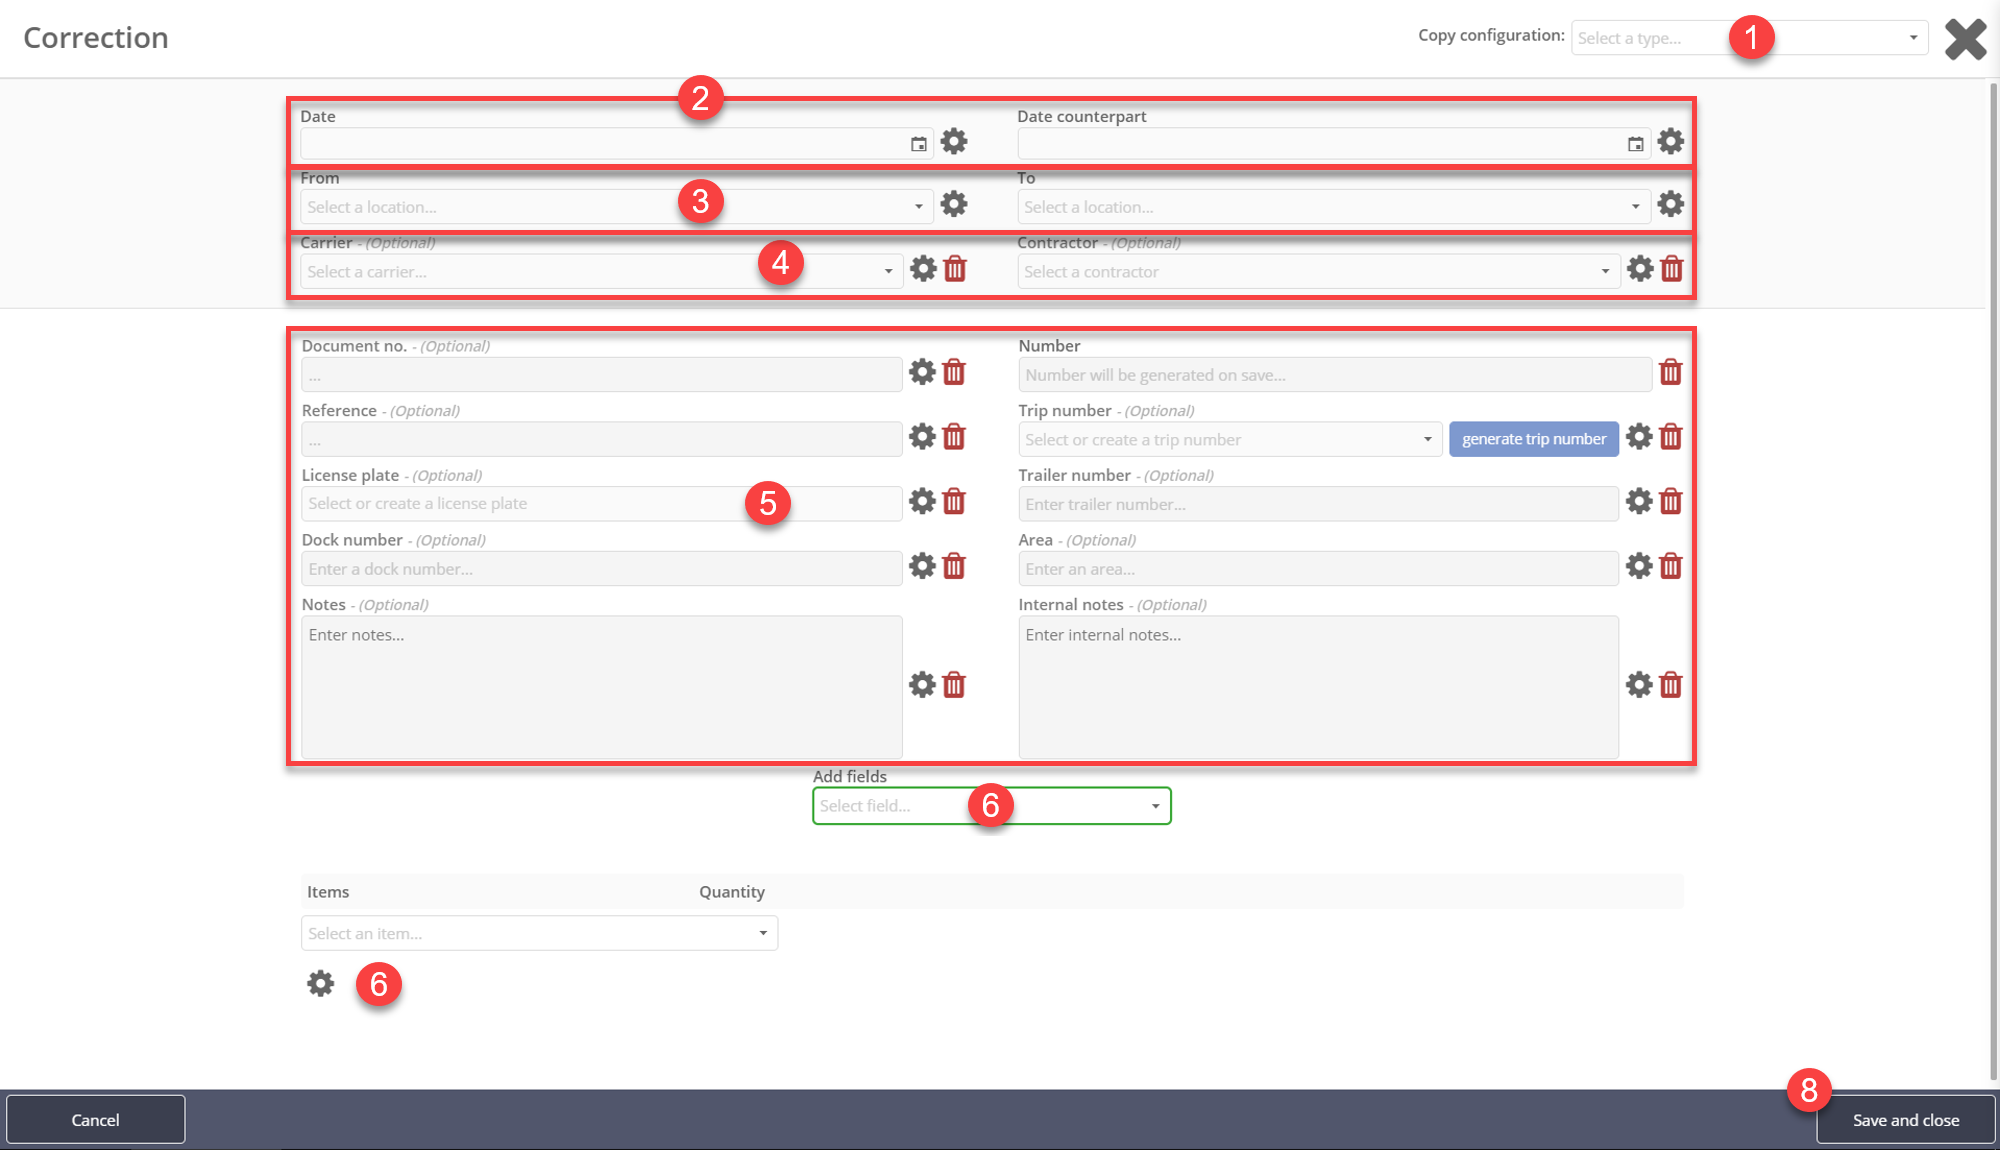
- If you wish to have the same form as another transaction type, you can simply choose the transaction type form to copy in this list.
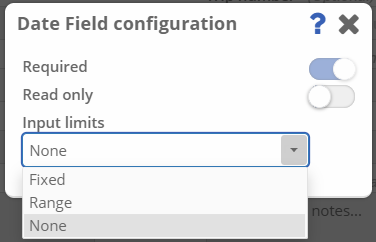
- Here you can configure date fields. The input limit will determine the date that can be entered in the field. No limit lets you choose any date, range limit let you choose between x and y days and fixed limit automatically sets x days.
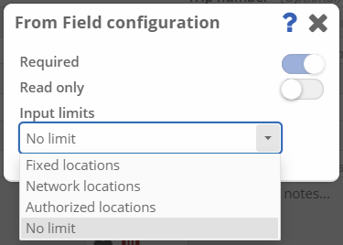
- From and To locations are mandatory fields, you can't delete them. However, you can set them as read-only so the locations cannot be changed. Four possibilities are available. You can choose no limits, then no restrictions will be applied to the locations that can be selected. Fixed locations will let you select a set of locations that will be offered when creating a transaction. Authorized locations will let you choose among your authorized locations when creating a transaction, more information about authorized locations HERE. Finally, you can choose network locations to be able to only choose locations that are part of your network at the transaction creation.
- Carriers and contractors can be removed or restricted. Carriers can be limited to a set of chosen carriers or to authorized carriers for the user. Contractors can be limited to fixed and authorized locations too but also to the locations that are part of your network.
- All these fields can be deleted, you can also choose whether they are required fields or not, except for Number, which is automatically generated.
- Here you can add a field to the transaction form. By default, only the
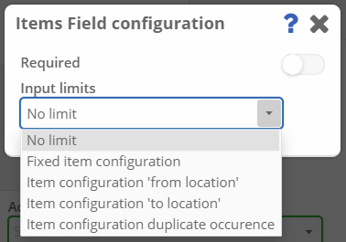
editorfield is available but each field you delete will be added in this list. - Here you can configure the limit for items quantities. Fixed item configuration limit will let you choose an item configuration which will be applied as the limit. You can also choose to use the item configuration of the From or To location as the limit. Item configuration duplicate occurrence will let you choose items and items quantities that satisfy both From and To item configurations.
- Here you can save your customized form and exit the wizard.
Fees configuration PRO PRO+ Enterprise
It is possible to create fees definitions that you can attach to your transaction to manage fees. Therefor, click on Edit under the column Transaction fees.
By default, one fees definition exists, so let's start by creating your own. Therefor, click on Fees definitions at the top.

Now, you can see the list of your fees definitions. Even though fees are applied to one transaction type, your fees definitions will be available for all transaction types when configuring them.
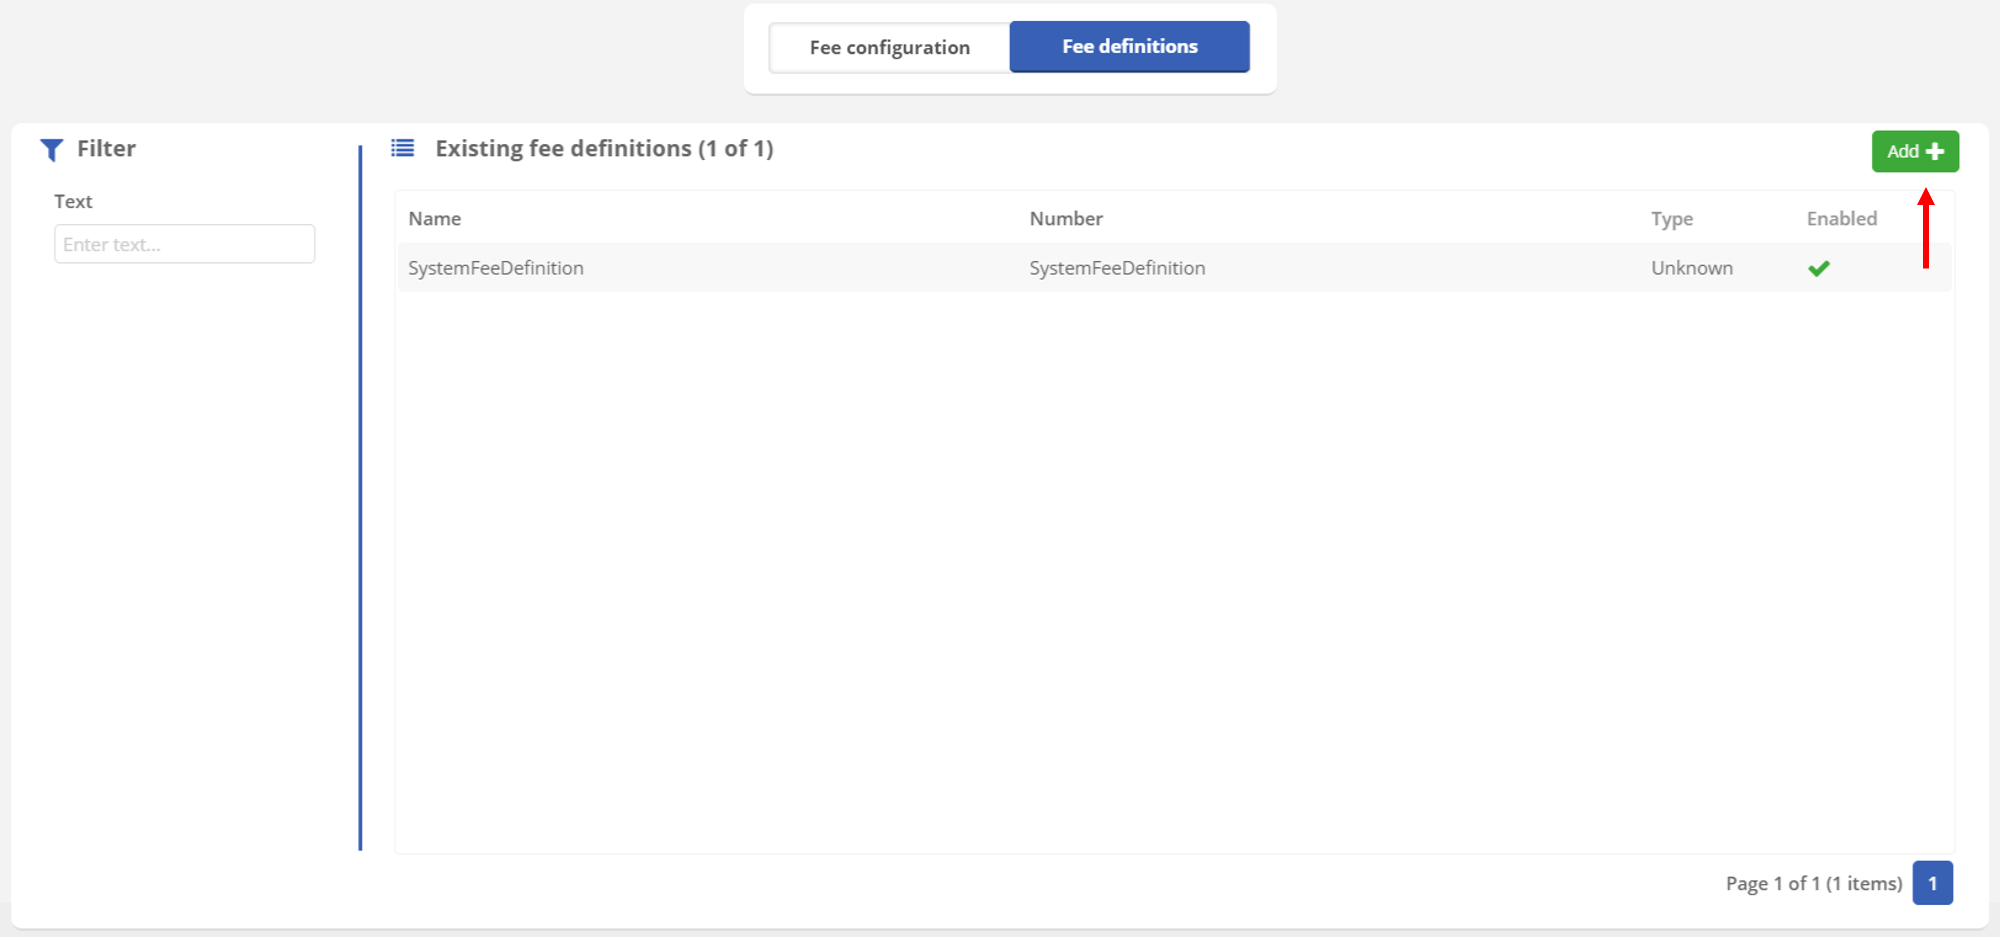
To create a new fees definition, click on Add at the top left of your screen. You are now on the form to create a fees definition.
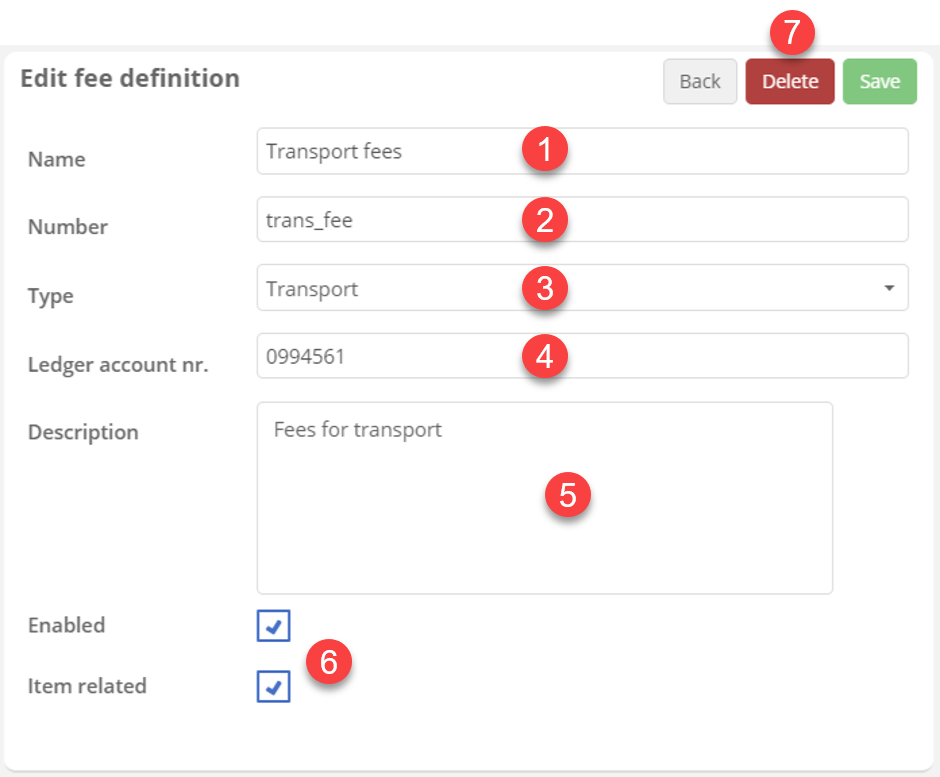
- This is the name of your fees definition. This is what you will see in the list when picking fees definitions.
- This is the identification of your definition.
- Here you can choose the type of fees that your definition relates to among
Unknown,Operational,AdministrativeandTransport. - The ledger account number is the number of the account the fees should be invoiced to.
- Here you can write a more detailed description of the fees definition.
- Here you can enable / disable your fees definition and choose if it relates to items or not.
- Finally, you can save your definition here, delete it or just go back without saving.
Once you have saved your fees definition, you should see it in the list under the default one. Please note that filters on the left can help you find the definition you need. Therefor, type the name of the definition you are searching for or part of it and hit enter on your keyboard.
Now let's go back to fees configuration.

You can choose your currency at the top with the Currency dropdown. To start the configuration, click on +.
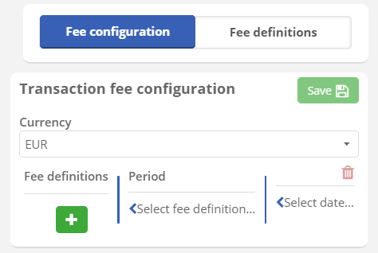
In the dropdown list, you can choose the fees definition that you want to use. The one we have created just before should be available. When you have chosen a definition, you can move directly to the third column and start the configuration.
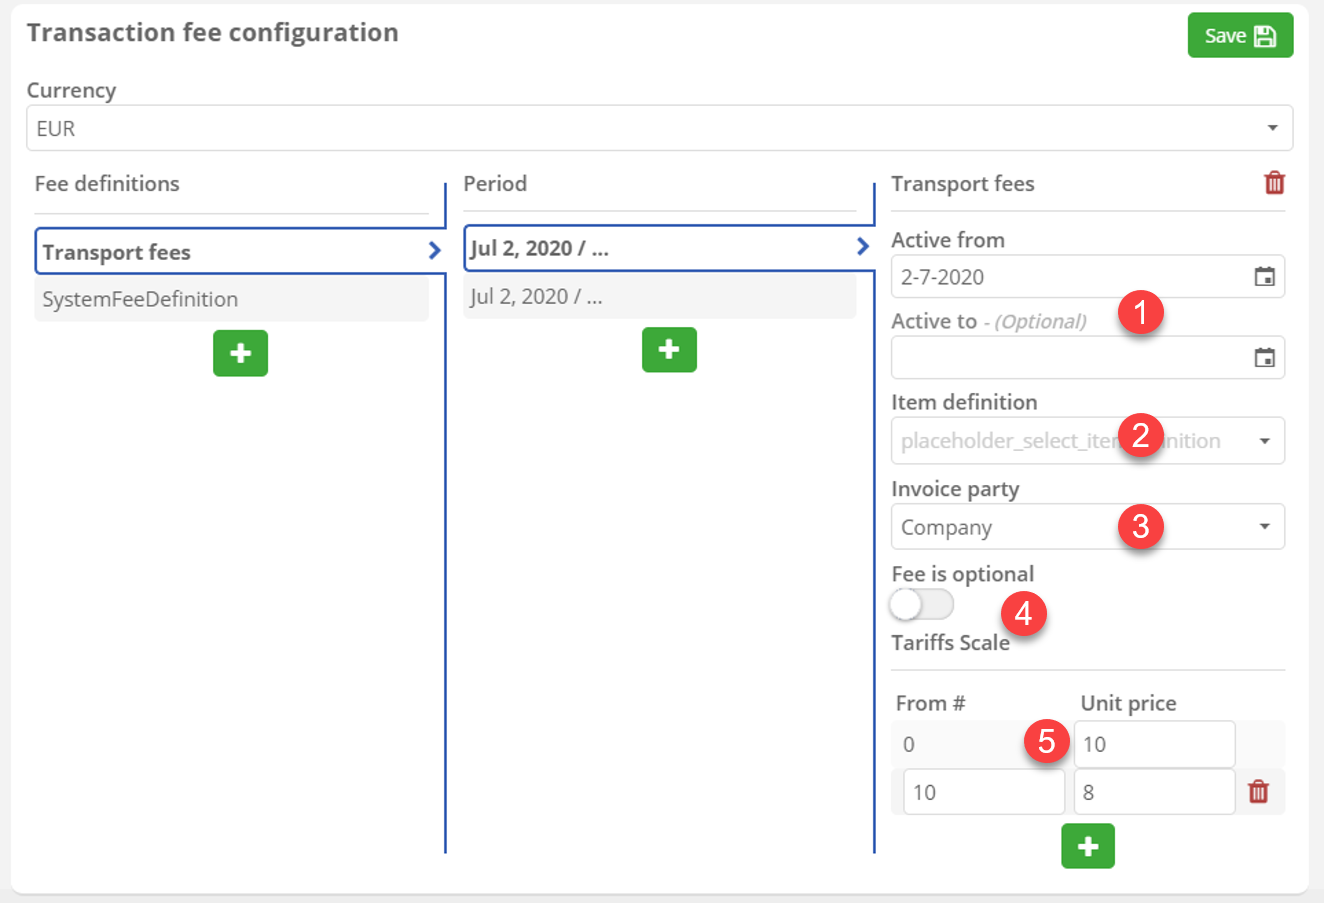
- First, you can set the period to apply the fees on. If you don't set any
Active todate, the fees will apply until you deactivate them. - The item definition is also optional, if you select one, the fees will only apply to this one.
- This is the party invoiced for the fees.
- Check this option if you want the fees to be optional.
- The tariffs scale allows you to decrease price with quantity. In this example, the first 10 items will be charged 10 euros each and the following, 8 euros each. You can add more stages with the button
+.
If you want to configure a second period with the same fees definition but another configuration, you can go back on the period column and click +. Then, you will be able to do another configuration as explained above.
You can also configure multiple fees definitions. Therefor, go back to the first column Fees definition and click on +. Selecting the same fees definition will create a new configuration period but choosing another fees definition lets you do the same process as explained before for this fees definition.
Once you have set up everything you need, you can save the configuration with the Save button at the top right of your screen.
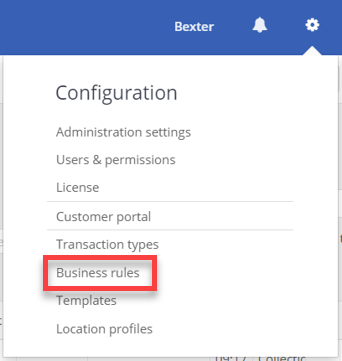
Business rules PRO PRO+ Enterprise
Business rules can be found by clicking on the ‘Gear wheel’ and then on ‘Business rules’, see the image below.
Topic Business rules
If you would like to automate manual (repetitive) processes in TrackOnline, you can use the 'Business rule'. The business rule is an engine in which you can set triggers based on a condition that eventually triggers an action. For instance, when you create a new transaction (trigger) with the transaction status 'New' (condition), you would like to send an email to a specific customer (action). Therefor you can use this feature.
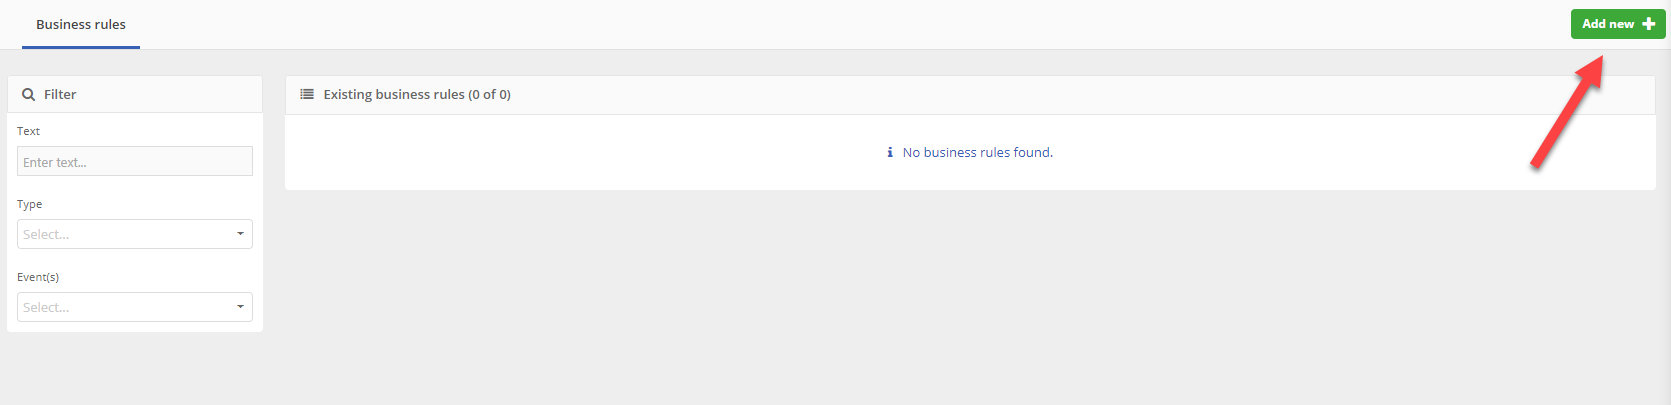
When you have clicked on 'business rules' in the gear wheel menu, you will see the overview as shown in the image below. Because we have not created any business rule yet, the overview is still empty.
Empty overview business rules
Create new business rule
To create a new business rule, click on the  button. A page as shown in the image below is shown.
Create new business rule
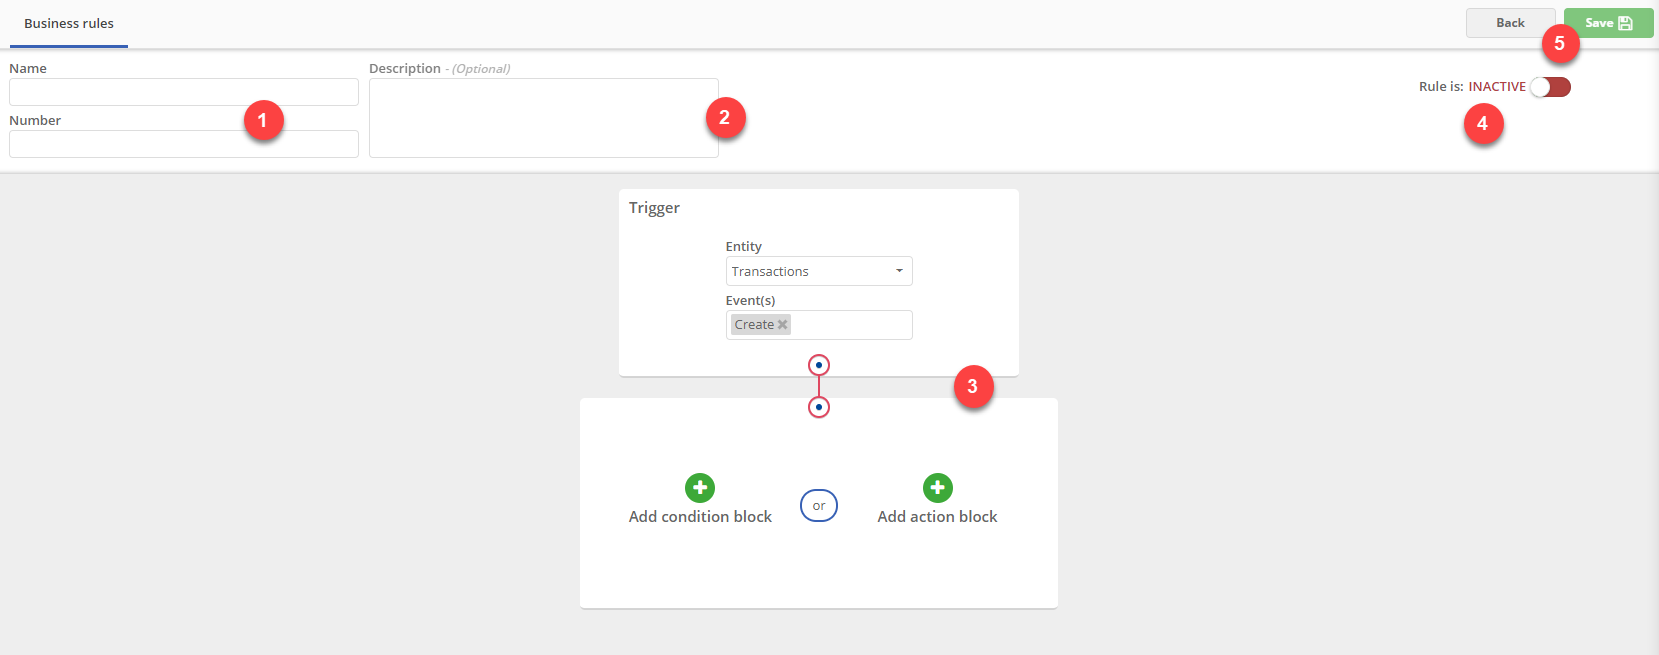
The different options are indicated with a number. Each of the options will be explained in detail below.
- Name/Number: Here you can give a name and number to the new business rule, to distinguish the different rules from each other.
- Description: Here you can give your business rule a description to make the functionality even more clear. This is optional.
- Business rule: Here you can configure the settings of the business rule. This is explained in more detail in the next paragraph, Business rule configuration.
- Active/Inactive: Here you can set the rule on active or inactive. This means that if you want your rule to be executed, you put this setting on
Active. If you want the rule not to be executed, for instance when your customer is on vacation and don't want to receive emails for a while, you can put this setting onInactive. - Save/Back: If you are satisfied with the settings of the new business rule, you can click on
 to save your rule. If you changed your mind and don't want to create a new rule, you can click on the
  button. This brings you back to the business rule overview page.
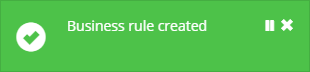
If you saved your business rule succesfully, you will see a message as shown below.
Business rule succesfully created
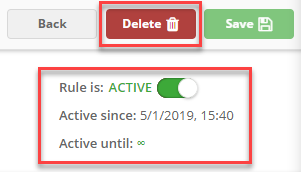
Also below the 'Inactive/Active' switch you will find the date and time that the rule was active and until when it is active. The same window also shows an extra button besides the 'Back' and 'Save' button. You can now 'Delete' the business rule if you don't use it anymore. In the image below an example of how this data would look like, is shown.
Business rule information
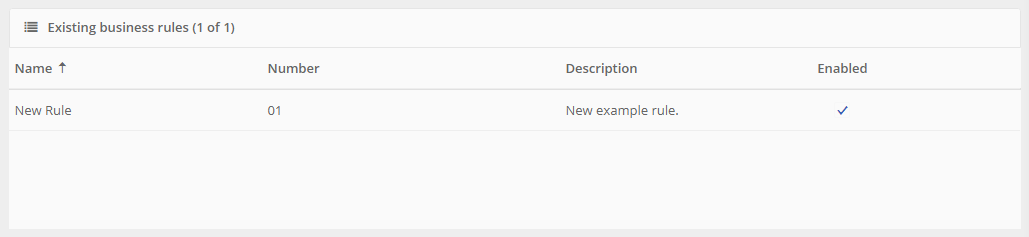
If you now return back to the business rule overview page (by clicking on the 'Business rules' tab on the top of the page), you will see that the new created rule is now visible in the overview. For example, if you created a business rule with the name New Rule, number 01, description New example rule and status Active, it would look like the image as shown below.
Overview existing business rules
If you have more business rules in your administration, the filter on the left side of the page gives you the option to filter for the specific rule that you are looking for. See the image below.
Business rule filter
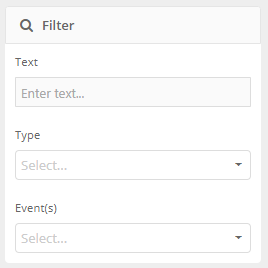
You can filter on:
- Text: For instance, here you can type in the name or number of the rule.
- Type: You can choose if you are looking for business rules that are event based, or scheduled.
- Event(s): You can choose if you are looking for rules with 'Create', 'Delete' or 'Modified' events.
Business rule configuration
In this paragraph we explain how to configure the different parts of the business rule. We start with the trigger block, see the image below.
Block - Trigger business rule
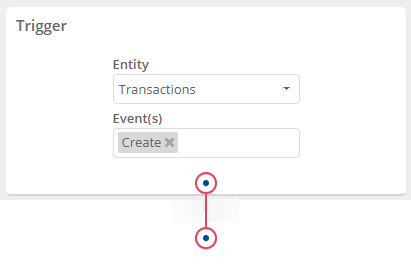
The first setting you can configure is the entity. In this example we choose Transactions. The second setting is an event (or more events). In the example we choose Create. So if a transaction is created, an action will happen. As event you can also choose more than one. For instance, you can also select 'Delete'. Now when a transaction is created OR deleted, an action will happen.
So we finished the first step of the business rule configuration. Let's move on.
The second block asks you if you want to add a Condition block or an Action block, see the image below.
Block - Choose condition or action
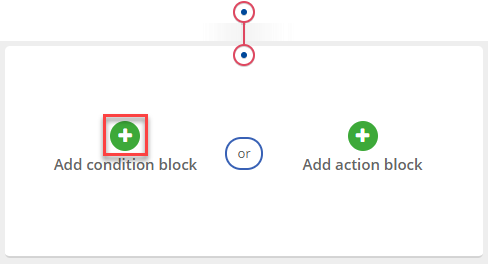
Let's say we will add a condition block. We click on  as marked with the red frame in the image above. The following block appears, see the image below.
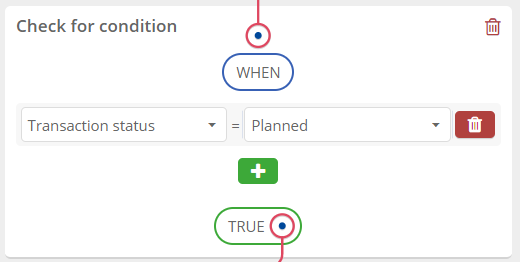
Block - Check for condition
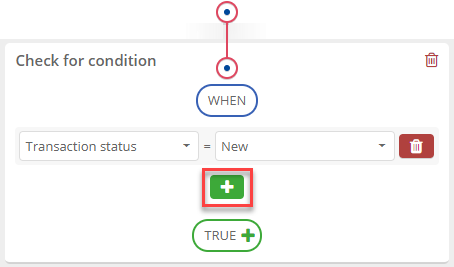
This condition block has a couple of options:
- From location type: This option refers to the type of the from location. So when the condition that the from location is of the chosen type, only then the rule is executed.
- E.g. locationtypes: Unknown, customer, Supplier.
- To locaiton type: This option refers to the type of the to location. So when the condition that the to location is of the chosen type, only then the rule is executed.
- E.g. locationtypes: Unknown, customer, Supplier.
- Transaction status: This option refers to the status of a transaction. For instance, when the condition is that the rule only applies to transactions with the status 'new', only then the rule is executed.
- E.g. transaction statuses: New, planned, confirmed.
- Transaction type: This option refers to the type of a transaction. For instance, when the condition is that the rule only applies to transactions of type 'order', only then the rule is executed.
- E.g. transaction types: Collection, correction, order.
It's also possible to add more than one condition. For instance, if you would like set a rule for transactions of type 'Planned' AND for a to location 'Location B'. To do this, click on  , marked with the red frame in the image above. You can now choose a new condition. When you have added an extra condition but then you changed your mind, you can still remove the condition. Therefor click on the
  button.
If you are satisfied with the business rule settings so far, you can click on the  button to go to the next block. This is the
 Action block, see the image below.
Block - Actions
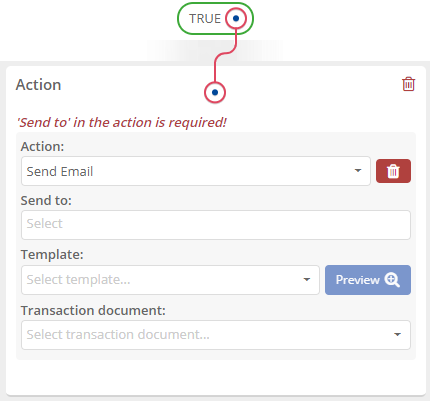
In this block you can configure what action should happen if all the conditions of the rule are true. For instance, you want to send an email to the To location with a template of your choose, when the conditions are true. The templates that you can choose are the templates that you have created in your own administration.
ℹ️ For more information about templates, click HERE.
If you would like to see how the template looks like, you can click on  to get a preview.
Note
When you use a template in a business rule, the language of the template is triggered based on the location/carrier language.
You can also add a type of transaction document to the email that is send automatically.
In the image below an example is shown of the action block settings.
Example action block settings

Below we show a complete example of a filled-in business rule to make this feature even more clear.
Scenario 1: automaic email to supplier
Example scenario
If we create a transaction of type order and the 'To' location is a Supplier, we would like to automatically send an email to this supplier. This email looks like a specific template in our administration and also includes a transaction document.
Then the business rule settings look like the image below.
Complete business rule example
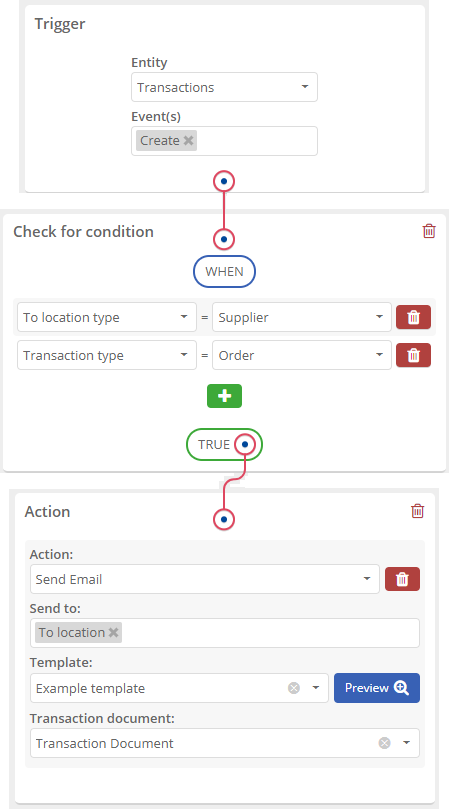
If you don't have conditions that applies to an action, you can also create a rule with only a trigger and an action block.
Scenario 2: auto update transaction status
Example scenario
When items of a transaction leave your facilities, you want the transaction to automatically update its status.
To configure this behavior, we need to trigger the business rule on the physical location of the items, this is made by choosing IoT GPS measurement in the entity list.
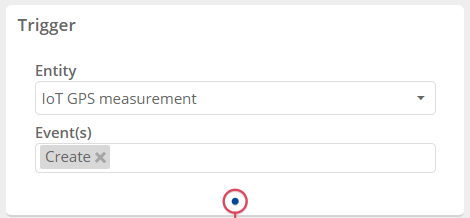
Then, you can bind the event to a specific transaction status, for example Planned if you know that transactions ready to be shipped are always on status Planned. This helps to prevent errors if wrong items are attached to the transaction, but you can also leave this empty.
Finally, let's pick the action. The only action available in this case is Go to next transaction status. In the second field, you can choose when this action is triggered:
- If the items leave the geofence area of the FROM location
- If the items leave the geofence area of the TO location
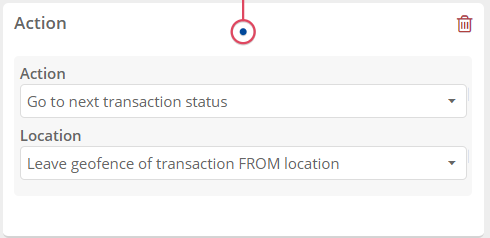
In our case, let's pick the first option because we want to trigger the action when the items leave the facilities to be shipped. Therefor, whenever a transaction is picked up and shipped, the status is automatically updated to the next one in your status process (learn more about status process HERE).
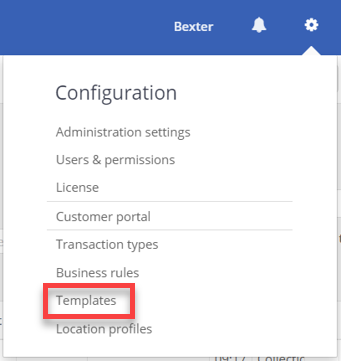
Templates
Templates can be found by clicking on the ‘Gear wheel’ and then on ‘Templates’, see the image below.
Topic Templates
When you would like to send emails to your customers, sometimes you want to use different templates. For instance, if you have customers in multiple countries, you can send templates in different languages. The language of the template is then triggered based on the location/carrier language setting (see Location Language).
ℹ️ This also applies when you use templates in a business rule. For more information about business rules, click HERE.
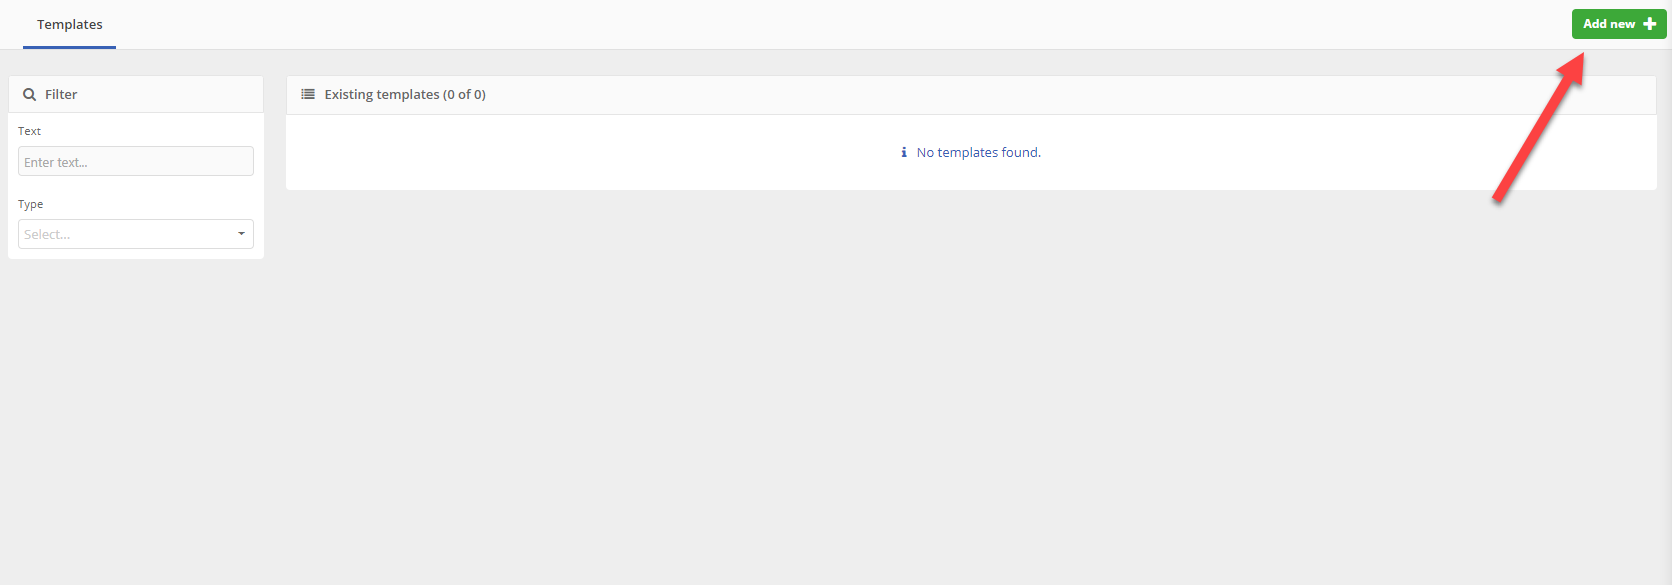
When you have clicked on 'templates' in the gear wheel menu, you will see the overview as shown in the image below. Because we have not created any templates yet, the overview is still empty.
Empty overview templates
Create new template
To create a new template, click on the button. A page as shown in the image below is shown.
Create new template
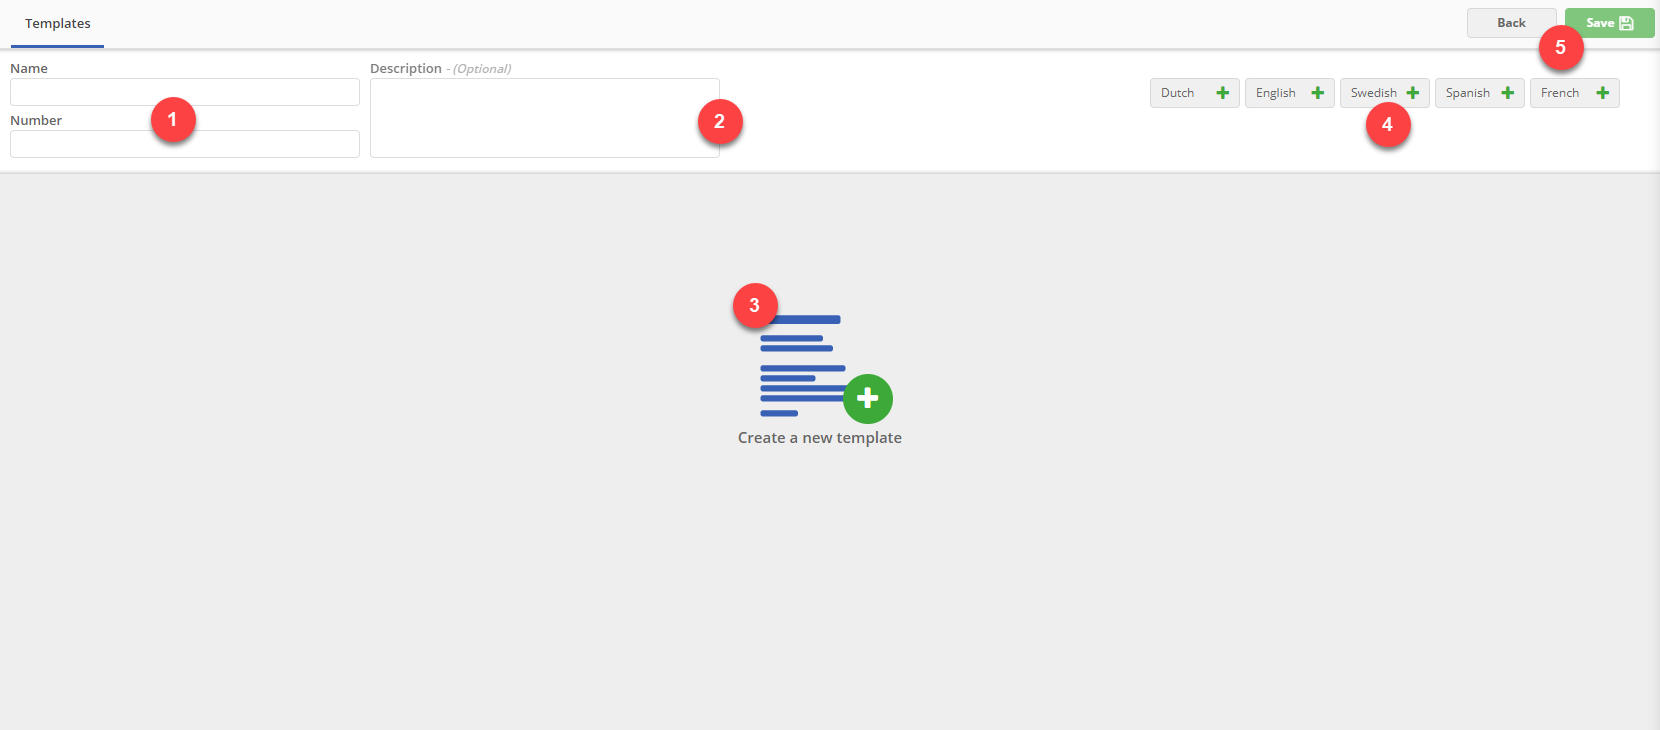
The different options are indicated with a number. Each of the options is explained below in more detail.
Name/Number: Here you can give a name and number to the new template, to distinguish the different templates from each other.
Description: Here you can give your template a description to make the functionality even more clear. This is optional.
Create a new template: To start creating your new template, you click on this image. How to exactly create a template is explained in more detail in the next paragraph Template configuration.
Languages: Here you can select the languages of which you want to create the templates for. For instance if you only have Dutch, English and Spanish customers, you can click on these language buttons. This setting will then look like this:

:information_source: This setting is also explained in more detail in the paragraph [Template configuration](/documentation/configuration.md#template-configuration).Save/Back: If you are satisfied with the design of your new template, you can click on
to save your template. If you changed your mind and don't want to create a new template, you can click on the button. This brings you back to the template overview page.
If you saved your template succesfully, you will see a message as shown below.
Template succesfully created

At the same window, an extra button besides the 'Back' and 'Save' button, is shown. You now have the option to 'Delete' the template if you don't use it anymore. Therefor click on the  button.
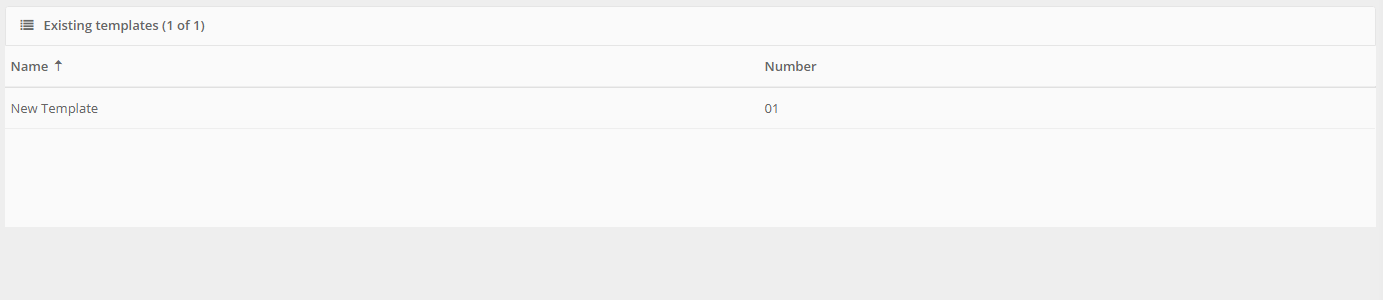
If you return back to the template overview page (by clicking on the 'Templates' tab on the top of the page), you will see that the new created template is now visible in the overview. For example, if you created a template with the name New Template and number 01, it would look like the image as shown below.
Overview existing templates
If you have more templates in your administration, the filter on the left side of the page gives you the option to filter for the specific template that you are looking for. See the image below.
Template filter
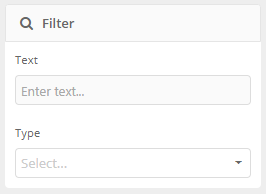
You can filter on:
- Text: For instance, here you can type in the name or number of the template.
- Type: You can choose if you are looking for templates that are used for
Audits,Balances,Confirmations,TransactionsorUnknown.
Template configuration
In this paragraph we explain how to configure the different options of the template editor.
If you have clicked on the  button, the template editor will be visible. This editor looks like the image as shown below.
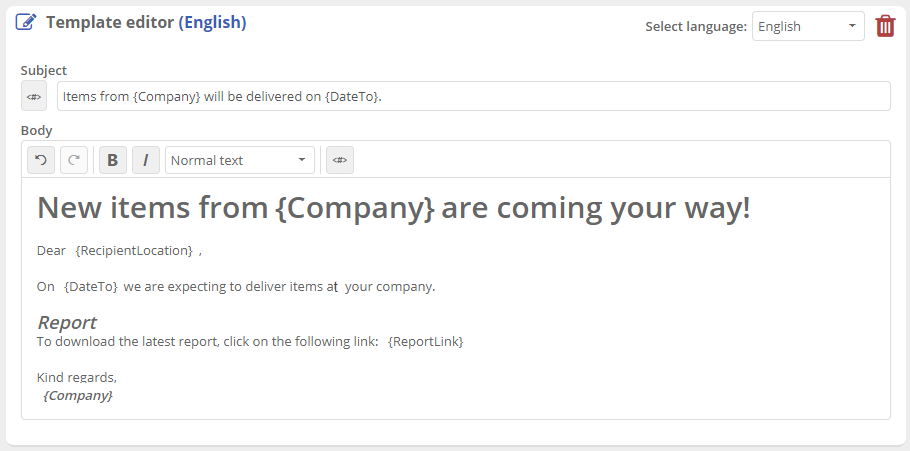
Template editor
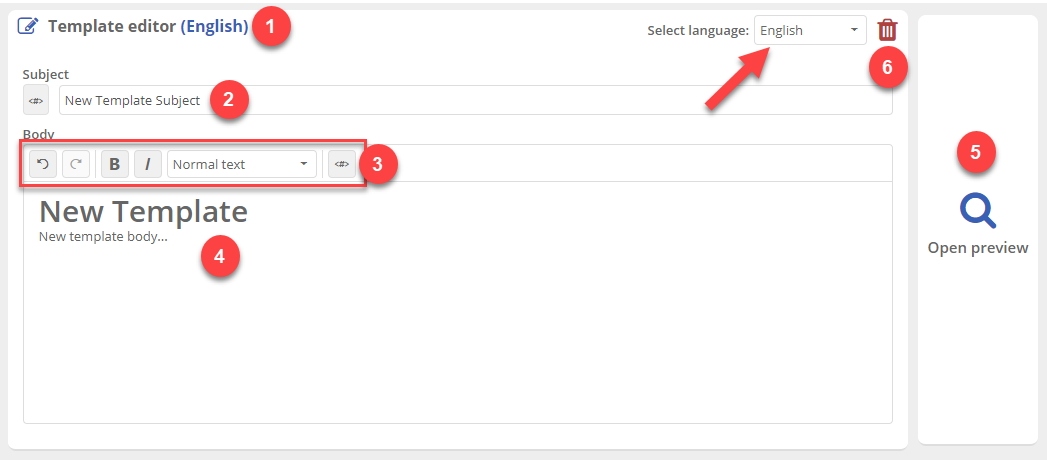
In the image the different options are indicated with a number. Below, each of these options are explained in more detail:
- Language indicator: Here you see which language you have selected and for which language you are making a template. You can switch to another language by clicking on the dropdown menu on the right side of the template (indicated with the red arrow in the image above) or you can click on one of these language buttons, on the top right of the screen.
The button that is colored blue, is the language that is selected. In this case that is the language 'English'.
- Template Subject: Here you can give your template a title. For instance, if you are creating a template to inform your customers about the items that will be delivered on a certain day, an example of a subject could be:
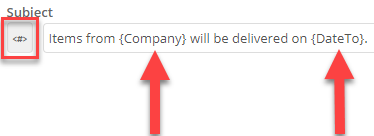
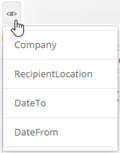
In this example you see the words {company} and {DateTo} between brackets. This means that they are variables and that they changing for each customer/date. So the word {company} will be replaced with the name of the Company and the word {DateTo} will be replaced with the To date of the selected transaction. You can choose these variables by clicking on  as indicated with the red frame in the image above. The options that you can choose are:
 Company, RecipientLocation, DateTo and DateFrom. See the image below.
Template variables
- Text editor buttons: Here you can use the buttons to edit your text. In the table below each button is explained.
Button Function 
Undo the changes that you have made to the template body. 
Redo the changes that you have made to the template body. 
Make the text (of parts of the text) bold. 
Make the text (of parts of the text) italic. 
Add headings or write your text in 'normal text'. Add variables (e.g. {Company}) to your template text. See below for a detailed explanation.
Body-variables: You can add different variables to the body of the template. These are: Company, RecipientLocation, DateTo, ReportLink and DateFrom. These variables differ, depending on the customer/date etc. For instance, if you fill in {Company}, this variable changes to the name of your company. An example of how a text could look like, is visible in the image, shown ad number 4.
- Template text: Here you can write the text of the template that you would like to send to your customers. An example is shown below.
Template body example
Open preview: Here you can click if you would like to see a preview of a template. For instance, if you have created multiple templates in different languages, you can switch between languages to compare the layout of your templates with each other.
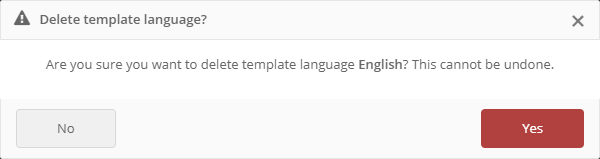
Remove template: If you would like to remove a template, you can click on the trash can icon. A pop-up window will appear to make sure you are making the right decision. This window looks like the image below. Click
Yesif you definitely want to remove the template. ClickNoif you changed your mind and still want to keep the template.
Delete template message
Note:
If a template is used in your administration, for example in a business rule, it is not possible to delete the template!
Template example
In the paragraphs above, we have created an English example template similar to the image below.
Template example
In this paragraph we will show you how this will look like when you receive an email created with this template.
For example, we are sending a Transaction per location report to location A with the template 'New template' as created above. When location A opens the email, it will look like the image below.
Email created with template
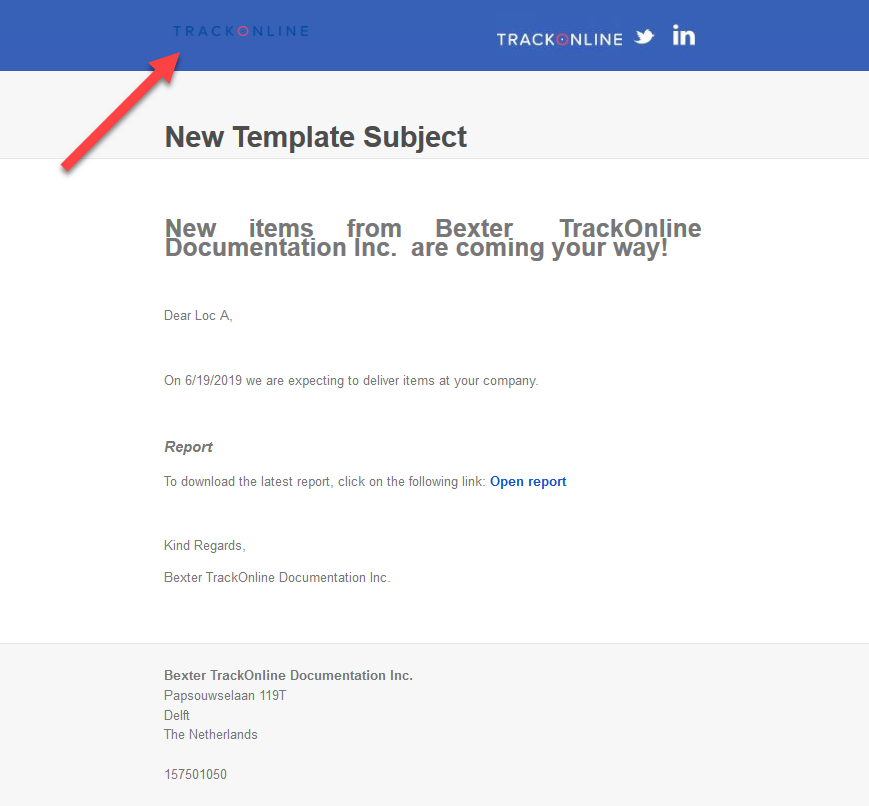
If you have added a image/company-logo to your administration, this image is shown instead of the 'TrackOnline' logo (see the red arrow).
ℹ️ Do you want to know how to add a logo to your administration, click HERE.
Process management PRO+ Enterprise
The functionality Process management gives you the opportunity to incorporate your business flows in TrackOnline. For instance, if you would like to manage who can access a transaction, who can change a transaction or to automatically change the status of a transaction after a certain time, you can use this functionality.
Before you can manage processes, there are a couple of actions you have to do first. You have to adjust some settings in your administration so you can apply these to the processes.
In the next paragraph But First we explain which actions you need to take.
But First...
Before you can use the process management functionality the right way, make sure your administration has the following settings configured:
1. Customer Portal + Portal Users
2. Location Profiles
3. Item Configurations
Declining and confirming transactions with the help of the process management functionality, is ONLY possible when you have configured a customer portal. This is a portal that gives you the opportunity, as head administration, to configure what types of orders your customers can place.
To let the customer portal work completely as it should be, you also need to have location profiles and item configurations in your administration.
ℹ️ Why? Click HERE for more information. Here you can also find how to configure all of these settings.
Create new process rule
Coming soon!
Location profiles
Location profiles can be found by clicking on the ‘Gear wheel’ and then on ‘Location profiles’, see the image below.
Topic Location profiles
If you would like to configure the behavior of a location, for instance to set specific workdays, you should take a look at Location profiles. A location profile is a reusable object in TrackOnline, selectable as a property of a location. Once a location has a profile configured, all transactions from and to this location respect the rules of the location profile. (ℹ️ To read more about creating a location and adding a location profile to this location, click HERE).
When you have clicked on 'Location profiles', you will see a screen as shown in the image below.
Location profiles overview

Here you see an overview of the existing location profiles in your administration. In this example there are already five profiles. If you would like to remove one of the profiles you can simple do this by clicking on the  button on the right side of the screen. See the red arrow in the image above.
If you would like to add a new location profile to your administration, we recommend to first create 'Workday configurations', 'Holiday configurations' and/or 'Item configurations'. We will explain step by step, how you create these configurations.
If you already have created these three profiles you can skip step 1 till 3 and directly go to step 4: Add new location profile. It is also possible to only create 'item configurations' (and not a 'workday' or 'holiday' configuration) before creating a new location profile.
Step 1: Add new workday configurations
First you can create a new workday configuration (optional). The effect of a workday configuration is noticeable when you want to create a transaction on a non-workday. The system shows a message that this option is not possible. You have to change the date of the transaction to a date that is a workday.
To create a new workday configuration, click on 'Workdays' as shown with the red frame in de image below.
Workdays tab

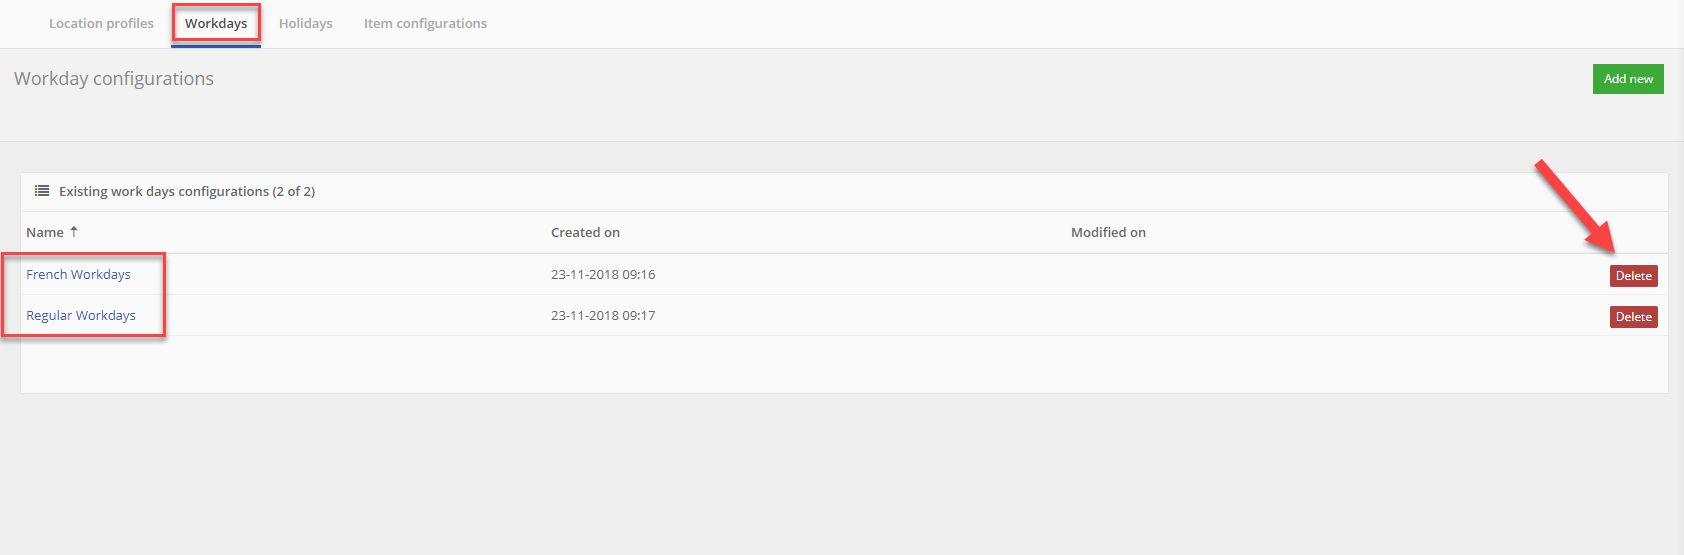
Now you see an overview of the workday configurations. If you have not created any yet, the overview will be empty.
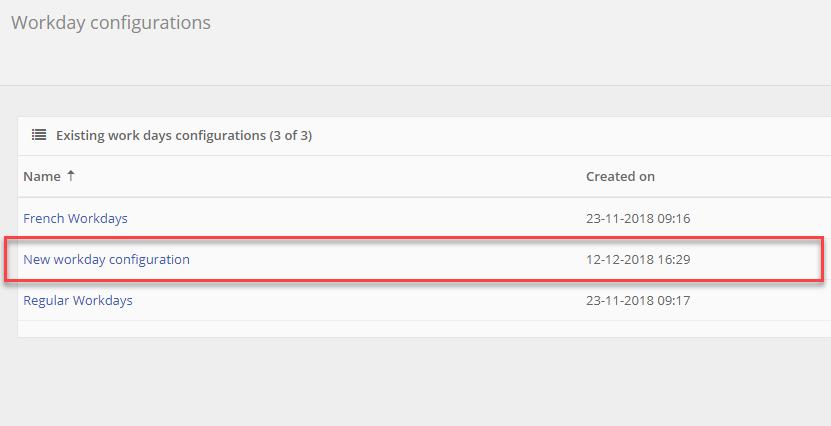
In the example below, we have already created two workday configurations. If you would like to delete one of the workday configurations, you can click on the button on the right side of the screen (see the red arrow).
Workdays overview
If you want to add a new workday configuration, click on the  button. A window will open similar to the image below.
Workdays details
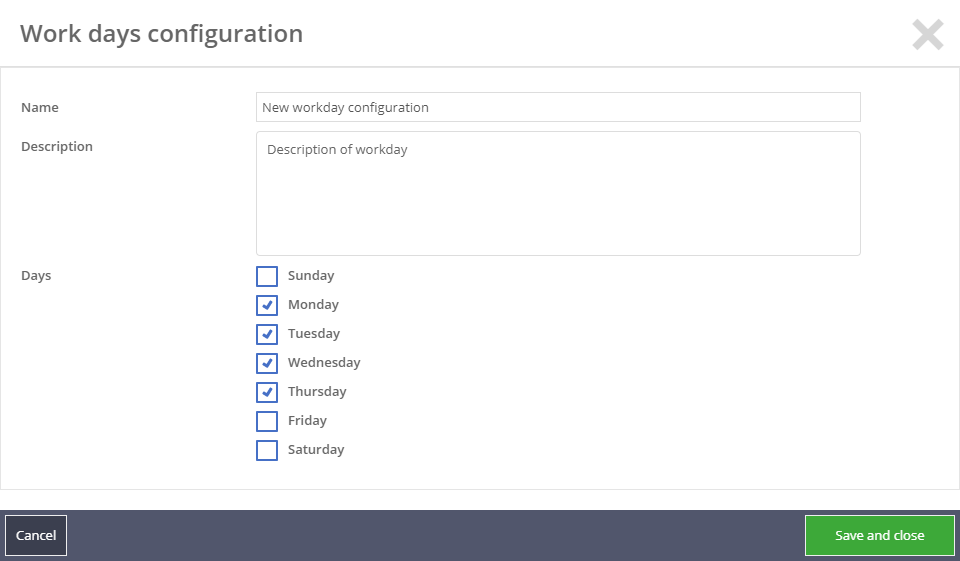
In this window you can fill in the following information:
- Name: Here you can give your workday configuration a specific name. For example: French Workdays;
- Description: Here you can write a description about the configuration. This is optional;
- Days: Here you can switch the checkboxes on and off defining whether it is a workday or not. The effect of this setting is visible when you want to create a transaction on a non-workday. A message will appear which tells you to change the date of the transaction to a workday.
When you have filled in all the information, click on the  button. Now your new created workday configuration will be visible in the overview. See the image below.
New created workday configuration
Step 2: Add new holiday configurations
A configuration of holidays is a reusable set of holidays. Holidays are used to exclude certain workdays from being a workday so the system can recognize if it is possible to make a transaction on that day or not.
To create a new holiday configuration, click on the tab 'Holidays' as shown with the red frame in de image below.
Holidays tab

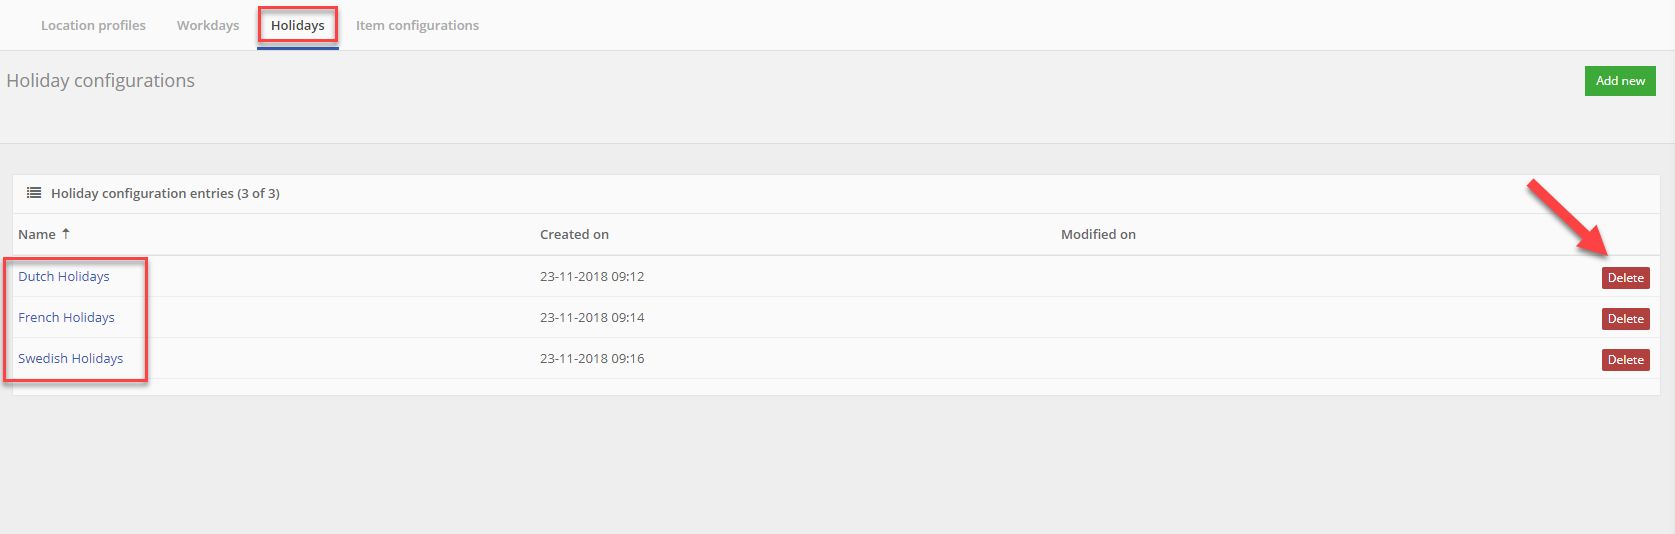
You will see an overview of the holiday configurations. If you have not created any yet, the overview will be empty.
In the example below, we have already created three configurations. If you would like to delete one of the holiday configurations, you can click on the button on the right side of the screen (see the red arrow).
Holidays overview
If you want to add a new holiday configuration, click on the button. A window will open similar to the image below.
Holidays details
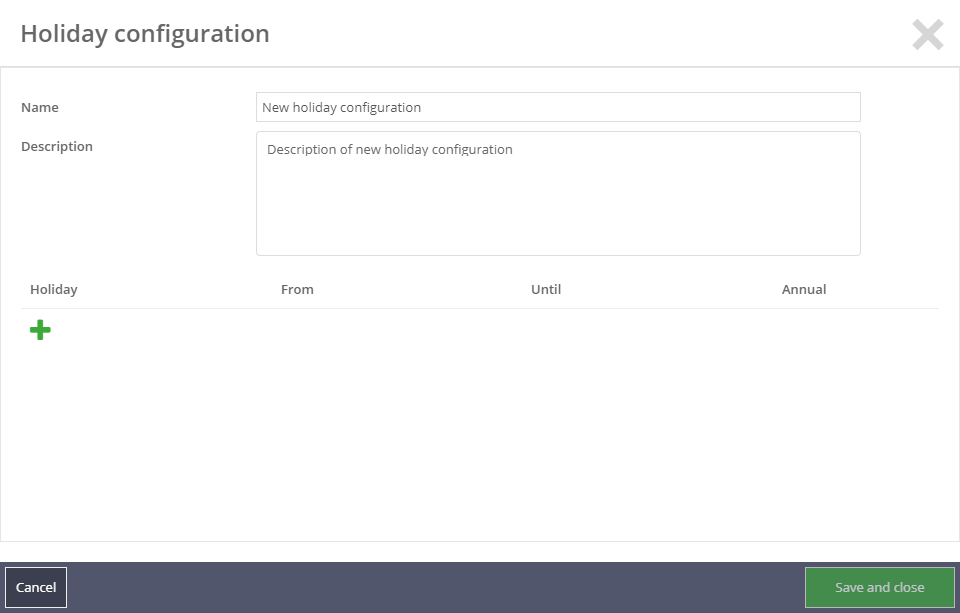
Fill in a name for your new holiday configuration. You can also write a description about your configuration (optional).
To add a new holiday, click on . This will show new options, see the image below.
Holiday options

In the first box you can fill in the name of the holiday. In the example above we have chosen 'Christmas'. In the second en third box you can set the date of the holiday, for instance 25 December until 26 December.
The checkbox 'Annual' can be switched on if the holiday is returning annually.
If you would like to add more holidays to the configuration, click on. If you want to remove one of the created holidays, click on  .
.
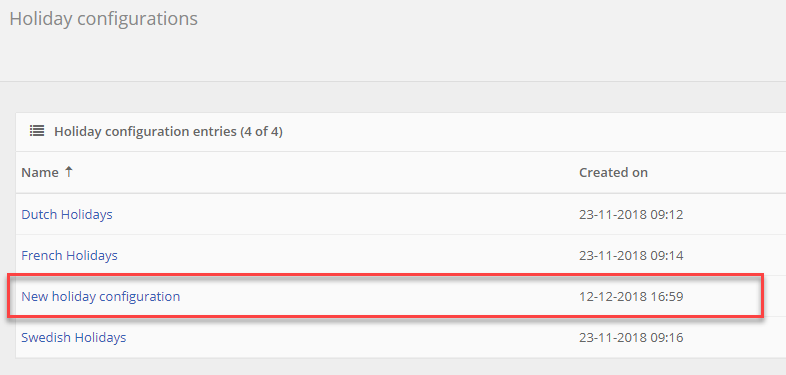
When you are satisfied with the settings, click on the button. Now your new created holiday configuration will be visible in the overview. See the image below.
New created holiday configuration
Step 3: Add new item configurations
A TrackOnline administration may contain tons of items. Users of the system however mostly use a subset of this collection. They are however, confronted with the entire set, polluting the clean overview TrackOnline pursues. TrackOnline provides a system that allows you to filter unwanted items for users using an item configuration. This way users are not bothered with items that they never use but must be available in the system for other users for example.
To create a new item configuration, click on the tab 'Item configurations' as shown with the red frame in de image below.
Item configuration tab

(This option is also accessible from 'items' in the base data menu).
You will see an overview of the existing item configurations. If you have not created any yet, the overview will be empty.
In the example below, we have already created five configurations. If you would like to delete one of the item configurations, you can click on the button on the right side of the screen (see the red arrow).
Item configuration overview

If you want to add a new item configuration, click on the button. A window will open similar to the image below.
Create new item configuration
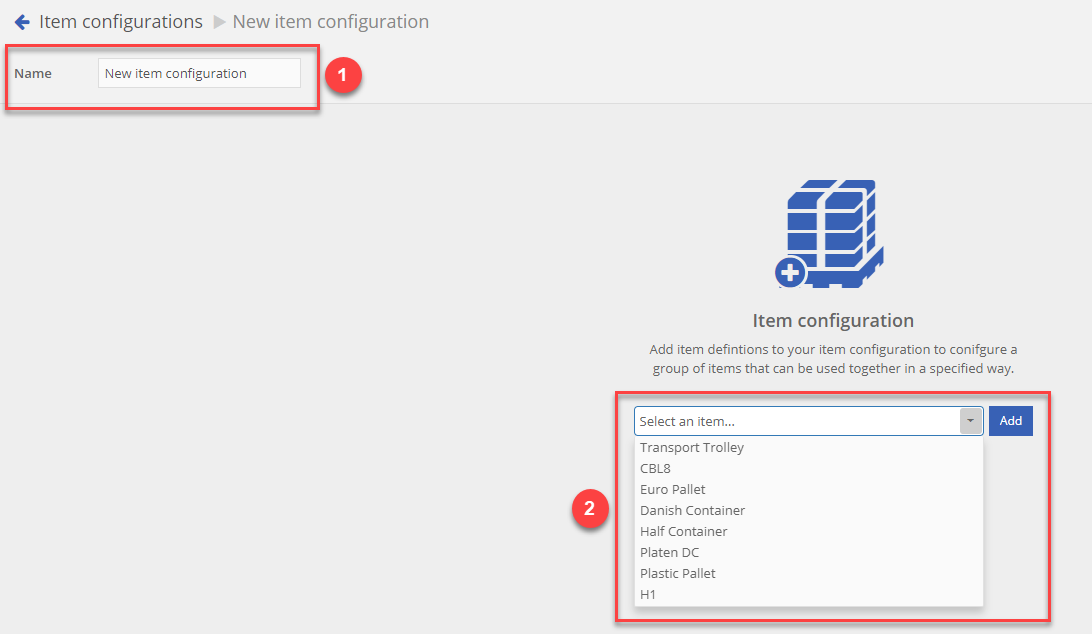
On the top left of the screen, indicated with number 1 in the image above, you can give your new item configuration a name. The red frame, indicated with number 2, shows the part where you can add items to your item configuration. Choose an item and click on the  button.
Note:
The item that you choose is not permanent. Later you can add more items to your configuration. It is also possible to remove items.
When you have clicked on the button, a window similar to the image below, will appear. For this example, we have chosen the item 'Euro Pallet' before, which is why this item is already visible in this window.
Items in configuration
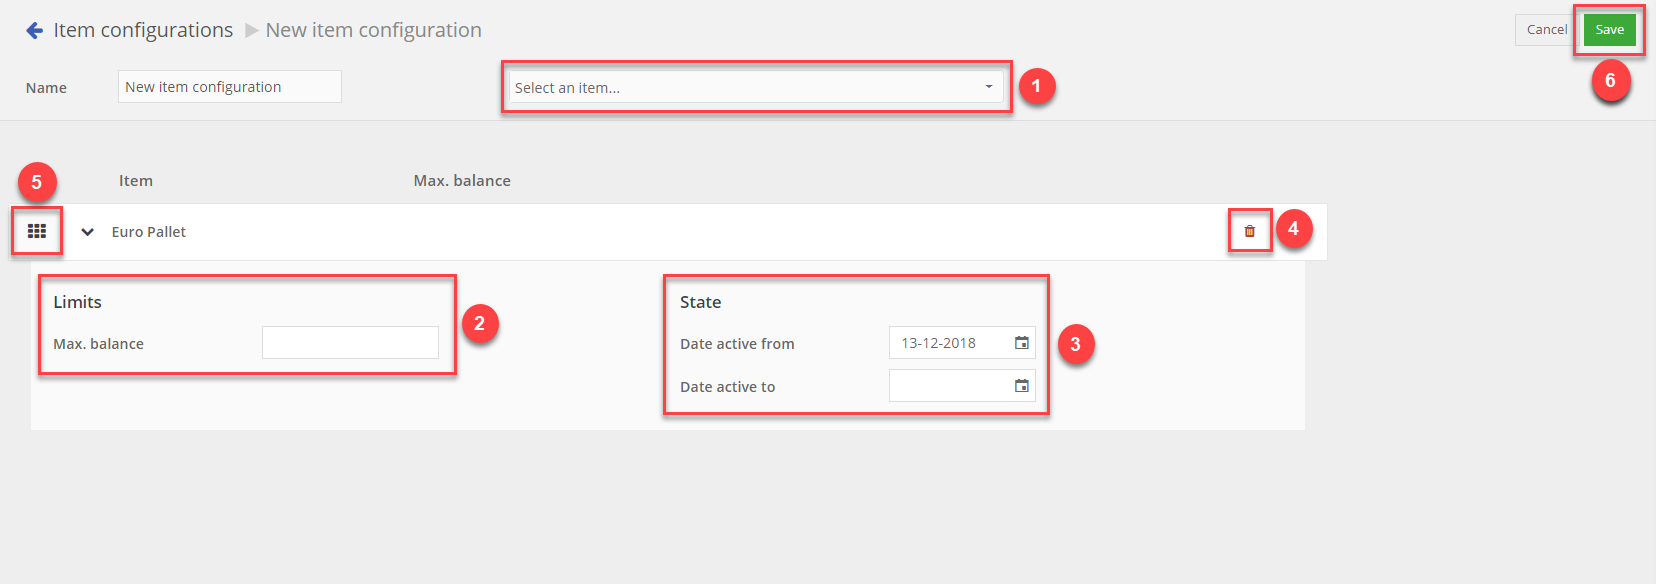
In this window there are a couple of options. We will explain each of the options:
- 1: Here you can select the items for your new configuration. In the drop drown you can find all the items that you have created in your TrackOnline administration.
- 2: Here you can fill in a maximum balance for the particular item.
- 3: Here you can set the date in which between the item is active. For instance, when you want to create a transaction, the item is only visible in the transaction screen if the date of the transaction lies in-between the date interval of the item configuration.
- 4: Here you can delete an item that you have added to the new configuration.
- 5: If you click and hold this icon, you can drag and drop the items in a specific order. This has effect on the item order in your transaction overview when it is filtered on a specific item configuration. See also arranging columns.
- 6: If you are satisfied with all the settings in your new configuration, you can click on the button.
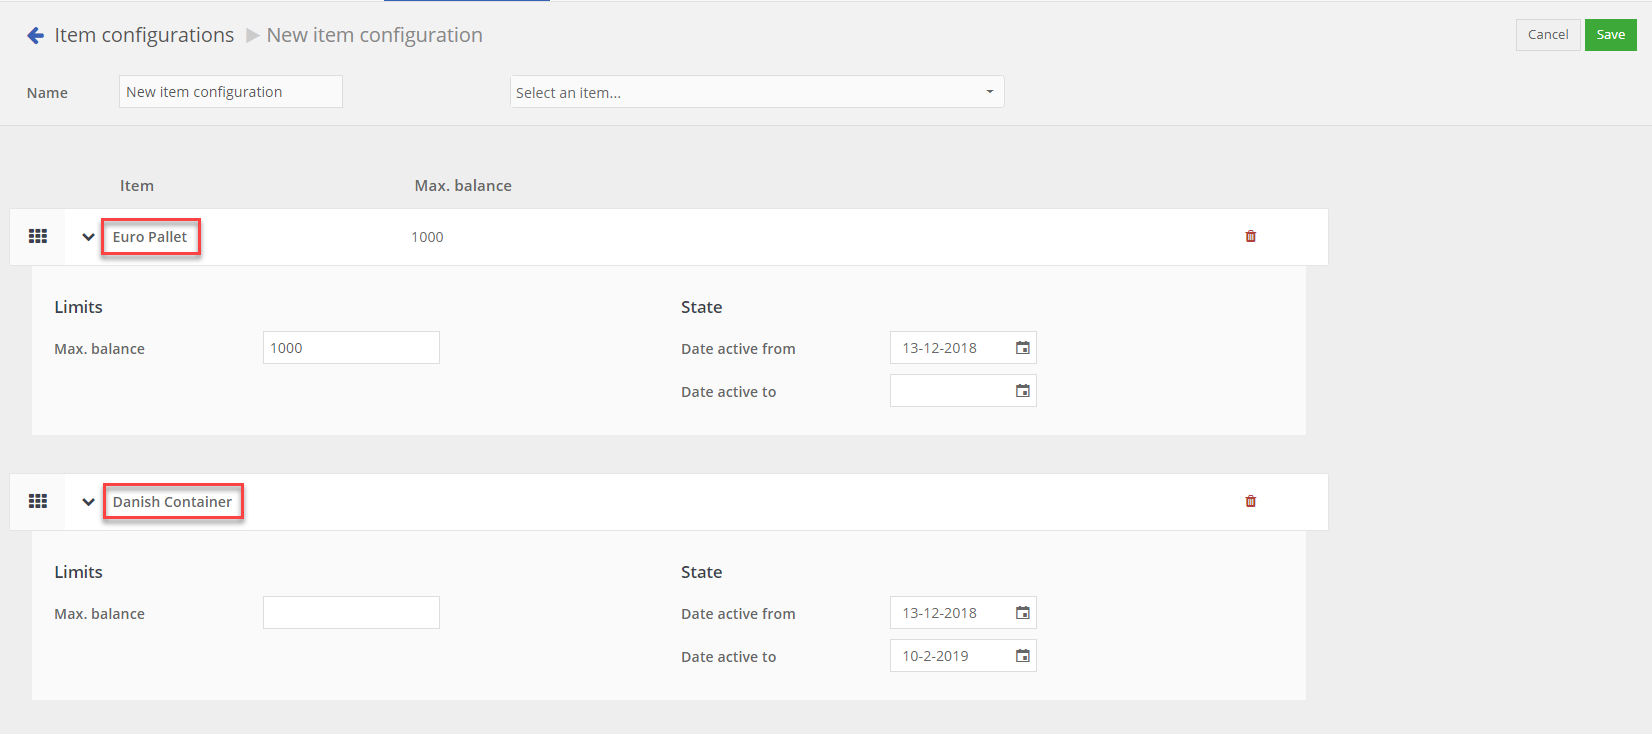
Let's create an example!
We have decided to set the maximum balance of the 'Euro Pallet' on 1000, set the active date on the 13th of December (2018) and add one more item to our configuration with no maximum balance and an active date in-between the 13th of December 2018 and the 10th of February 2019. This will look like the image below.
Item configuration details
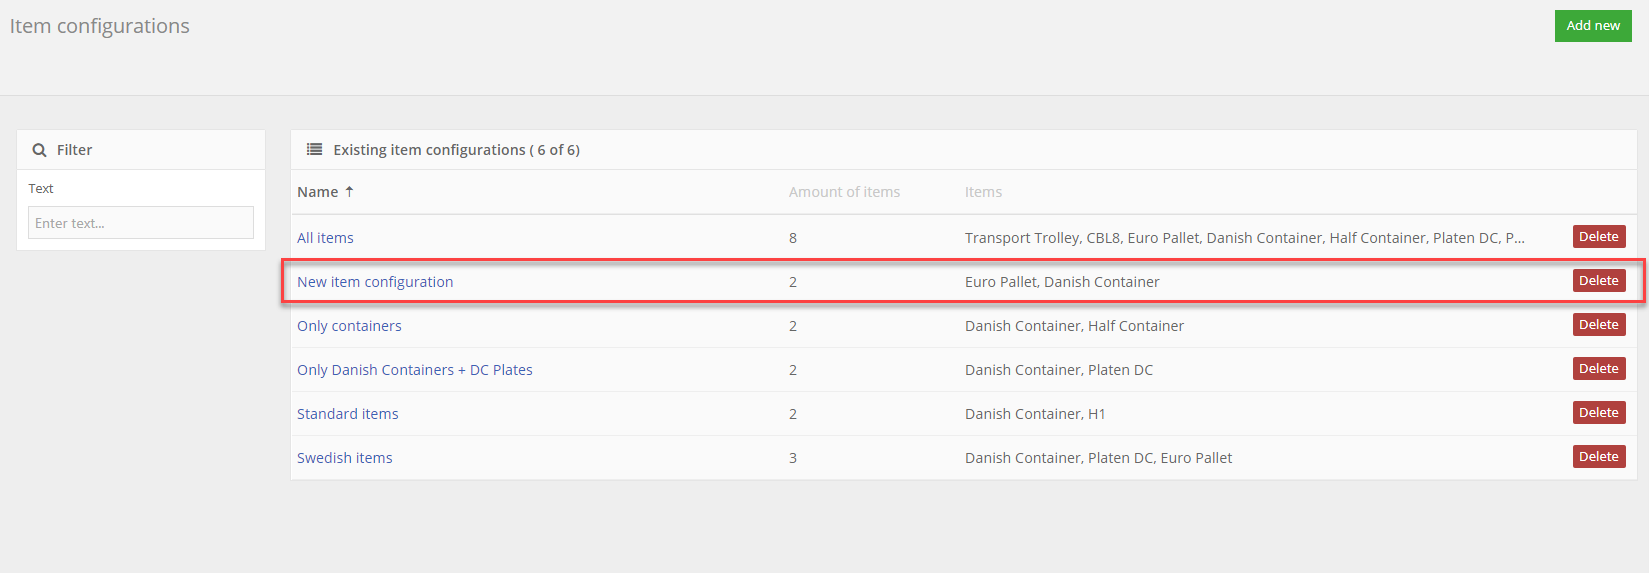
Then we click on the save button. This will bring us to the item configuration overview screen. Our new created configuration is now visible in the overview. The overview shows the number of items in a configuration and what these items are.
Item configuration overview new
Step 4: Add new location profile
If you have created a workday configuration, holiday configuration and item configuration, you are now ready to create a new location profile. Therefor, go to the tab 'Location profiles' and click on the button on the top right of the screen. You see a window similar to the image below.
New location profile
First choose a name for your new location profile. Then select an item, workday and/or holiday configuration. You can also add a description about the location profile.
If you would like to make your new location profile the default profile, you can check the 'Default' checkbox. This means that when you create a new location, it automatically is linked with this location profile. This is only the case for new created locations. Locations that are already in your administration will not automatically be linked to this location profile.
In the image below, you see an example of a completed form. In this form we have chosen for the configurations that we have created in step 2 and step 3 above. For the workday configuration we have chosen 'Regular Workdays' which was a workday configuration that was already in our administration. We have checked the 'Default' checkbox, which means that when we decide to create a new location, it automatically is linked to the location profile: 'New location profile'.
Location profile details
Click on the  button to save your new created location profile. The location profile is now visible in the overview. See the image below.
In this overview you can see that the new created location profile has seven workdays, one holiday and two item configurations.
Location profile overview new
Customer portal PRO+ Enterprise
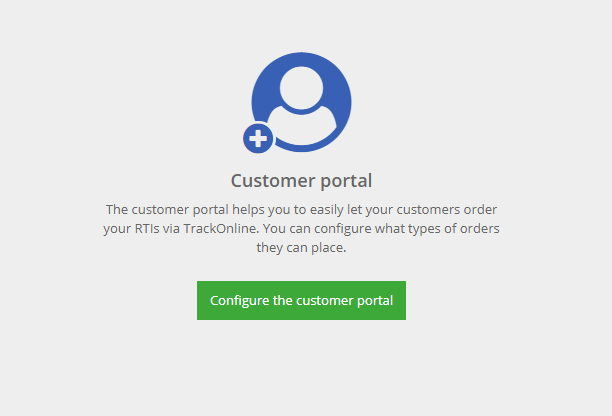
Customer portal can be found by clicking on the ‘Gear wheel’ and then on ‘Customer portal’, see the image below.
Topic Customer portal
If you would like to create custom administrations for your customers in which they can create transactions, you can use the customer portal. This portal gives you the opportunity, as head administration, to configure what types of orders your customers can place. When you have clicked on 'Customer portal' for the first time, you will see a screen as shown in the image below.
Customer portal
Click on the green button 'Configure the customer portal', to go to the next screen. A screen will appear as shown below.
Starting with the customer portal
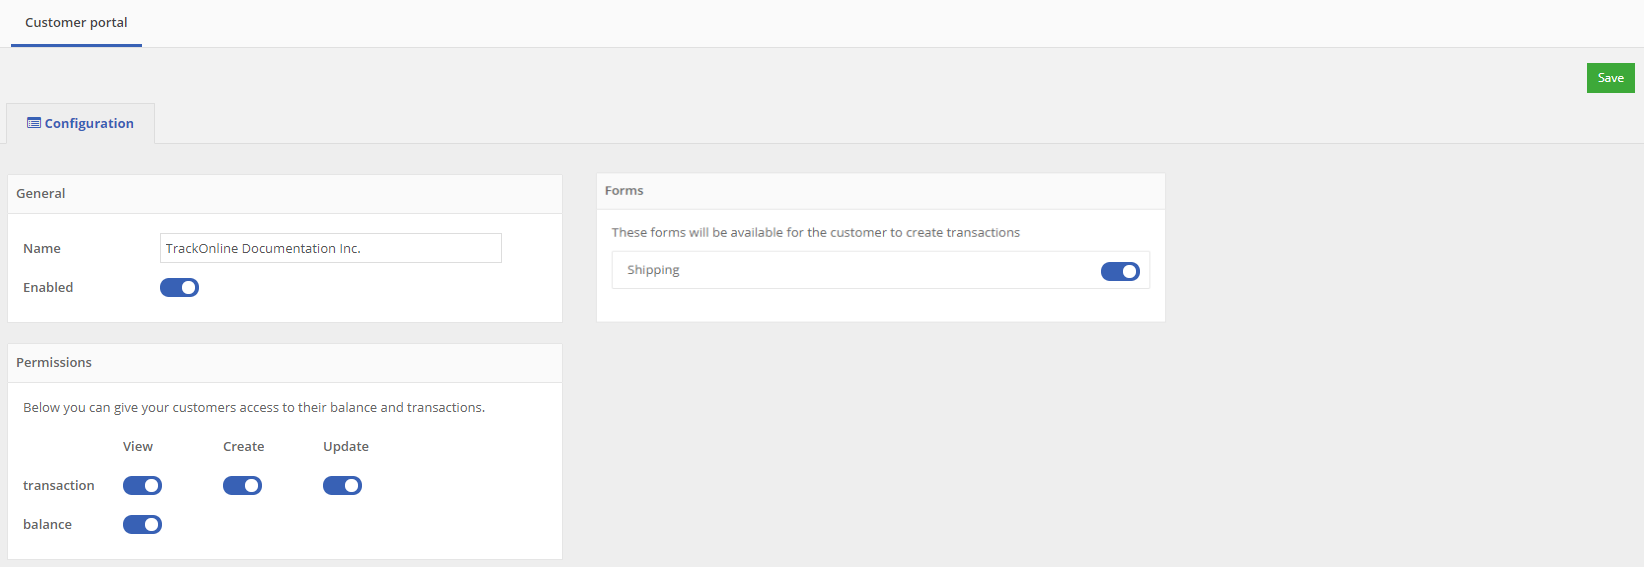
In this window you can set different permissions:
- Enabled: With this switch button you can enable or disable the customer portal. For instance, when you decide to give the whole company a day off, you can disable the customer portal so users can no longer login.
- View, Create, Update transactions: With these switch buttons you can give the customer portal users particular permissions. For instance, if the 'View' switch is enabled and the 'Create' and 'Update' switches are not, the user can only see transactions in the overview, but can not create or update the transactions.
- View balance: If this switch is enabled, the user will see an extra topic 'Balance' on the left sight of the customer portal screen. Here the user can view the balance of a specific location.
- Forms: Here you see the forms that the customer can use to create a transaction in the customer portal. In this example the customer is allowed to create a
Shippingtransaction. However this is only possible if the 'Create' switch is enabled.
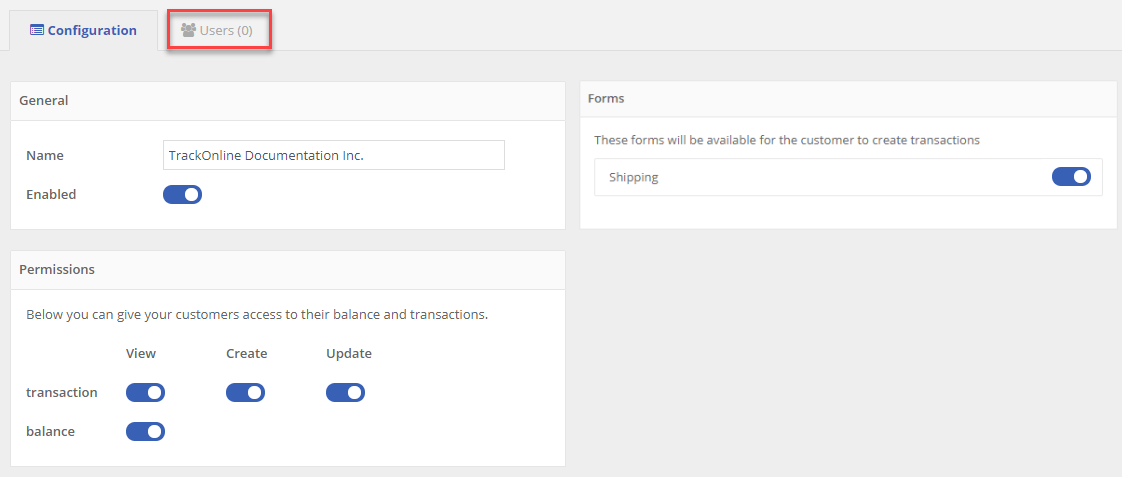
When you have finished configuring the settings, you can save the settings by clicking on the green 'Save' button at the top right of the screen. A new tab Users(X) will appear. See the red frame in the image below. The 'X' stands for the amount of portal users in the customer portal. In the image below this amount is 0, what is correct because no portal users have been added to the administration yet.
Customer portal overview
Create new portal user
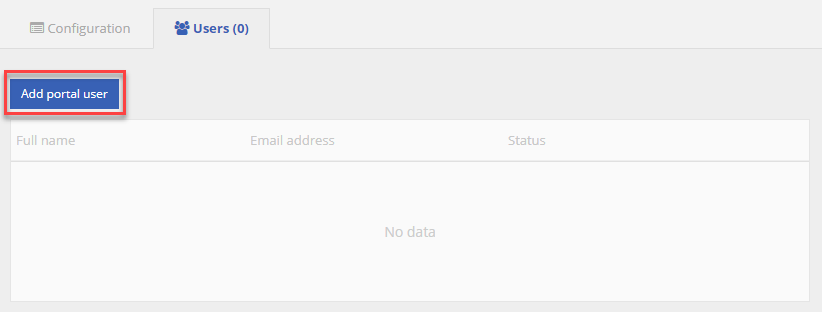
If you click on the tab 'Users', you will see a window similar to the image below. In this window you can add new portal users. Therefor, click on the blue button 'Add portal user', marked with the red frame in the image below.
Customer portal users
If you have clicked on the button, the window 'Add new portal user' will open, see the image below. In this window you can fill in all the information about the new portal user. The different entry-fields will be explained under the image.
Customer portal new user
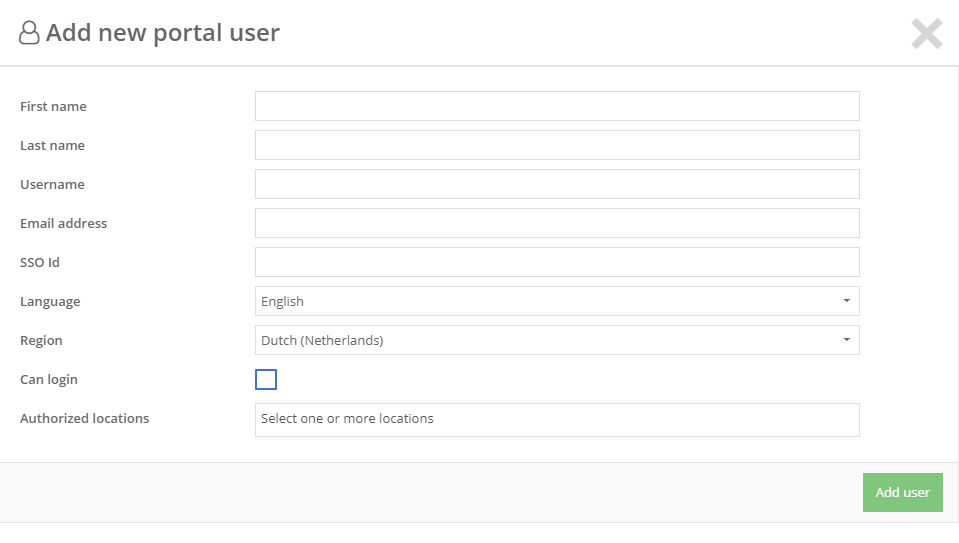
User information:
- First name: The first name of the TrackOnline user;
- Last name: The last name of the TrackOnline user;
- Username: A self-created username for the new portal user. This username gives the new user (in combination with a password) access to TrackOnline;
- Email address: The email address of the user that will be linked to the TrackOnline administration. To this email address, the confirmation email is sent which gives the new user the ability to login to his/her new TrackOnline administration;
- SSO Id: The Single Sign-On Id;
- Language: Here you can set the language of the TrackOnline administration for the new user. Later the user can change the settings in his/her own profile settings;
- Region: Here you can set the region settings. Changing the region can impact the sequence that the user will see. For example, the dates in TrackOnline (DD/MM/YYYY for continental Europe and MM/DD/YYYY for the United states). You can see the changes in the long/short date & time format. Also this setting can be changed by the user in his/her own TrackOnline administration;
- Can login: Here you can set whether or not a user is allowed to login. For instance, when a user is no longer working at your company, you can switch this option off;
- Authorized locations: Here you can set the authorization of the locations. Only transactions made with these locations, will be visible/available in the TrackOnline administration of the portal user. Also if the portal user has the permissions to create a Shipping transaction, only these locations are available as from and to locations.
Note:
The authorized locations MUST comply with certain rules to let the portal user create a Shipping transaction. In the next paragraph 'Authorized location rules' you will find these rules.
In the image below an example shown.
Customer portal user information
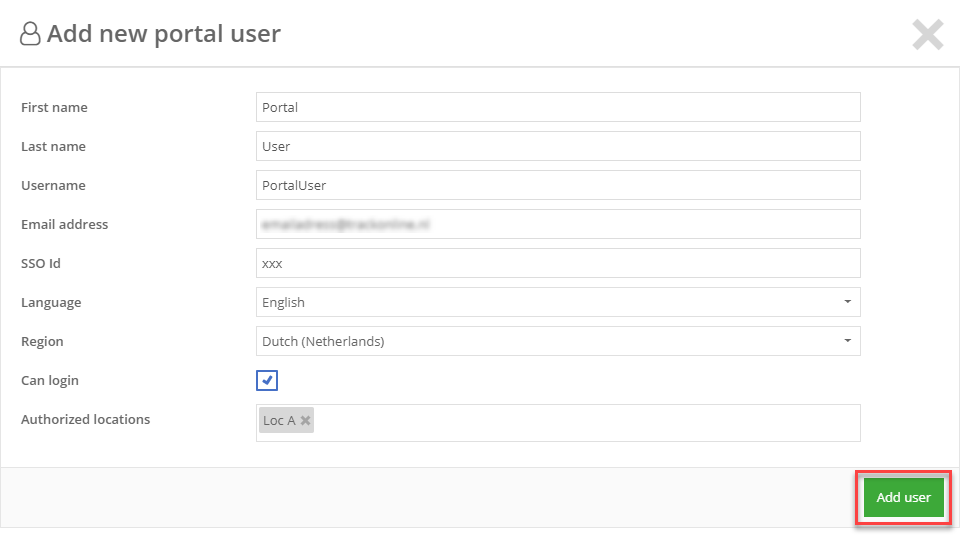
If you have filled in all the information, click on the green button 'Add user'. You see the new user in the overview, see the image 'Customer portal overview users' below. The status is set to 'Invited' which means that the user has received an invitation-email with an invitation to use TrackOnline. On the right side of the screen you see a green 'Action' button. If you click on this button, three options will be shown. See the image below. Under the image these options are explained.
Customer portal overview users
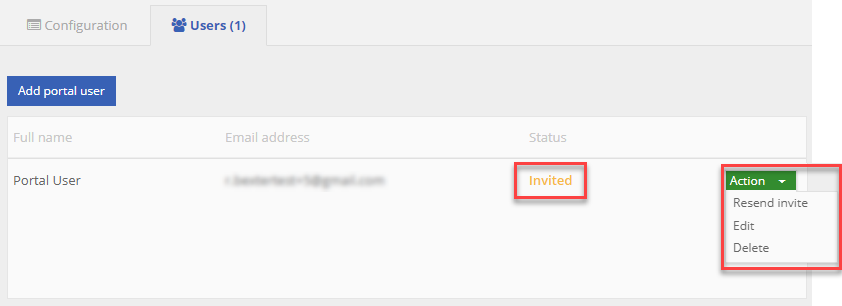
- Resend invite: Here you can send a new invitation. For example, if a user has not yet responded to the invitation email;
- Edit: Here you can change the information settings of the user;
- Delete: Here you can delete a user profile.
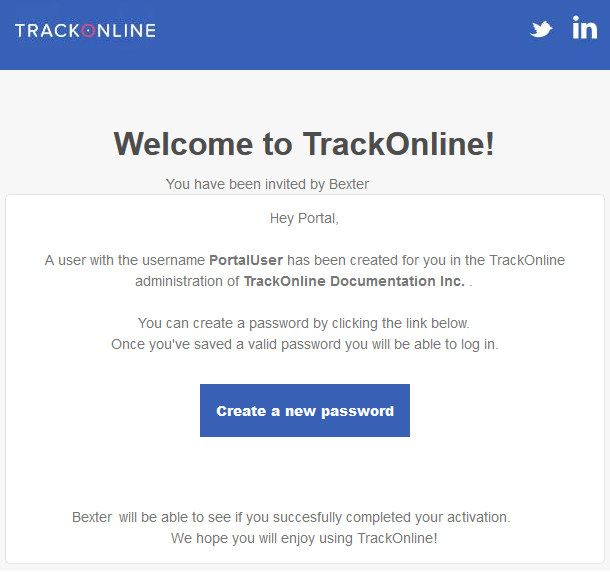
An example of the invitation-email is shown in the image 'Customer portal invitation email', below.
Customer portal invitation email
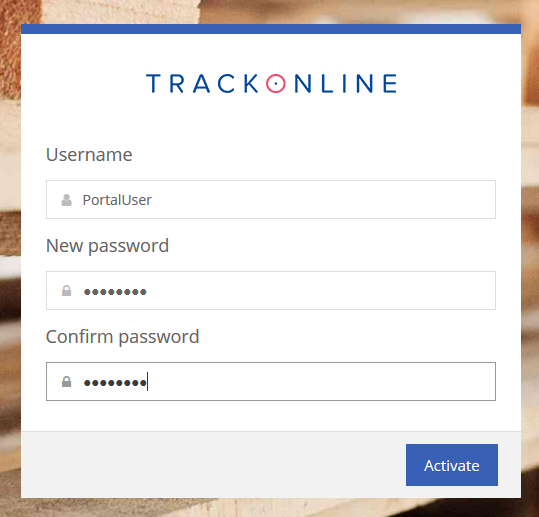
If the user clicks on the blue button 'Create a new password', he/she will see a screen as shown below. The username that you have chosen before, is already filled in. The user can choose a password and activate his/her account by clicking on the blue 'Activate' button.
Customer portal create password
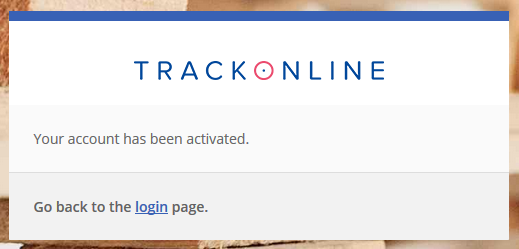
When the activation has been successful the user will see a screen as shown in the image below.
Customer portal account activated
This will automatically change the status in your User-overview to 'Active'. See the image below.
Customer portal status active

Authorized location rules
For each portal user you can configure for which locations they can see and/or create or update transactions. However, to be able to create a shipping transaction the right way, there are some rules that have to apply to the locations. In this paragraph we explain which rules and how to configure them.
Follow it step by step and you are ready to go.
- Location network
An authorized location has to be part of a location network. Otherwise it is not possible for the portal user to fill-in both a 'From' and a 'To' location in the shipping form.
ℹ️ Do you want to know how to add a location to a network? click HERE.
- Location Profiles and Item Configurations
An authorized location needs to have a location profile. This profile ALSO needs to have an item configuration to make sure the portal user can only make transactions to locations and with items that he or she is allowed to.
ℹ️ More information about how to configure a location profile you can find HERE.
ℹ️ Information about Item configurations is explained HERE.
Note:
The items that are shown in the shipping form of the portal user, are only the matching items. This means that only the items that are both in the item configuration of the 'From' location AND in the 'To' location are shown on the form. If you don't have matching items, it is NOT possible as portal user to fill in item quantities. And therefor it is NOT possible to save the new created shipping transaction.
Portal User administration
When the portal user logs in, a Dashboard is shown. Depending on the settings of the head administration the user will see a dashboard similar to the image below. For instance, if the permission switch in the head administration to view the balance is disabled, the user will not see the information about balances in the dashboard (marked with the red frame in the image below).
Customer portal dashboard
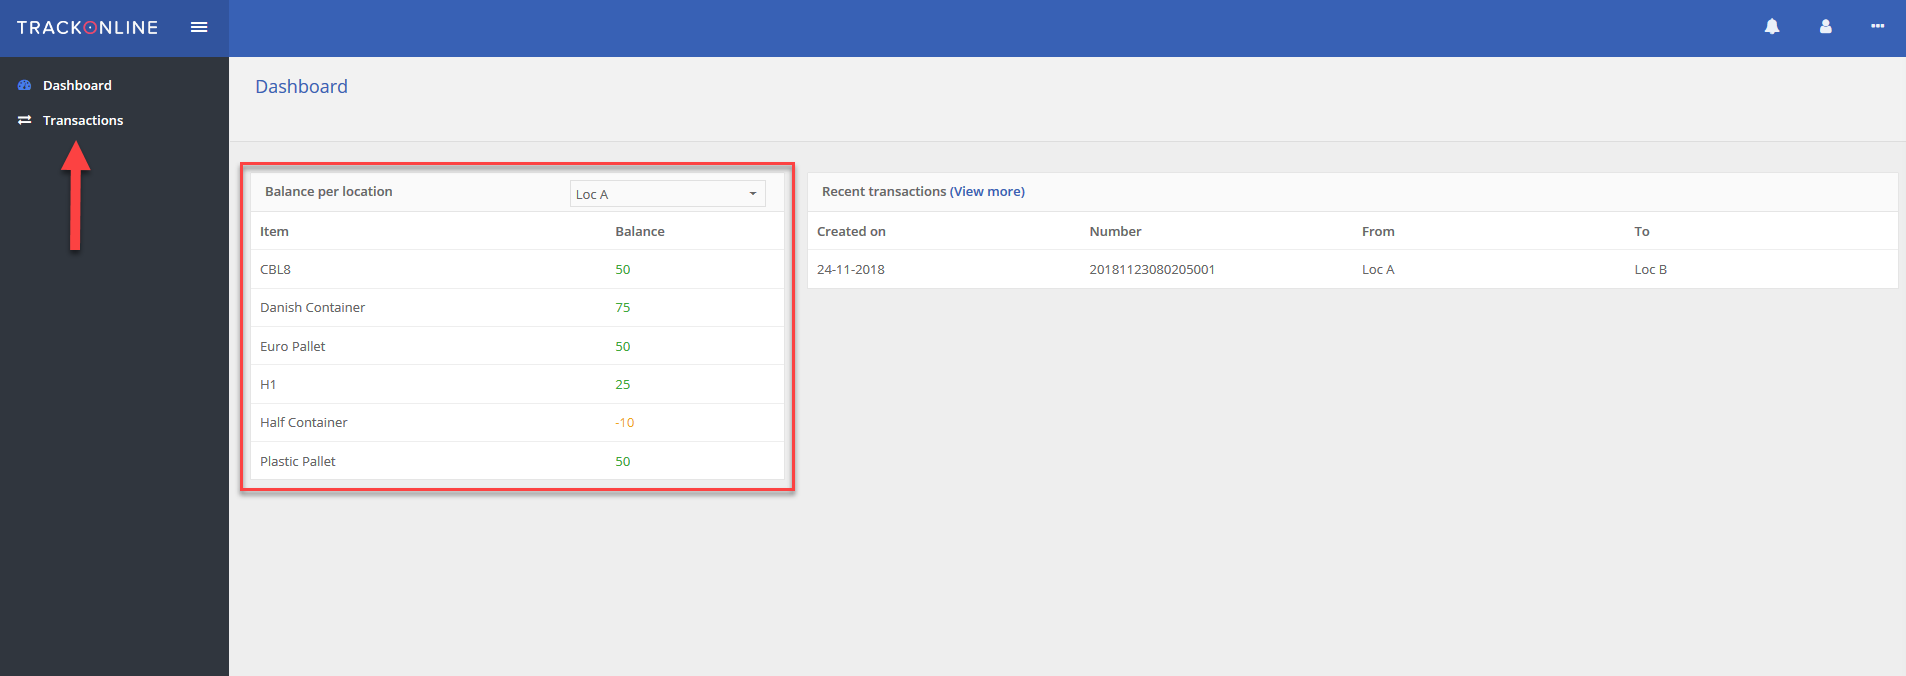
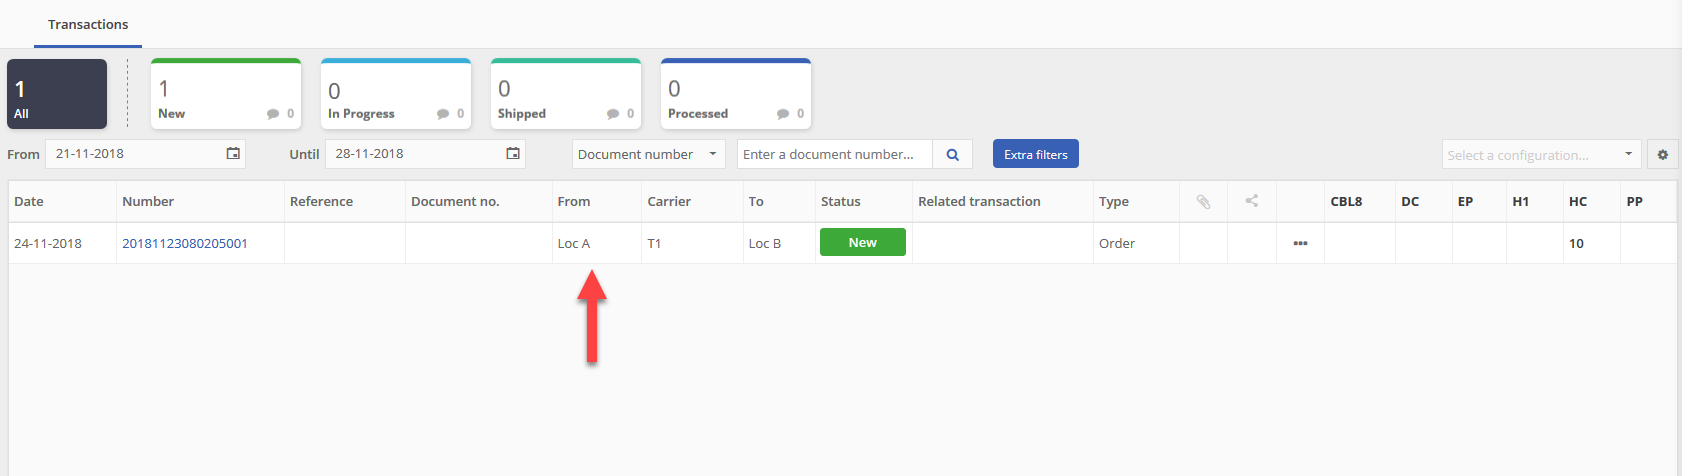
If the user clicks on 'Transactions' on the left side of the screen (see the red arrow in the image above), he/she will see the transaction overview. Here are only transactions shown associated with the authorized locations. For example, in the head administration only 'Loc A' was set as the authorized location (see image 'Customer portal user information'). So in the transaction overview of the portal user, only transactions to or from 'Loc A' are visible. Also the portal user can only create/update transactions that are associated with 'Loc A' (depending on the permission settings).
Customer portal transaction overview
Scenarios
In this section, we describe use cases that you could be exposed to.
How to setup permissions for truck drivers?
Truck drivers deliver your items, they may use the TrackOnline app to manage their deliveries and sign. However, you wouldn't want them to be able to see or modify transactions they have no link with. We are going to set up their permissions so that they are only able to see the transactions they are editors of in the app.
To start, go to Configuration / Users & permissions. Choose the user you want to set up and click on it to display the details. More information about this screen can be found HERE.

By setting the user type to Operational, this user will now only be able to see and edit the transactions where he is the editor from the app. This allows the drivers to have a clear follow-up in the app.
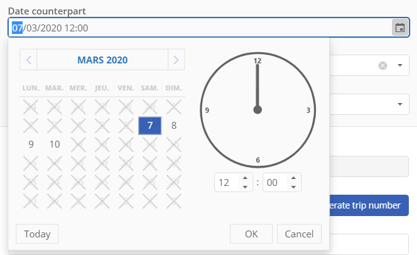
How to setup transactions lasting a fixed duration? PRO+ Enterprise
Let's say you need your Declare transactions to start of the following day and to end 3 days after. You can configure this in Configuration / Transaction types. Then, click on Edit for the Declare type.

Click on the gear wheel on the right of the date field.

On the popup, select a fixed input limit and type 1 in the field Fixed amount of days.

Now, Declare transactions automatically start 1 day after their creation. We are now going to configure the duration of the transaction. Therefor, click on the gear wheel of Date counterpart. Select a fixed input limit again, but this time, type 3.
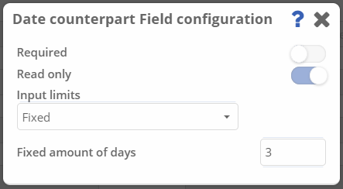
Then click Save and close at the bottom right, your Declare transactions will start 1 day after the current date and end 3 days after. For example, a transaction created on the 4th of March will start on the 5th and end on the 7th of March.
Additionally, if you want to be able to configure the end date between 2 and 5 days for more flexibility, click on the date counterpart gear wheel again. This time, select a range input limit, type 2 in the minimum field and 5 in the maximum field.
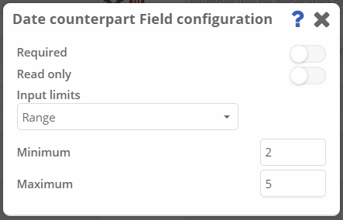
Again, click Save and close to save the configuration. For example, if you create a Declare transaction on the 4th of March, the transaction will automatically start on the 5th of March and you will be able to choose the end date between the 7th and the 10th of March. The time is automatically set to 12pm but you can also change it if needed.