Transactions
Transaction overview
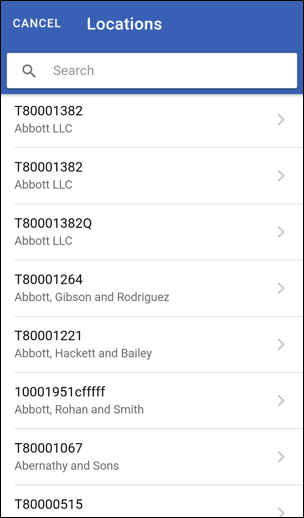
On the bottom of the screen you can see that we are in the tab called Transactions. When you press on this, you will see the transactions of the day, in this case this are the 4 transactions of November 15th.
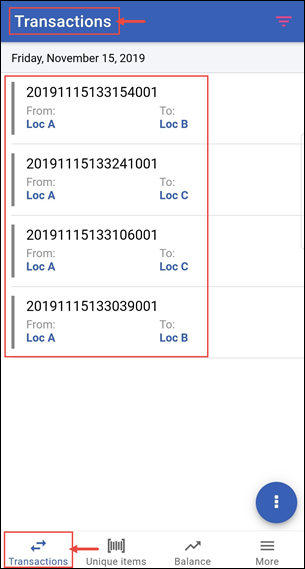
The transaction overview consists of rules, each rule stands for one transaction. When you press on one of the rules you will see the details of that specific transaction.
To see the details, press on one of the transaction rules.
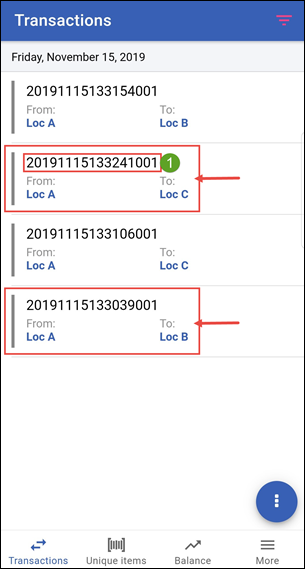
(1) = The Order number. You can recognize the transaction with this number.
Create transaction
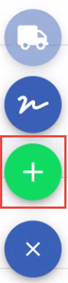
To create a new transaction you start from the transaction overview. From the overview press the action button and next press the green +.
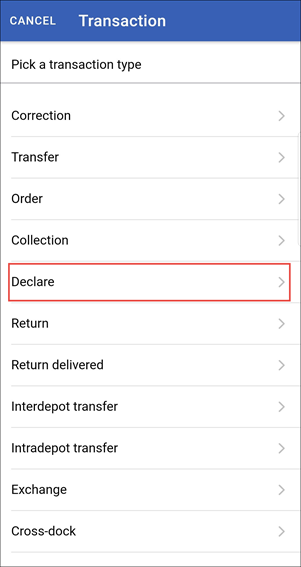
A screen like the one in the picture below will show. Here you can choose what type of transaction you are going to create. In this example we select the transaction type: Declare
There are 3 different tabs in a transaction detail window. Below you will find a explanation on what screen is meant for what purpose:
- Info: Here you can find all information about the transaction.
- Attachments: Here you can find all attached documents, like photos, freight notes etc.
- Items: This will be the containers, plates, pallets and crates that will be shipped or returned.
1. Info tab
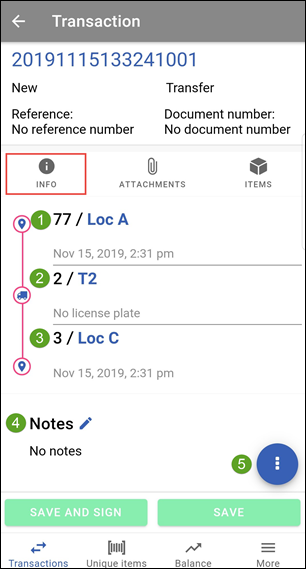
- The sending location.
- The carrier.
- The receiving location, this will be the customer or in case of a return for example the supplier.
- Space for notes. For example when containers are broken of there is other important information about this transaction that needs to be shared.
- Notes: The action button (see Action button).
Prefilled fields
From / To locations and carrier may be already filled as TrackOnline adds the data used last time for this type of transaction in order to save you even more time.
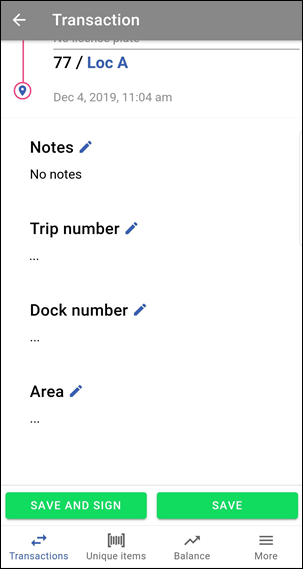
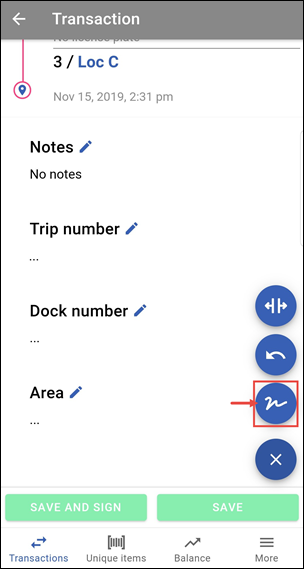
When you scroll down you will see the following screen:
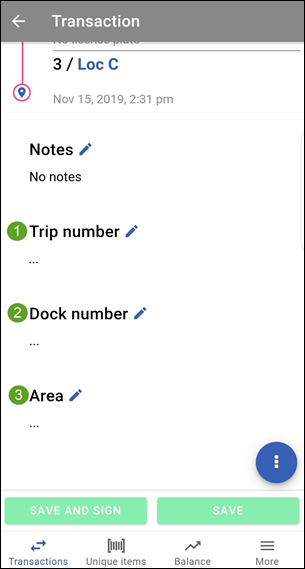
- Trip number: This is the number of the trip when a transaction is belonging to a trip.
- Dock number: This is the number of the dock where the transaction will be prepared.
- Area: This is the area number where the transaction will be prepared.
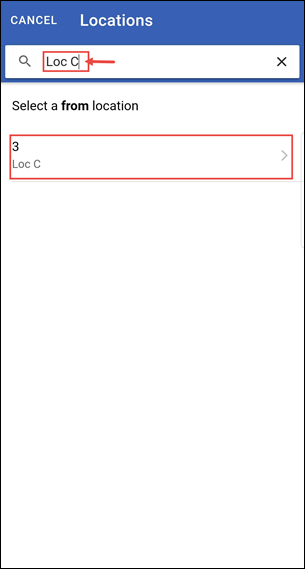
When creating a transaction of a type you have never used, the From location screen will appear automatically as shown below.
You can search at the top the name of the location or part of it. Once you have found the location you want, tap on it to choose it. In this case, we choose Loc C as the From location of the transaction.
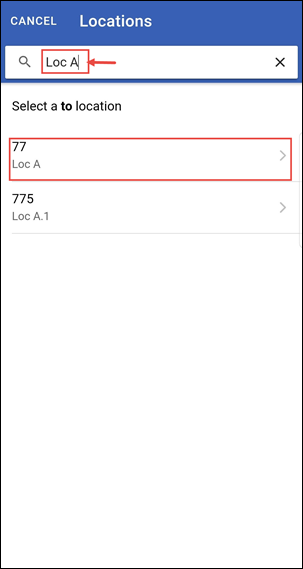
Next the screen to enter a To location will appear. This is always the location of the depot where the shipment will be returned. In this example tap on 77 - Loc A to confirm the To location.
Next press on the ITEMS tab to fill the items that will be delivered. When you pressed on the ITEMS tab, you will see the screen on the picture below.

Then you will be sent to the items tab but you can still go back to the info tab or view the attachments tab explained in the next section. You will namely be able to change the transaction start and end dates in the From / To locations, as shown below.
2. Attachments tab
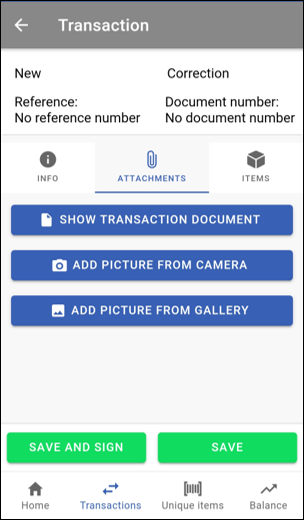
On this screen, you can see 3 buttons:
- Show transaction document: Tap on this button to download the transaction document. Generating the document can take a few seconds.
- Add picture from camera: Tap on this button to open the camera. You can now take a picture that will be attached to the transaction.
- Add picture from gallery: Tap on this button to open the gallery and select a picture to attach to the transaction.
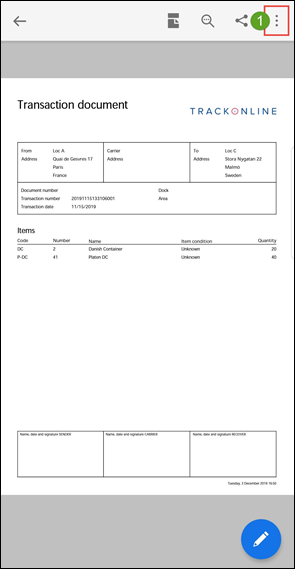
To see the transaction document, tap on the Show transaction document. The document will be opened with a PDF viewer. From there, you will be able to print the document if needed. On the bottom of the document you will see the signature (if there are any).
Note:
There will only be signatures on the transaction document when they are entered with the TrackOnline app.
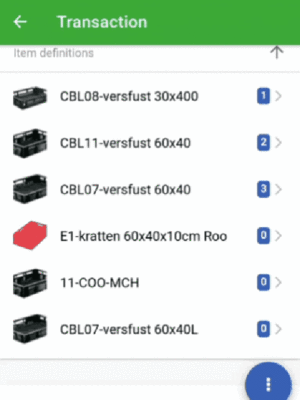
3. Items tab
You can see and manage the items that will be shipped with the transaction from this screen.
Add a non unique item
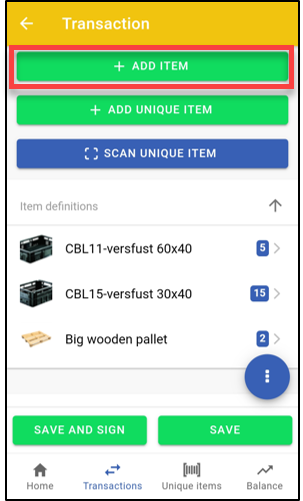
Tap on the Add item button as shown above. You will see the following screen where you can select the items to add.

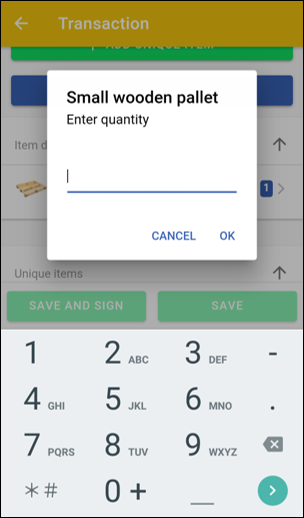
You can search at the top the name of the item you want to add or part of it. Once you have found the item to add, tap on this item, a line is added under Item definitions in the transaction details with count 0. Tap on the line to enter the desired quantity as shown below. Once this is done, tap on Ok. You can add as many item definitions and items per definition that you want.
Add unique item
Unique item from the list
Tap on the Add unique item button, you will see the following screen.
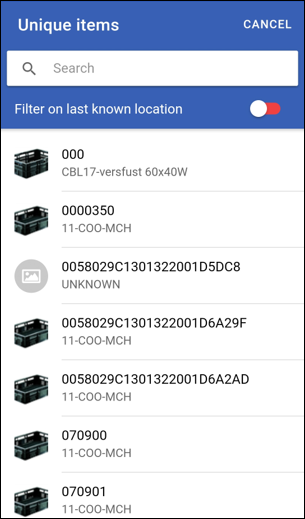
Here you can search at the top the name of the item you want to add or part of it. You can also filter by last known location, namely the items that are currently located at the departure location of the transaction. Once you have found the item you want to add, tap on it to add it to the transaction. It will be added under the Unique items section, at the bottom of the transaction details.
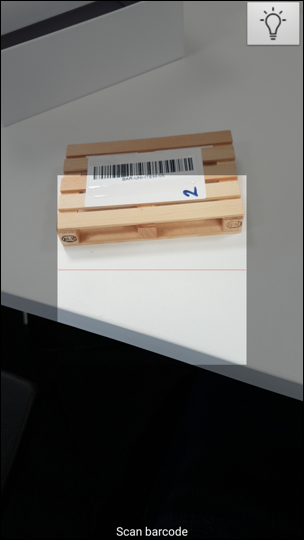
Scan unique item barcode
Tap on the Scan unique item button. If you are on a smartphone, you will directly be able to scan a barcode (see below). Just aim at the barcode so that the red line in the middle of the screen cross the entire barcode and detection will occur automatically. The item is then added to the transaction details under the Unique items section.
Flash
If it is too dark and the camera does not recognize the barcode, you can enable the flashlight by tapping on the  button at the top right corner.
Scan unique item RFID tag PRO+ Enterprise
If you are on the RFID scanning device, you will have the choice to scan a regular barcode or an RFID tag. To add an item by scanning its RFID tag, tap on the Scan EPC button. You will get the list of the unique items around you, as shown below. You can also choose to add items manually, as explained in the previous section.
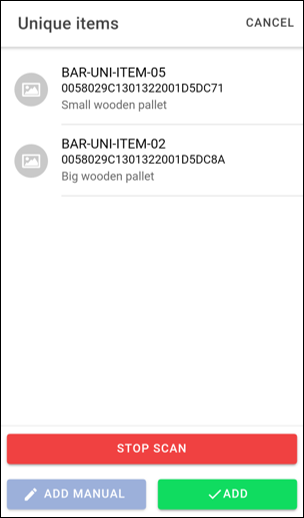
Once you have scanned the items, you can tap on the Add button, they will been added to the transaction details under the Unique items section.
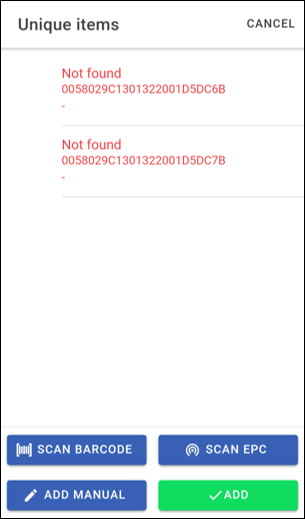
Not found items
If the items scanned are not registered unique items, they will appear red with the title Not found in the list.
Delete items
If an item definition or a unique item has wrongly be added to the transaction, you can delete it. Therefor, swipe the line of the item to the left, a Delete button will appear on the right. Tap on it to delete the item definition or the unique item. The animation below shows you how to proceed.
You can also delete unique items the same way.
Save the transaction
After you pressed SAVE the transaction will be saved, you can now press on INFO again to add notes etc. Caution! After you have added notes or any other information please to not forget to press SAVE to save the information.
You can also tap on Save and sign for the transaction at the same time. More information on signing HERE.
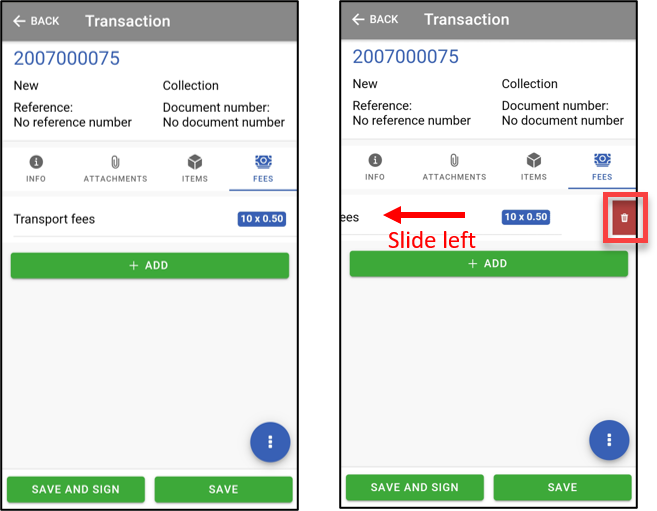
4. Fees tab
The fees tab let you add fees attached to the transaction.
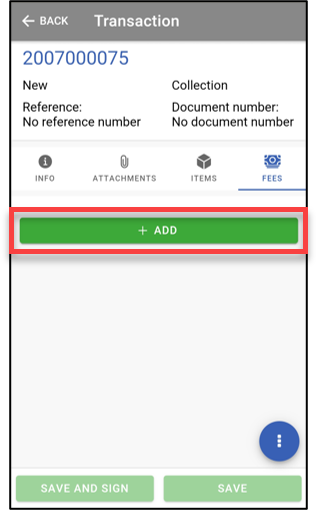
To add new fees to the transaction, let's start with the Add button.
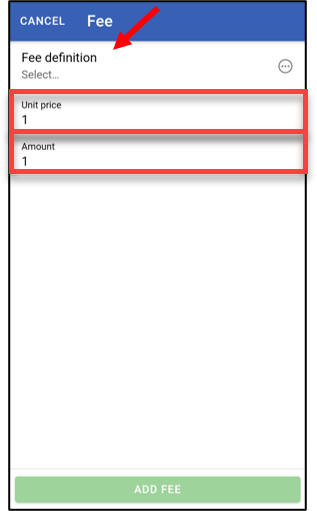
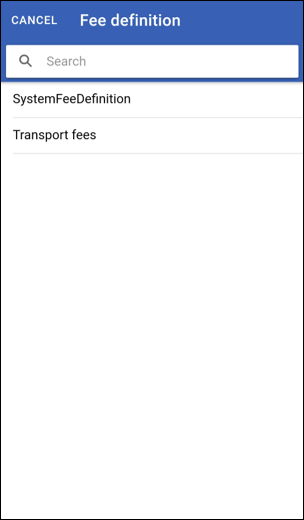
Now you can choose a fee definition. If you didn't add you own fees definition yet, you can do it from the web version of TrackOnline, more information about it HERE. Tap on Fee definition and pick one from the list.
Once this is done, you can also enter the actual cost for each item in Unit price and the number of items in Amount.
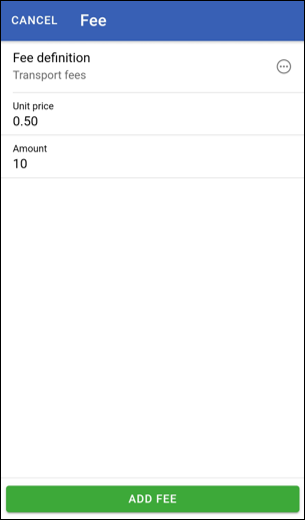
If you are all good, tap on Add fee at the bottom to add it to the transaction. Now, the fee is added to the transaction. You can still add other fees if you want by doing the above process again. If you want to delete a fee, slide id to the left to make the delete button appear and tap on the bin icon as shown below.
Signing transactions
TrackOnline gives you the possibility to sign transactions on item pickup or delivery, therefore moving forward automatically in the transaction process. To sign one or several transactions, go to the transactions overview, tap on the action button at the bottom left to open the menu and choose the sign button as shown below.
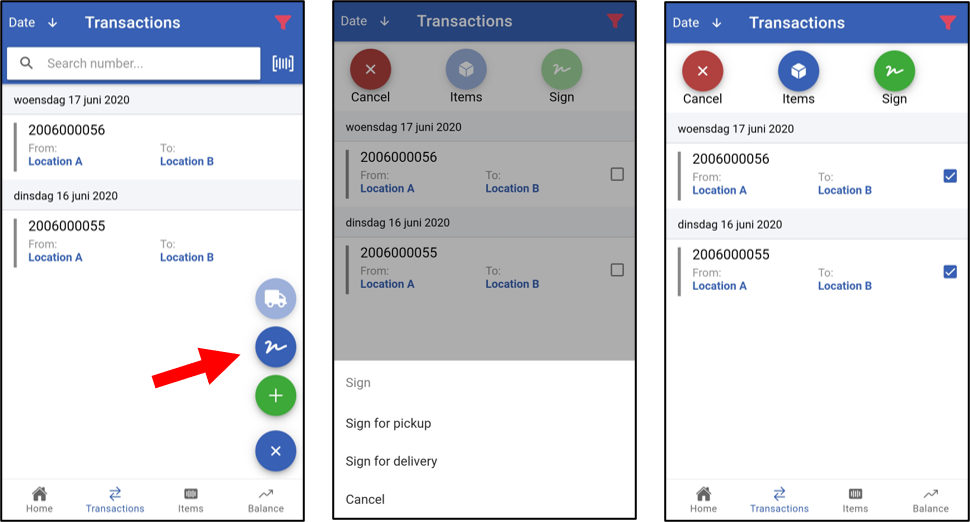
Once this is done, you will be asked if you want to sign for pickup or delivery. After this step, you can select the transactions you want to sign. You can choose as many transactions as you want as long as they have the same from and to locations. Other transactions cannot be selected and will have a grey tick box.
Signing for pickup
Signing for pickup is available only if the option is activated in TrackOnline. Learn more about it HERE.
Once you have selected the transactions, you have the choice between Items and Sign at the top of your screen, but you can also cancel at any time. Items will show you the total number of items in the selected transactions for each item definition. Sign will let you begin the signing process that is explained just below.
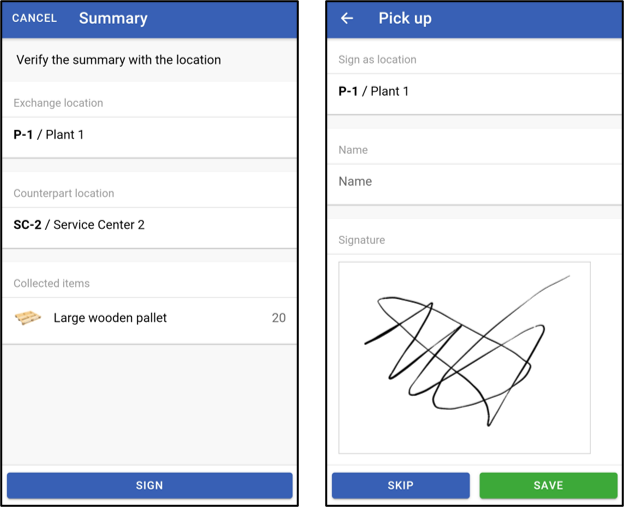
If you have chosen Pickup, you will be asked to check the the transaction data and to enter your name and sign on the device with your finger. A document will be automatically attached to the transaction with the signature and the date. However, you can also choose to skip this step and the transaction will just move to Planned status.
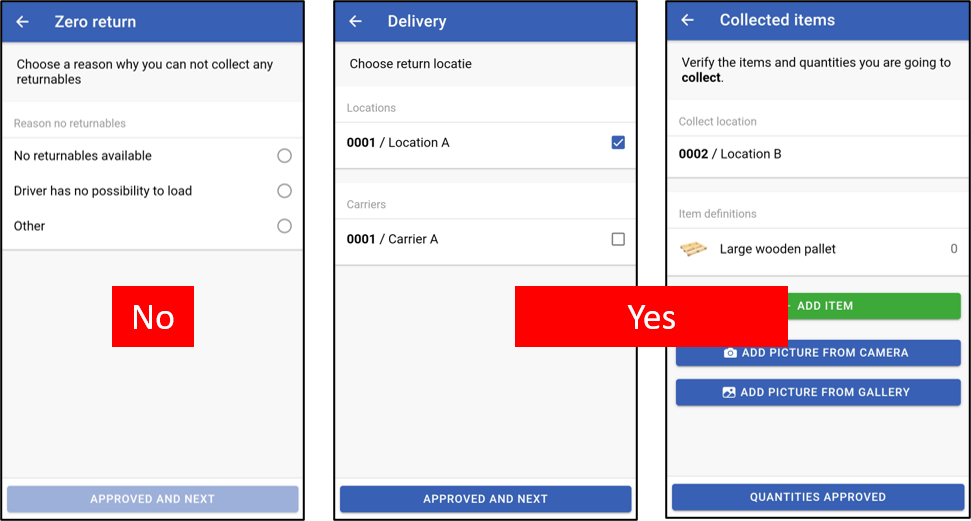
When signing for delivery, you are also asked to verify the transaction data such as the delivery location and the items. You are able to modify delivered items at this step. You can also attach a picture from the camera or from the gallery. When this is complete, tap on Quantities approved at the bottom of your screen.
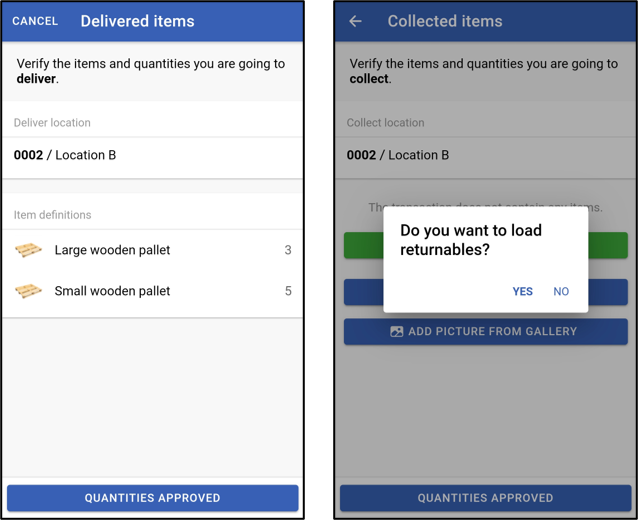
A dialog window will ask you if you want to load items for a return. If you answer yes, you will be asked to enter the item definitions and the number of items on the next screen but also if you are returning the items to the start location or to the carrier's location. If you answer no, you have to choose a reason between No returnables available, Driver has no possibility to load and Other.
Return items required
Returns items are required only if the option is activated in TrackOnline. Learn more about it HERE.
Signing
You can learn more about how to sign a transaction in the next section Action button.
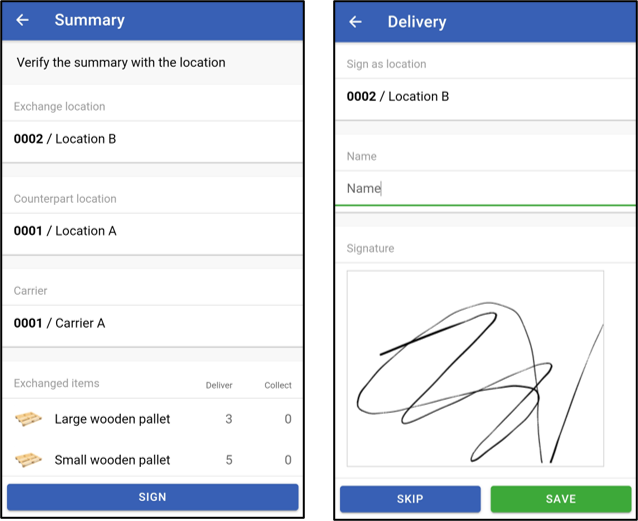
Once this is done, you can finally see a summary screen with the delivered and collected items, and you are able to sign by entering your name and signing with your finger. Of course, you can also skip this step with the button Skip. When a transaction is signed for delivery, it moves to status Shipped and the transaction document is updated with the delivery signature and date.
Claiming transactions
User with the role Driver have 2 tabs on the transactions page : My transactions and Unassigned. My transactions are the transactions which have been assigned to the user while unassigned transactions are transactions without editor. In other words, my transactions are the transactions you have to handle while unassigned transactions aren't handled by anyone yet.
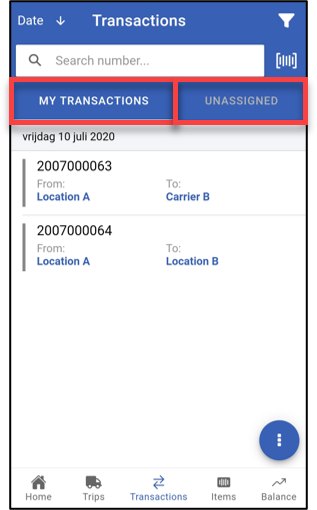
Therefore, you can claim unassigned transactions to assign them to yourself. Tap on the Unassigned tab to see the list of unassigned transactions. Now tap on a transactions that you want to claim. At the bottom of your screen, tap on the button Claim.
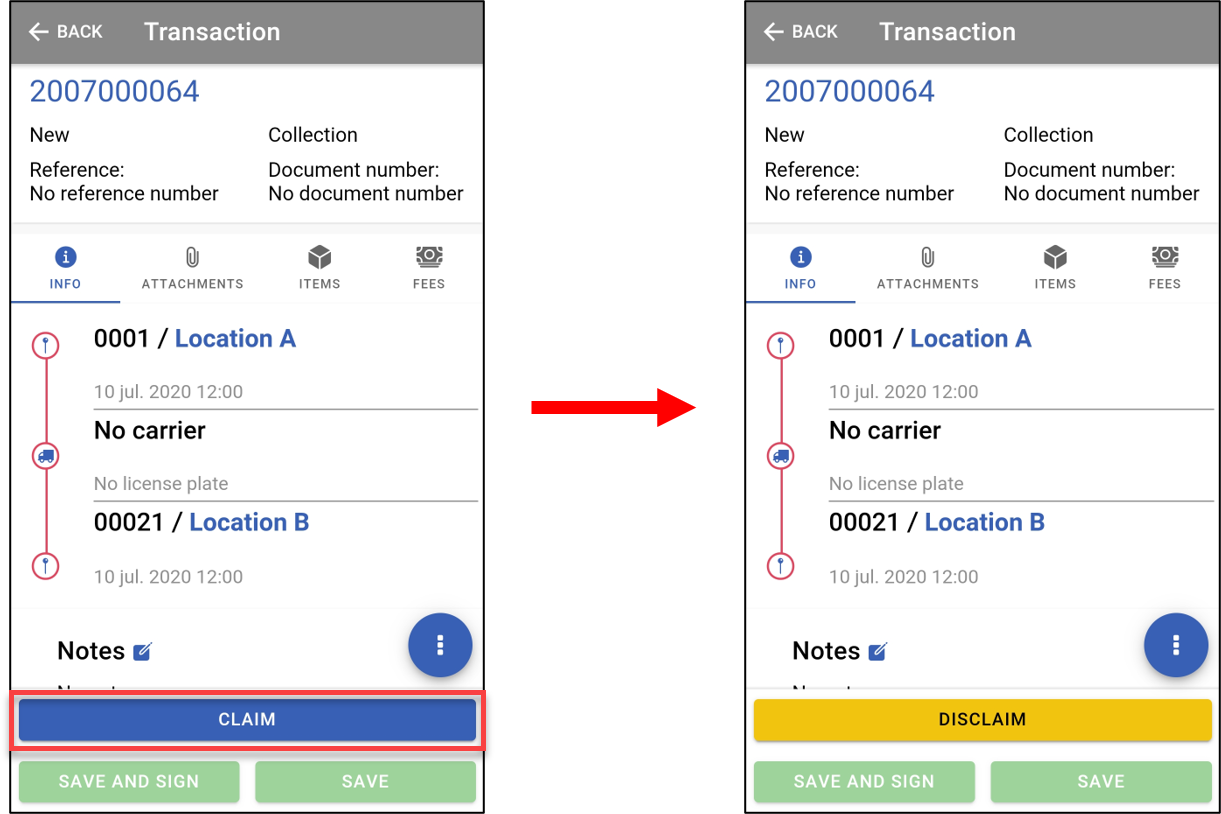
If you go back to the list, the transaction that you have claimed has been removed from the Unassigned tab and is now in My transactions. To cancel this, tap on the transaction again and tap on Disclaim at the bottom.
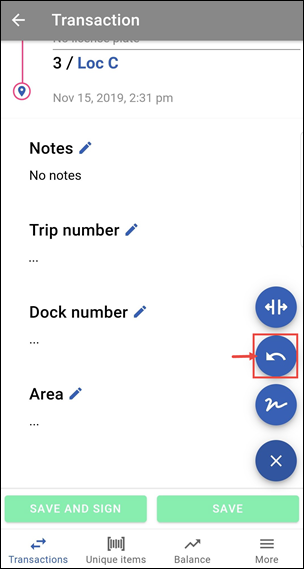
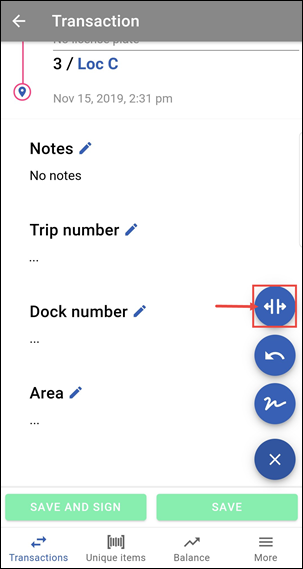
Action button
This is the action button. With this button, we can make multiple different actions on the order, see explanation below.
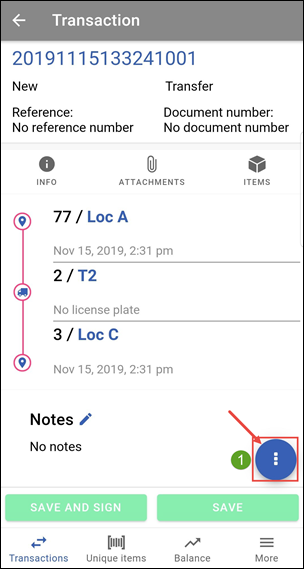
When you press on the action button you will see four different options:
- Split the transaction, partial shipment (see explanation in the chapter Split Transaction).
- Transfer/Return transaction on the existing transaction (see explanation in the chapter How do I book a transfer transaction on an existing transaction?)
- Signing (see explanation in the chapter Sign transaction).
- Close the options.

Sign transaction
To sign the transaction, first of all press the sign button (indicated with the red arrow in the image below.
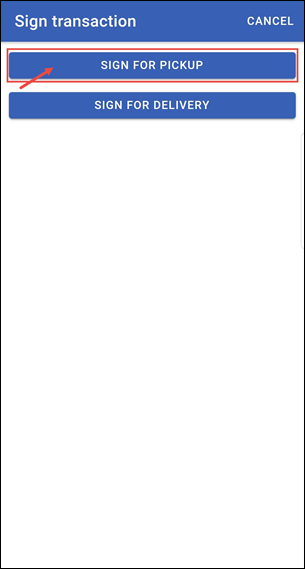
When you pressed on the button you will see two options:
- To let the carrier sign for pickup of the containers press SIGN FOR PICKUP.
- If you want to have a signature for delivery press SIGN FOR DELIVERY.
Next you will see the window as shown below. Each input field is described below.
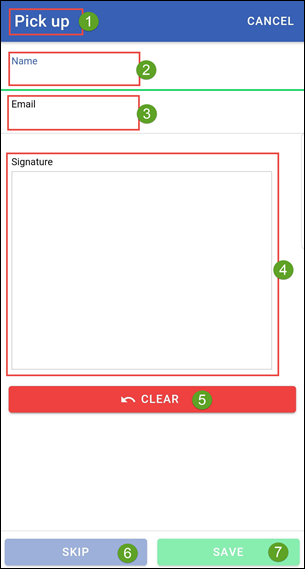
- Here you are able to see for what action you will sign, in this case Pickup.
- Here you need to fill in the name of the driver / person who is collecting the transaction.
- Here you can enter the email address of the relevant party, this is not mandatory.
- Here the person who picks up the shipment can put the signature with his or her finger.
- Delete the signature so that it can be re-done.
- Skip the signature, so you put NO signature.
- Save all entered and confirm transaction.
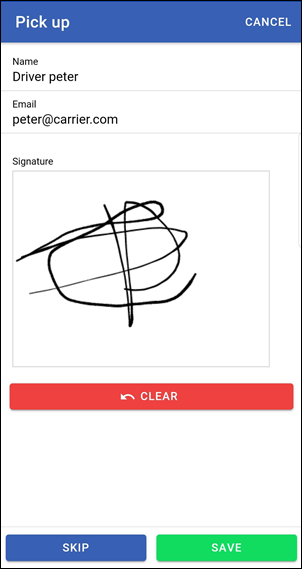
Below you will find an example of how the signature screen will look after it has been filled in entirely.
When you press SAVE you have confirmed the transaction and it will disappear from the transaction overview.
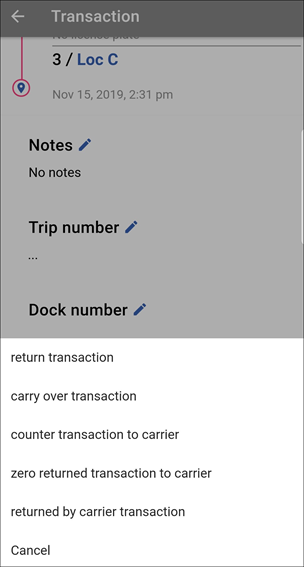
Return and Carry over transactions
When you press the transfer button, you get different options. This way you can book a return transaction, transfer and transfer to a carrier.
You will see the following options (see also the image below):
- Return transaction: The from and to will switch.
- Transfer transaction: The from will stay the same, but you can transfer the balance to a new to location.
- Transfer transaction to carrier: Transfer the balance to the carrier of this transaction (is a carrier is selected).
- Zero returned transaction to carrier: Zero returned transaction to the carrier.
- Returned by carrier transaction: The balance of the carrier will be transferred to the original from location.
- Cancel: Go back to the transaction screen.
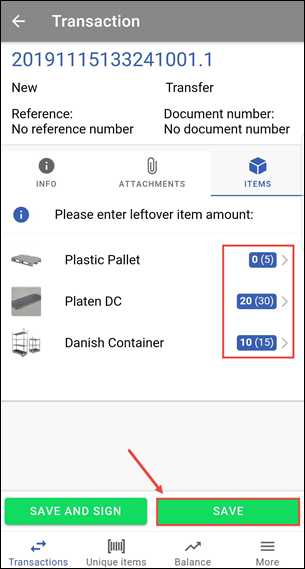
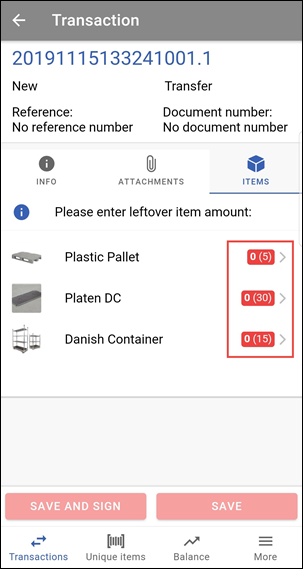
Split transaction
To be able to create a partial shipment, when for example not all containers can be taken at once, press the 'split transaction' button.
When you have pressed the partial shipment button you will see the amounts of the original transaction stated in red.
The current transaction contains 15 Danish Containers, 30 Platen DC and 5 Plastic Pallets.
We will change this to 10 Danish Containers, 20 Platen DC and 0 Plastic Pallets.
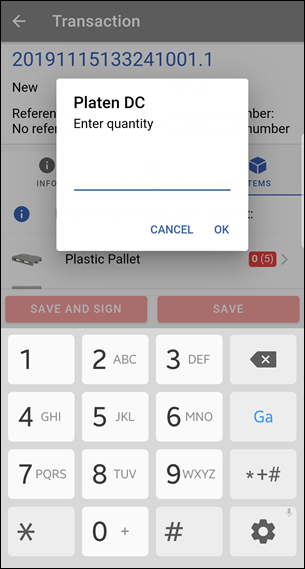
When you tap on one of the items, you see the window as shown below. Here you can enter the amounts that the carrier cannot take with him. So, you will note the amount that are outstanding instead of the amounts that the carrier has taken with him.
Example: The carrier will take 5 of the 15 Danish Containers and 10 of the 30 Platen DC. You will enter that 10 Danish Containers & 20 platen DC will stay behind.
When you press on the amounts you will see that the screen to enter the amounts that will stay behind will pop-up. Here you can enter the modification in the amounts when for example another 2 Plastic Pallets are taken by the carrier. See the picture below.

When you have entered the partial shipment as desired, you can press SAVE to confirm the shipment. Or you can tap on SAVE AND SIGN to directly sign the transaction.