Transactions
The transaction tile consists of the screens "Unclaimed & My Transactions" for that administration (see switching administration to change the administration you are working in). You can switch screens with the tabs on top of the screen. From within these screens the primary actions are respectively: claiming and unclaiming a transaction. From the Unclaimed transaction tab, the transactions can only be viewed and not changed. After claiming them, they move to the My Transactions tab and your transactions can be edited and signed. In the lists on these screens you can see transactions grouped and sorted by date or date counterpart, depending on the sorting filter you are using (see filtering views section below).
Filtering views
Before explaining how to claim or unclaim transaction should be aware of the filter option that gives the possibility to "sort and filter" your list. A new filter and selection is required for initial use to see transactions! These filters can be used in both tabs of the Transaction overview. By selecting the 3 stripes in the top right corner you can choose which filter to use for viewing all the transactions required. A filter can be broad, like just showing all transactions for the past 30 days, or it can be more specific. Each filter consists of a name and a particular set of settings chosen per user. You can configure this in the filter settings screen here.
Filter Required
In order to view your transactions you must first create a filter in the Users screen. Please find more information on how to set this up in the filter preset section for the user screen.
Authorized Locations and User Permissions
In order to be able to see particular transactions in the Unclaimed tab, it is important that the applicable authorized locations are added for that particular user in the web app. If no authorized locations are added, then all transactions can be searched with the right permissions or they can be moved to the My Transaction screen by assigning an Editor via the web app (this is done by right clicking on a transaction or after selecting multiple transactions). As soon as authorized locations are set, the users can only view transactions for which they are an authorized user. Even when assigning the user as Editor it will adhere to this setting. Authorized Locations van be set up within the web app through  > "{Users & Permissions}" > "[User] (goes to Details for that user) > "Authorized Locations" field:
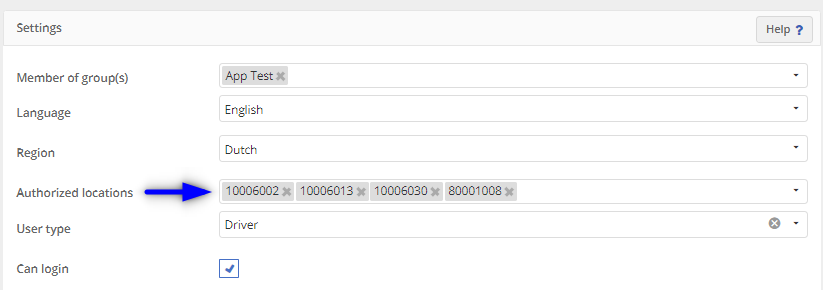
See more info on setting up permissions in the TrackOnline webapp here in the FAQ section
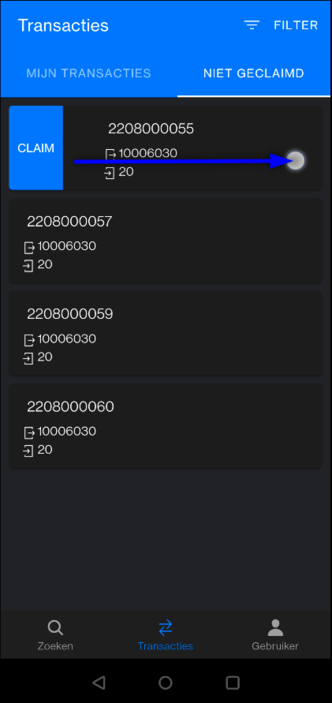
Unclaimed
Here one can find all the unclaimed transactions. These are the transactions that the user is authorized to view. As mentioned above, the transaction set that will be displayed, depends on the chosen filter and on your authorized locations. Authorization settings are usually managed by an administrator and can be changed within the web version of TrackOnline. More detailed information will soon also be available in the updated TO Web App Documentation on this documentation page.
Unclaimed Transaction Tab

Reviewing a transaction
Clicking on a transaction opens it, enabling you to quickly review the details. By claiming transactions you make it yours, so it can be edited and signed in the My Transactions Tab.
Claiming a transaction
In order to claim a transaction the user swipes to the right on an unclaimed transaction item. A pop-up at the bottom of the screen will appear stating "The transaction is now yours". If you accidentally claim a transaction you can always unclaim it (see 'Unclaiming a transaction'). After claiming a transaction you will be registered as "Editor" in the TrackOnline Web App. Please note, a Read Only Transaction can still be claimed (see Read Only Transactions at the bottom of this page for more info)
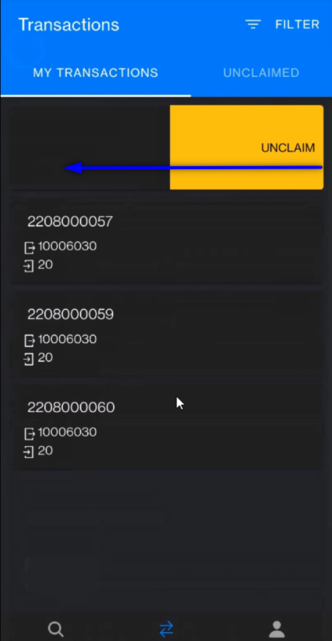
My Transactions
With a similar view as the Unclaimed Tab, this overview shows the claimed transactions with the oldest date on top (unless configured differently by an active sorting filter). For each transaction, a list item exists with data on the Transaction number, From location and To location. A picture of related transaction screens are shown below.
My Transactions Tab
Unclaiming a transaction
In order to unclaim a transaction the user swipes to the left on an claimed transaction item in the My Transaction Screen.
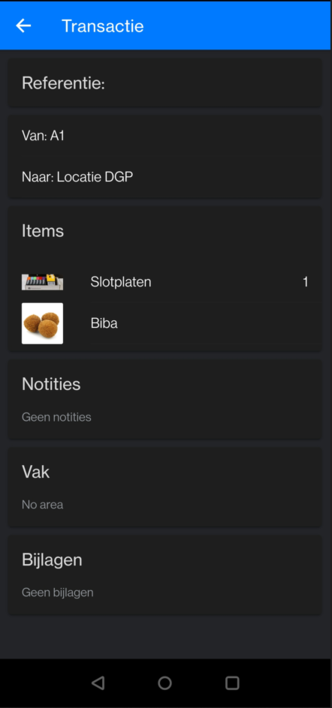
Editing a transaction
The user can edit and see a transaction by clicking on it. A screen similar to the following one is presented:
After editing and also signing (if applicable) a transaction, it moves to the next status and you return to the transaction overview.
The following transaction fields can be reviewed and/or edited:
- Reference with From and To location, not editable in (early versions)
- Items
- Notes
- Area
- Attachments
- Signature
Please see the chapter transaction fields for a description of all these items.
Read-Only Transactions (identified by the Read only label on the right of the transaction)
In certain cases the transaction could be read-only and will not be editable. For example, when the transaction is informational through transfer rule automation or if the status is already processed A potentially overlooked reason could be that the transaction contains an E-CMR linking to TransFollow. In such a case the transaction will automatically become read-only. You will be able to click on the E-CMR to go to the TransFollow app (if you have it installed and set up) The TrackOnline app has an integration with the TransFollow app For further reference Please refer to the TransFollow (Portal) website here